A Sitecore Upgrade Devlog - Final Part: Post-upgrade maintenance, NVelocity migration, testing strategies, and content merge


This is the final part of a devlog I started last year. Now that the upgrade I was working on went live, I can finally wrap this series with the following topics:
- Understanding general post-upgrade maintenance
- Learning how to migrate NVelocity templates to Scriban templates
- Understanding some post-upgrade testing strategies
- Learning some approaches to merge content between Sitecore instances
As I mentioned in the previous articles, I did a upgrade from a Sitecore XP + SXA version 9.0.2 to 10.1.0.
Understanding general post-upgrade maintenance
The post-upgrade maintenance process consists of several tasks. This process is split between the Content Management and the xDB roles. This article does not cover everything you should do after the upgrade. Instead, you must follow the official Sitecore Upgrade Guide.
Some post-upgrade actions are listed below:
- Clear the browser cache
- Republish your website
- Rebuild link databases
- Clean up databases
- Migrate xDB data
- Rebuild the xDB index
- Redeploy the marketing definitions
Performing Content Management (CM) maintenance
In the Content Management instance, most post-upgrade actions are available through the Control Panel page (/sitecore/client/Applications/ControlPanel.aspx). Some actions are accessed through specific URLs such as the restore marketing definitions (/sitecore/admin/RestoreDeletedMarketingDefinitions.aspx).
Since everything is described in the Sitecore Upgrade Guide, the following topic describes a publishing-related issue that you might encounter.
Fixing publish site issue
While republishing your site, you might see the following error message:
19172 10:44:12 ERROR An error during Publish Pipeline Process Queue execution.
Exception: Sitecore.Framework.Data.Blobs.Abstractions.BlobProviderException
Message: No supported provider for is configured.
Source: Sitecore.Framework.Data.Blobs
This error occurs when a media item does not contain a valid blob for a given language version. Since the logs do not provide any additional information to help me locate these media items, the Sitecore Support team sent me a version of the Sitecore.Kernel that outputs in the logs the broken images:
41208 14:30:05 INFO  [SUPPORT] {6F12B0ED-29AC-47AC-865B-C59F8123D900} en
41208 14:30:05 INFO  [SUPPORT] {6F12B0ED-29AC-47AC-865B-C59F8123D900} fr-FR
41208 14:30:05 INFO  [SUPPORT] {6F12B0ED-29AC-47AC-865B-C59F8123D900} de-DE
41208 14:30:05 INFO  [SUPPORT] {6F12B0ED-29AC-47AC-865B-C59F8123D900} id-ID
41208 14:30:05 INFO  [SUPPORT] {6F12B0ED-29AC-47AC-865B-C59F8123D900} pt-BR
41208 14:30:05 INFO  [SUPPORT] {6F12B0ED-29AC-47AC-865B-C59F8123D900} pt-PT
41208 14:30:05 INFO  [SUPPORT] {6F12B0ED-29AC-47AC-865B-C59F8123D900} es-AR
41208 14:30:05 INFO  [SUPPORT] {6F12B0ED-29AC-47AC-865B-C59F8123D900} es-CL
41208 14:30:05 INFO  [SUPPORT] {6F12B0ED-29AC-47AC-865B-C59F8123D900} es-MX
The quickest way to fix that is to remove the faulty versions with a Sitecore PowerShell script:
Get-Item -Path "master:/" -ID "{2DECEA29-DCC8-4921-B850-E99E79407927}" | Remove-ItemVersion -Language @("zh-HK") -Verbose
Get-Item -Path "master:/" -ID "{2E352B73-ED9A-4868-8210-D24BA87A6109}" | Remove-ItemVersion -Language @("zh-HK") -Verbose
Get-Item -Path "master:/" -ID "{2E352B73-ED9A-4868-8210-D24BA87A6109}" | Remove-ItemVersion -Language @("en") -Verbose
Get-Item -Path "master:/" -ID "{99740055-39CD-4C2E-ABAC-6576B950D110}" | Remove-ItemVersion -Language @("en") -Verbose
Ideally, the publishing process should not be interrupted when a media item does not contain a valid blob associated with it. In any case, if you are seeing these errors, you should raise a ticket with the Sitecore Support team.
Performing xDB maintenance
Some post-upgrade actions related to xDB take too long to finish. This is especially true if the databases contain production data.
If you are still working on your local environment, you might want to skip these action as they make more sense in testing, pre-production, and production environments. In your local environment, you can simply deploy fresh new reporting, reference, and shards databases. This way, you can skip those long-consuming actions.
Since the xDB maintenance is extensively described in the Sitecore Upgrade Guide, the following topic focus on a xDB rebuild index issue you might encounter.
Understanding the Index Worker rebuild failure
The process to rebuild the xDB index consists of running the rebuild command against the Index Worker executable. The Index Worker executable file is available in the xConnect Search Indexer role. It is installed in the following path: \App_Data\jobs\continuous\IndexWorker.
Run the following command to start the xDB index rebuild:
.\Sitecore.XConnectSearchIndexer.exe -RebuildMonitor You will see the output of the indexing progress:

During the index rebuild, you might see the following exceptions in the logs:
2021-03-23 11:48:06.129 +01:00 [Error] The attempt to recover from previous failure has not been successful. There will be another attempt. Attempts count: 1808
Sitecore.Xdb.Collection.Failures.DataProviderException: *** [xdb_collection.GetContactsChanges], Line 26. Errno 50000: Sync token is no longer valid for [Contacts] table. ---> System.Data.SqlClient.SqlException: *** [xdb_collection.GetContactsChanges], Line 26. Errno 50000: Sync token is no longer valid for [Contacts] table.
xConnect Search Indexer uses SQL Server’s change tracking feature to keep up to date with any incoming changes. SQL Server only keeps changes for a limited amount of time (configurable) called the retention period. The xConnect Search Indexer no longer can figure out all the changes saved to xConnect while you were performing the upgrade.
More information on Getting exception "Sync token is no longer valid for [Contacts] / [Interactions] table" with xConnect Search Indexer. .
This output is expected while the index rebuilds. Once the index is fully rebuilt, you should no longer see these errors.
Learning how to migrate NVelocity templates to Scriban templates
NVelocity is a template engine that was introduced to SXA in version 1.4. Basically, it allows developers to create rendering variants using HTML and JavaScript-like instructions:
#if ($item.Title == "")
    <p>There is no title</p>
#elseif ($item.Title != "")
    <h1>$item.Title</h1>
#else
    <h1>Final else statement</h1>
#end
Scriban is also a template engine that was introduced in SXA version 9.3. Scriban completely deprecates NVelocity. The implication is that NVelocity templates no longer work on Sitecore 9.3 and further releases.
Both Scriban and NVelocity are extensible. This means you can create custom functions and item extensions. It also means that any extension created on NVelocity must be migrated to Scriban.
In the list below, you can find some nice blog posts helps you on the process of migrating any customization you might have built on NVelocity:
- How to migrate NVelocity Extensions to Scriban (dotnet-ltd.com)
- Create a function for the Scriban template in SXA 9.3.0 (dotnet-ltd.com)
- Create an Item extension with Scriban in SXA 9.3.0 (dotnet-ltd.com)
In short, you must migrate as the following:
- For functions, extend the
generateScribanContextpipeline. - For item extensions, extend the
getScribanItemMemberspipeline.
With regards to the template items, unfortunately there is no automated process to carry out the migration. You can, however, leverage some Sitecore Powershell scripts to speed up this process.
First, you need to understand how many NVelocity items are there in your instance and how are they implemented. Use the following Sitecore Powershell script export the existing NVelocity items to a CSV file:
$csv_file = "$SitecoreDataFolder\Scriban_Migration $(Get-Date -Format FileDateTime).csv"
Get-Childitem -Path master:/sitecore/content/RootSiteItem -Recurse | Where-Object { $_.TemplateID -eq "{C645DD63-2462-470C-A48D-8B55757A2DB3}" } | Select-Object Id, Name, ItemPath,  {$_.Fields["Template"]} | Export-Csv $csv_file
Note: The GUID {C645DD63-2462-470C-A48D-8B55757A2DB3} is the GUID of the NVelocity template.This CSV file gives you a dimension of how many items you must migrate. If you have several items that uses the same NVelocity functions and item extensions, you can easily replace them with the respective Scriban ones. Use the following Sitecore Powershell script as base to replace the NVelocity text:
Get-Childitem -Path master:/sitecore/content/RootSiteItem -Recurse | Where-Object { $_.TemplateID -eq "{C645DD63-2462-470C-A48D-8B55757A2DB3}" } | ForEach-Object {

    if($_.Fields["Template"] -like '*<span class="$item.Value"></span>*') {

        Write-Host "Update $($_.ItemPath) item"
        $temp = $_
        $temp.Editing.BeginEdit()
        $templateField = $temp.Fields["Template"].Value.Replace('$item.Value', '{{ i_item.Value.Raw }}')
        $temp.Fields["Template"].Value = $templateField
        $temp.Editing.EndEdit()
        Write-Host "Finished editing $($_.ItemPath) item"
    }
}
As a final step, once you are confident that the replacement worked fine, you can run the following Sitecore Powershell script to change the NVelocity templates to Scriban ones:
# Here's the item ids you want to replace the template
# You can however update this script to read all NVelocity templates instead
$itemIds = @(
"{BD875442-D268-4E05-8691-DE5298F891B5}"
"{E7310451-7D87-4921-AE48-8BF93311E712}"
)

$targetTemplate = Get-Item "{8FCD3CFE-8B3B-423E-8176-6A7C72CB43FC}"

foreach($id in $itemIds) {
    $item = Get-Item $id
    Set-ItemTemplate -Item $item -TemplateItem $targetTemplate -FieldsToCopy @{ Tag = "Tag"; Template = "Template"; CssClass = "CssClass"; DataAttributes = "DataAttributes" } -Verbose
    Write-Host "Finished changing template for item $($item.ItemPath) [$($item.ID)]."
}
Note: The GUID {8FCD3CFE-8B3B-423E-8176-6A7C72CB43FC} is the GUID of the Scriban template.There is a limitation with this automated process, however. The field Tag is not properly updated since it is a dropdown field and the listed items GUID differs between Scriban and NVelocity. After you change the templates to Scriban, you need to go through each template item and fix the Tag field manually.
Below, you find some quick tips and fixes that can save you up some time:
- Do not use
i_item.Value. Use insteadi_item.Value.Raw. For some unknown reason (bug), using onlyi_item.Valuebreaks the Experience Editor. In the browser console, you will see the following error:Uncaught TypeError: Cannot read property 'replace' of undefined. - The NVelocity
$geospatialcorresponds to the Scribano_geospatialobject. - Do not use in the same Rendering Variant the standard Placeholder variant field together with the Scriban
sc_placeholderfunction. They use different logic to generate the placeholder keys. Mixing them can cause some data sources to disappear from existing pages.
Understanding some post-upgrade testing strategies
After a Sitecore upgrade, testing your application is the most important tasks and definitely not a one-man job. This is especially true if you upgraded from an old version like 8 (or even 7.5) to the latest release available.
The testing process starts with the developer checking a couple of things such as the application start-up, logs, the Content Management application (/sitecore) and a handful of pages in the published site. Then, it goes through several rounds of tests and fixes between the QA and Development teams. Finally, it gets a final look by the authors and marketers in and pre-acceptance environment.
Below, you find some quick tips that can save you up some time:
- Once you start the Sitecore instance, check if is there any error or warning message in the Sitecore logs. Do not simply ignore these messages as they might come back to haunt you in the pre-production environments.
- Do a quick smoke test on the website. Try opening a couple of published pages on the website.
- Do a round of tests in the Content Management applications: publish some items, open Experience Editor and try saving some changes, send a couple of e-mail using EXM, etc.
- Use BackstopJS to run an automated page comparison between the current production site (using the old Sitecore version) and the upgraded instance in your machine (or a development environment). BackstopJS will show you a report highlighting pages that look different between environments. This can help you find components that stopped working after the upgrade.
Learning some approaches to merge content between Sitecore instances
Merging content is a challenging task – if not the most – in the upgrade process. Leaving old content or forgetting to update new pages is a recipe for disaster. Sometimes, it won’t be your fault. A user decides to make a couple of changes during the content freeze and those are not contemplated in your package.
There are several approaches you can take to merge content. Next, you will see a list of those approaches and their pros and cons.
1. Upgrade Sitecore databases (again) before go-live
This approach consists of, during the content freeze, upgrading a fresh copy of the Sitecore production databases before the go live.
- Pros: This approach guaranties you a 99.99% chance that the latest updates will be there when you go live.
- Cons: You need to not only run an entire upgrade on the databases, but also must update third-party modules and do some clean-up work. If you are using SXA, you might have to migrated NVelocity items and delete WFFM content again.
2. Standard Sitecore packages
This is the most common used approach. You simply add content and media to a package and install them into the upgraded instance.
- Pros: You have more control over what gets installed. Different than upgrading the Sitecore databases again, you don’t need to update third-party modules.
- Cons: Depending on the size of the package, it can take hours to finish the installation. The installation might fail for several different reasons. Also, you might need to do some clean-up work if you added some unnecessary content to the package.
You should be extra careful when using standard Sitecore packages - specially with the installation options. You might end-up duplicating content or wiping out entire content tree depending on how you install your package. See Installation Options - SDN (sitecore.com) to understand how the installation option can after the end result.
3. Use Razl
Razl is a desktop application to compare and merge Sitecore content. Initially developed by Hedgehog, it now is maintained by Sitecore. Razl is a subscription-based application that allows you to compare content between two Sitecore databases and perform merge operations.
Razl offers you an interface to visualize compare Sitecore items and merge entire trees:
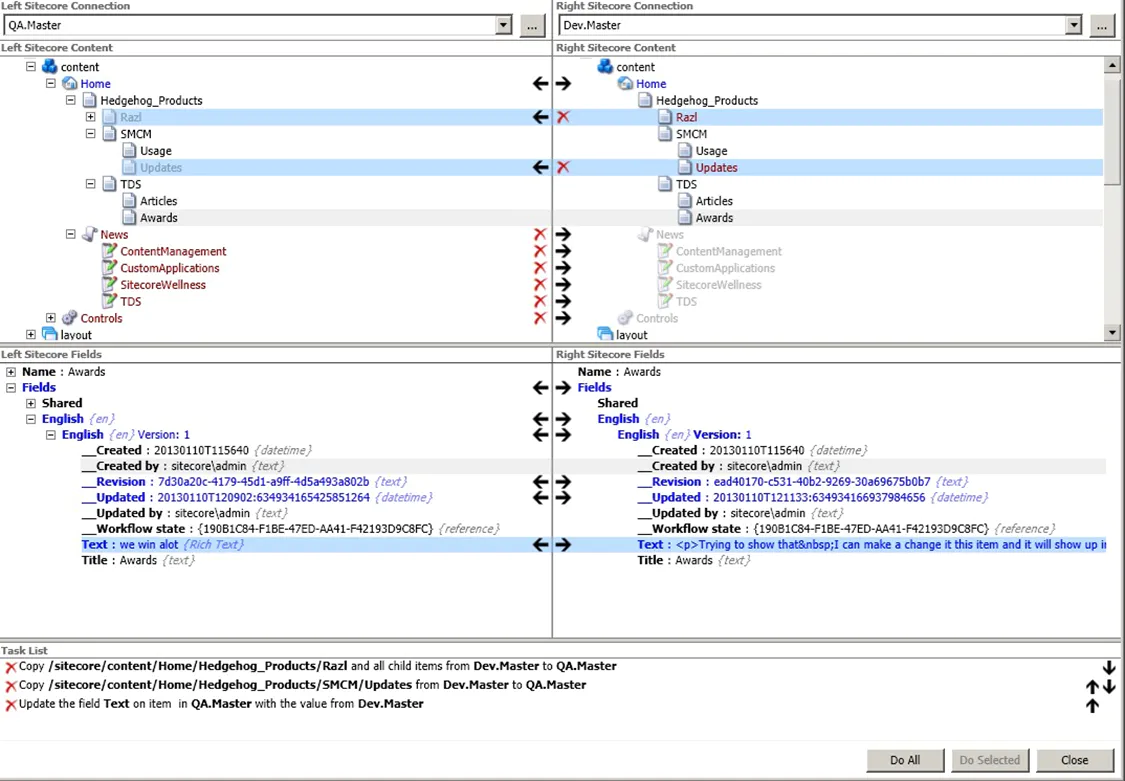
You also have the option to compare and merge content via its PowerShell cmdlets. Learn more about Razl PowerShell cmdlets in Sitecore Razl - Scripts. In the script below, you overwrite the existing content in the upgraded Sitecore instance with the one in the old Sitecore instance:
# Import Razl powershell commands. This may need to be updated if the script is moved to another computer.
import-module "C:\Program Files (x86)\Sitecore\Razl\HedgehogDevelopment.RazlClient.dll"

# Create connections
$Sitecore902Master = Get-RazlConnection -SitecoreWebUrl https://sitecore-old -DatabaseName master -Name "Sitecore 9.0.2 - Master" -AccessGuid "e6fa58ac-2d19-4420-9a72-af5e523d0e40" -SitecoreServerRoot "C:\inetpub\wwwroot\site\sitecore-old"
$Sitecore1010Master = Get-RazlConnection -SitecoreWebUrl https://sitecore-new/ -DatabaseName master -Name "Sitecore 10.1.0 - Master" -AccessGuid "baef203e-dfe0-4db4-b10d-5bdb38015739" -SitecoreServerRoot "C:\inetpub\wwwroot\site\sitecore.new"

# CopyAll Copy with overwrite /sitecore/Forms, all missing parents and all child items from site Shared 9.0.2 - Master to site Shared 10.1.0 - Master
Copy-RazlItemTree -source $Sitecore902Master -target $Sitecore1010Master -ItemId "b701850a-cb8a-4943-b2bc-dddb1238c103" -overwrite -lightningMode  -description "Copy with overwrite /sitecore/Forms, all missing parents and all child items from site Sitecore 9.0.2 (Master Database) to Sitecore 10.1.0 (Master Database)" -Verbose
• Pros: You have a visual interface to merge items or entire trees. You can have an automated merge process using PowerShell. Merging content using Razl is faster than a Sitecore package installation. • Cons: The visual interface is quite slow specially if you have too much content in Sitecore. You might need to do some clean-up work after the merge (e.g. fixing the jQuery version in all the Sitecore Forms). Depending on network policies at your company, it might not be possible to use Razl on non-production environments since you need to open network communication between different environments (e.g. old production instance and the upgraded instance).
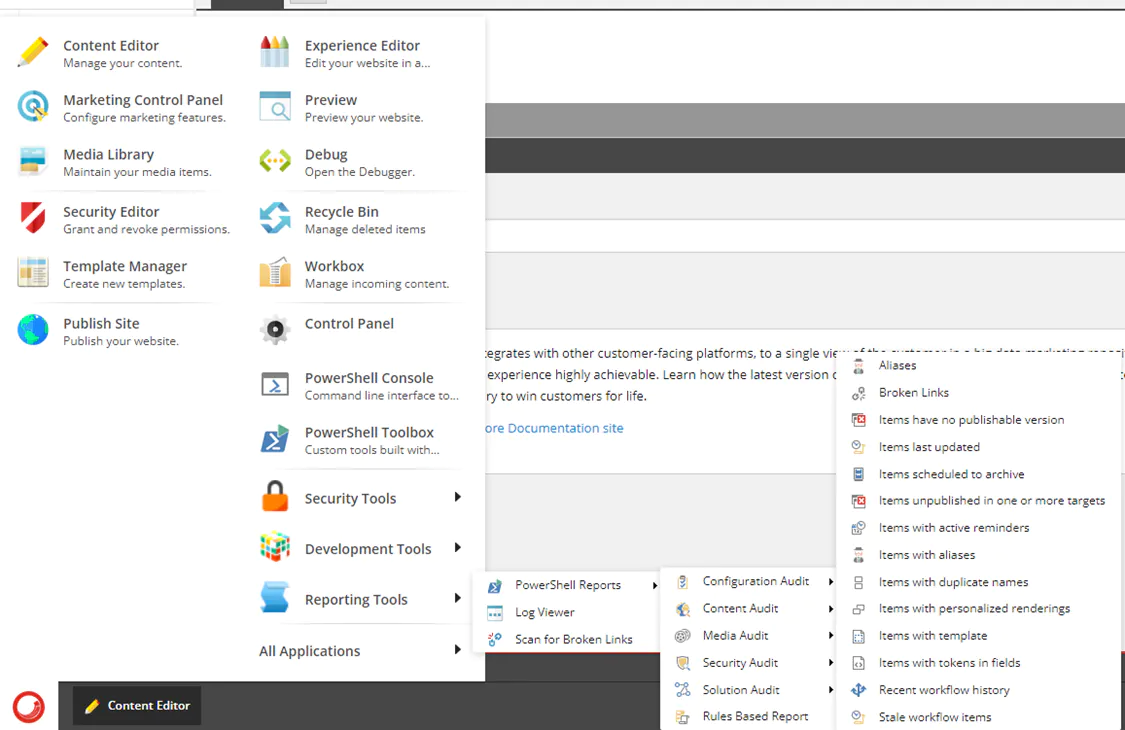
4. Use Sitecore PowerShell Extensions reporting tools to package the items recently updated or created
The Sitecore PowerShell Extensions comes with some powerful reporting tools that sometimes go unnoticed to developers. If you have this module installed, then stop whatever you are doing and open the desktop page in your Sitecore installation and browse to Reporting Tools > PowerShell Reports:
You are going to use the “Items last updated” report. This report allows you to view the items that were updated before or after a given date. You can also narrow the search to a specific location in the content tree:
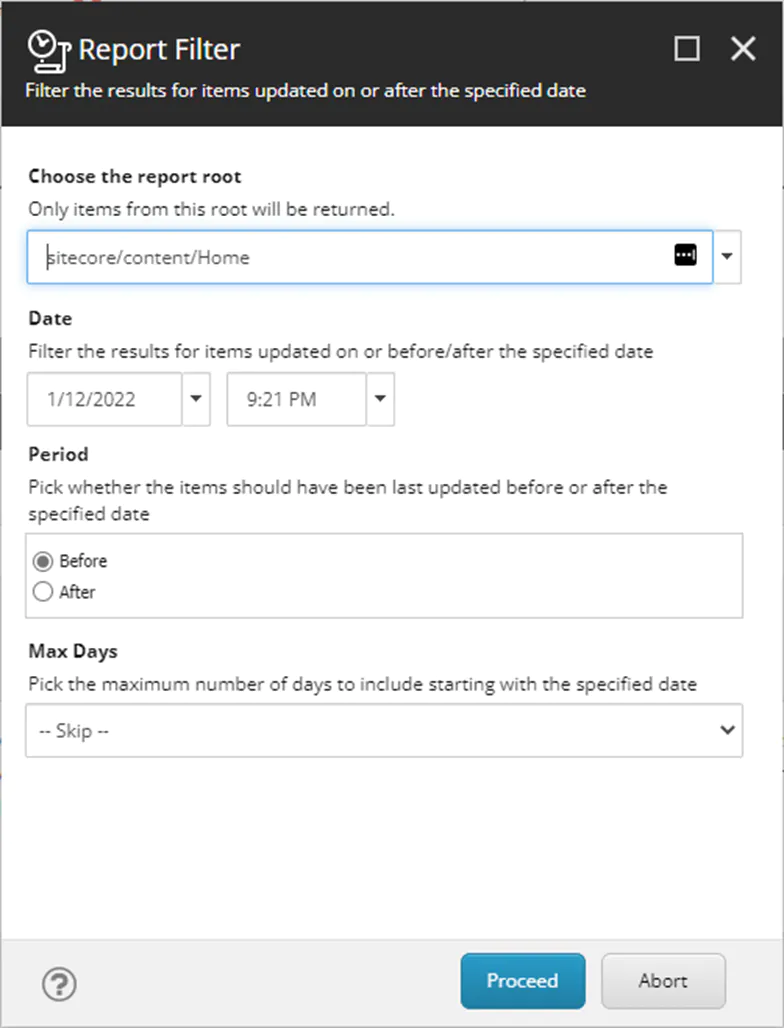
You can export the results in the report to a CSV file and create a Sitecore package to perform the content merge. Alternatively, you can install the Horseshoes extension that enhances the PowerShell Reports and allows you to download a Sitecore package with the results in the report.
- Pros: You can have more control over what content is being installed. Packages are smaller and installation is faster.
- Cons: Sitecore items that were moved or deleted won’t be updated. Moving or deleting items using Sitecore packages is only possible when you add an entire tree to the package and perform the installation with the Overwrite option.
5. Use Razl to compare content and package only the missing or changed items
This approach relies on using Razl PowerShell cmdlets to compare content and export the results into a CSV file. You can use the following script as an example:
# Import Razl powershell commands. This may need to be updated if the script is moved to another computer.
import-module "C:\Program Files (x86)\Sitecore\Razl\HedgehogDevelopment.RazlClient.dll"

# Create connections
$RootItem = "{B701850A-CB8A-4943-B2BC-DDDB1238C103}" #/sitecore/Forms
$Sitecore902MasterDb = Get-RazlConnection -SitecoreWebUrl https://sitecore-old -DatabaseName master -Name "Sitecore 9.0.2 - Master" -AccessGuid "e6fa58ac-2d19-4420-9a72-af5e523d0e40" -SitecoreServerRoot "C:\inetpub\wwwroot\site\sitecore-old"
$Sitecore1010MasterDb = Get-RazlConnection -SitecoreWebUrl https://sitecore-new -DatabaseName master -Name "Sitecore 10.1.0 - Master" -AccessGuid "baef203e-dfe0-4db4-b10d-5bdb38015739" -SitecoreServerRoot "C:\inetpub\wwwroot\site\sitecore-new"

$csv_file = "C:\Temp\RazlDeepCompareResults $(Get-Date -Format FileDateTime).csv"

Get-RazlDeepCompareResults -source $Sitecore902MasterDb -target $Sitecore1010MasterDb -RootItemId $RootItem | Export-Csv $csv_file
Once you compile a list of the items you want to update, use the following Sitecore PowerShell script to create a standard Sitecore package:
$packageName = "Site Update Package 28.06.2021";

$itemsToBeDeployed = @(
"{42014a22-ac3a-465e-be89-417ec8af41da}"
"{1358d133-e43a-4422-a9cc-cb7091f2a441}"
"{5e779e6e-7d77-4a45-9583-c0b0b81ba2ff}"
);

$ErrorActionPreference = "Stop"

$package = New-Package -Name $packageName;
$package.Sources.Clear();
$package.Metadata.Author = "PowerShell";
$package.Metadata.Publisher = "Sitecore";
$package.Metadata.Version = Get-Date -Format FileDateTimeUniversal;
$package.Metadata.Readme = 'This will install a Sitecore Package generated using PowerShell'

foreach ($item in $itemsToBeDeployed)
{
    $source = Get-Item -Path "master:/" -ID $item -ErrorAction SilentlyContinue | New-ExplicitItemSource -Name "master" -InstallMode Undefined
    $package.Sources.Add($Source);
}

# Save and Download Package
Export-Package -Project $package -Path "$( $package.Name ) - $( $package.Metadata.Version ).zip" -Zip
Download-File "$SitecorePackageFolder\$( $package.Name ) - $( $package.Metadata.Version ).zip"
- Pros: You can have more control over what content is being installed. Packages are smaller and installation is faster.
- Cons: Sitecore items that were moved or deleted won’t be updated. Moving or deleting items using Sitecore packages is only possible when you add an entire tree to the package and perform the installation with the Overwrite option.
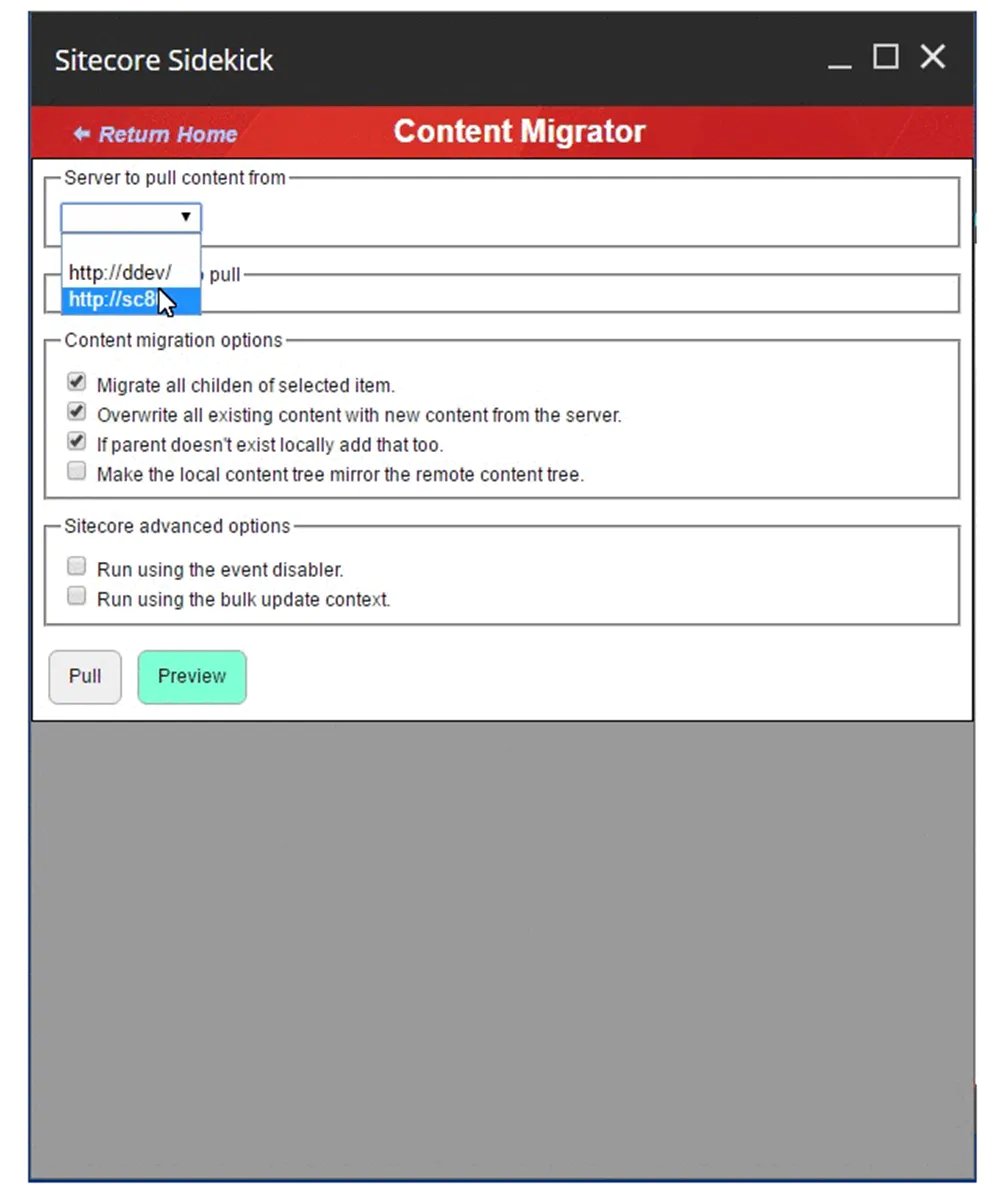
6. Use Sitecore SideKick Content Migrator
Sitecore SideKick Content Migrator is a Sitecore module that allows you to move content from one Sitecore instance to another (e.g. from production to acceptance). You can learn more about this module in Sitecore Sidekick – Content Migrator .
Pros: Merging content using Sitecore SideKick Content Migrator is faster than a Sitecore package installation. It can be automated with Sitecore PowerShell scripts. This is an open-source module with a great number of contributors. See more in SitecoreSidekick (github.com) .
- Cons: Depending on network policies at your company, it might not be possible to use Sitecore SideKick Content Migrator since you need to open network communication between different environments.
BONUS: Fixing some other issues
'ReusableIndex' was not found on controller
Extending existing SXA renderings is a common practice in the SXA development workflow. However, if you were using the ReusableIndex action, you need to refactor your code since it is no longer supported.
43728 16:04:33 ERROR Failed to render rendering
Exception: System.Web.HttpException
Message: A public action method 'ReusableIndex' was not found on controller 'Sitecore.XA.Feature.PageContent.Controllers.RichTextController'.
Solution: The ReusableIndex action no longer exists. Update it to the Index action.
Sitecore Forms submission not working after the upgrade
Existing forms might be still referencing an old jquery.{version}.min.js library. Check what is the current jQuery version in usage by the upgraded Sitecore installation and run the following Sitecore PowerShell script to update them:
$sitecoreFormsTemplate = "{6ABEE1F2-4AB4-47F0-AD8B-BDB36F37F64C}"

Get-Childitem -Path master:/sitecore/Forms -Recurse | Where-Object { $_.TemplateID -eq $sitecoreFormsTemplate } | ForEach-Object {

    if($_.Fields["Scripts"] -like '*jquery-2.1.3.min.js*') {

        Write-Host "Update $($_.ItemPath) item"

        $temp = $_
        $temp.Editing.BeginEdit()

        $templateField = $temp.Fields["Scripts"].Value.Replace('jquery-2.1.3.min.js', 'jquery-3.4.1.min.js')
        $temp.Fields["Scripts"].Value = $templateField

        $temp.Editing.EndEdit()

        Write-Host "Finished editing $($_.ItemPath) item"

    }
}
Performance issues with the SXA PageListController
We noticed that after upgrading from version 9.0.2 to 10.1.0 the performance of the sites that use this component decreased significantly. One site had a cold load of 2 mins in Sitecore 9.0.2, but now in version 10.1.0 it took 22 mins to load.
One major difference we noticed in this component was how Solr queries are built. In version 10.1.0, it doesn't consider the path limiting nor the sorting defined in the Item Query.
The Sitecore Support team provided us with a hotfix. There was no issue tracking number registered in the ticket we raised, which could indicate that this issue might persist in the latest releases.
Sitecore Forms conditionals not working
Sitecore Forms conditionals is a new feature introduced in later releases. Existing forms might be missing reference to the newly added form.conditionals.js library. Check if that is the case and run Sitecore PowerShell script to update them.
CONCLUSION
In this last part, you learned how to migrate NVelocity templates to Scriban templates. We highlighted the importance of having the QA and authors helping developers to test the application after an upgrade. Finally, you learned some approaches for merging content between Sitecore instances.
Credits
Photo by Radoslav Bali on Unsplash
comments powered by Disqus