
Application Insights allows you to monitor your website performance and log messages. You can use it with many web platforms including Sitecore. When you install Sitecore using the Azure installation package, Application Insights is automatically setup by the installation scripts. This is not the case when you install Sitecore on a virtual machine hosted in the cloud or in a server within your premises.
In this article, you’ll explore Application Insights and learn how to quickly configure it on a IaaS/On-premises Sitecore installation.
The following sections will guide you through getting started with Application Insights on Sitecore:
- Understanding what Application Insights is
- Installing Application Insights on your solution
- Configuring Application Insights in the Core roles
- Configuring Application Insights in Sitecore Identity role
- Configuring Application Insights in the XP roles
- Querying and visualizing Sitecore log data on Application Insights
- Using Sitecore Azure Tools
Understanding what Application Insights is
Application Insights is an application performance management (APM) service for web applications. It allows you to monitor your website performance. You can use it with many web platforms and the application itself doesn’t have to be hosted in Azure.
How Application Insights works is you insert a small package to your application and set up the Application Insights resource within Azure, thus sending the data to Azure to collect information. The web app is monitored, and it sends telemetry data to the Application Insight portal.
In terms of Sitecore, you use it to monitor performance, identify error and warning messages, identify messages from specific roles, and search for specific log messages.

Installing Application Insights on your solution
The process for the installation consists of first identifying which Application Insights dependencies are compatible with your Sitecore installation and then installing the required Application Insights NuGet packages.
To identifying which Application Insights dependencies are compatible with your Sitecore installation, you should download the Assembly list available on the Sitecore Downloads portal. The assembly list can be found in the Release Information section.
For example, in the Sitecore Downloads: Sitecore Experience Platform 101 Update 1 page, you can find the following:
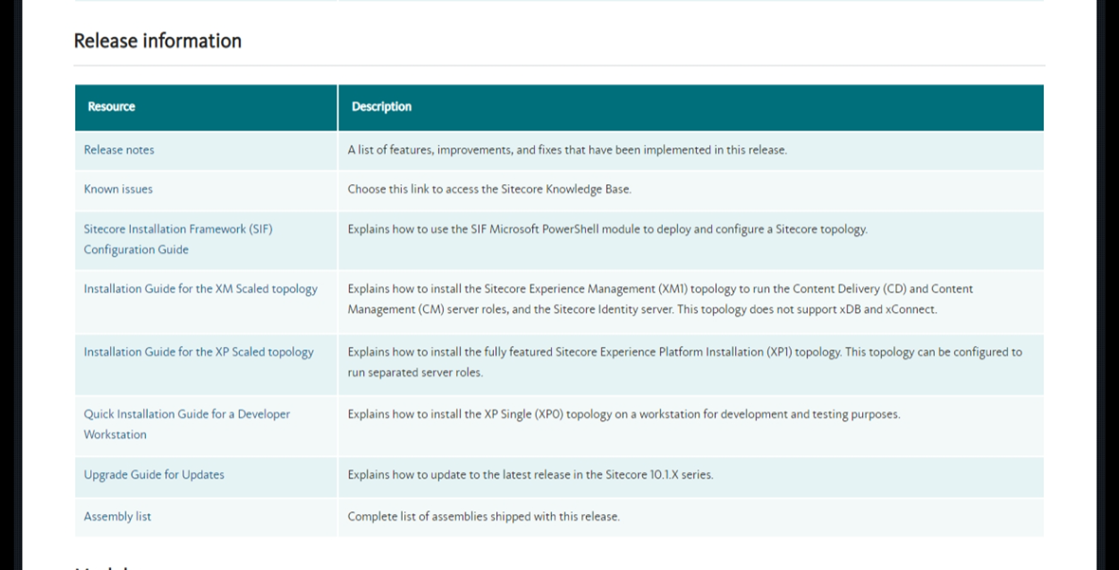
By clicking on the Assembly list, you will be downloading a zip package containing a CSV file for each Sitecore role.
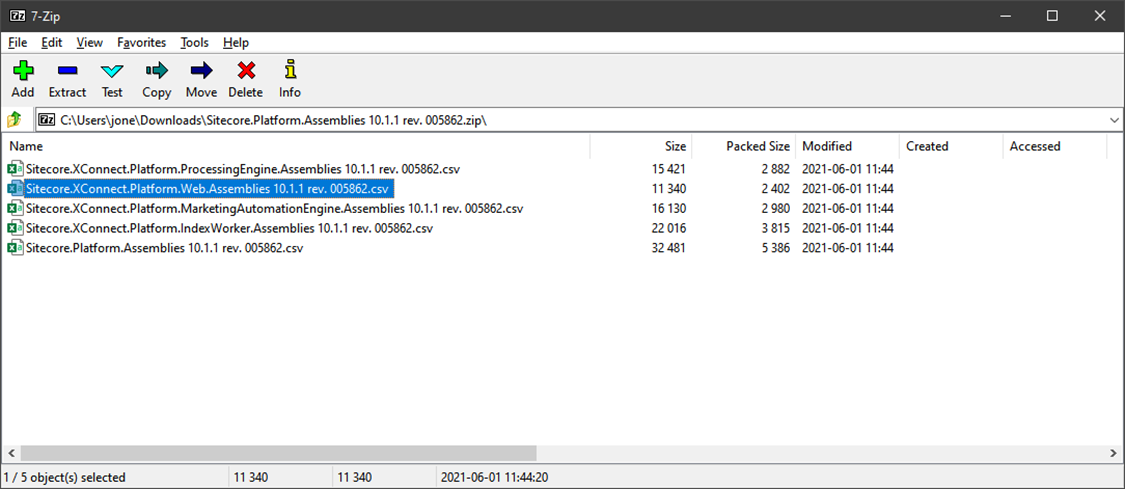
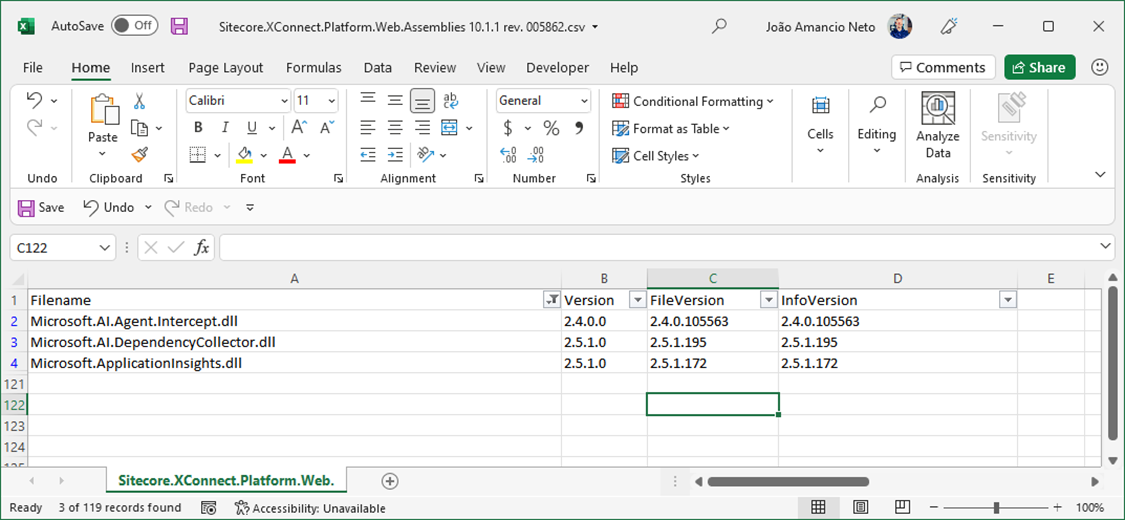
In the zip package, open the Sitecore.XConnect.Platform.Web.Assemblies xx.x.x rev. xxxxxx.csv file and search for the Microsoft.ApplicationInsights.dll assembly version. This is the minimal version you should install on your project.
Now on your Visual Studio solution, install the following NuGet packages and their dependencies:
- Microsoft.ApplicationInsights
- Microsoft.ApplicationInsights.Agent.Intercept
- Microsoft.ApplicationInsights.DependencyCollector
- Microsoft.ApplicationInsights.PerfCounterCollector
- Microsoft.ApplicationInsights.TraceListener
- Microsoft.ApplicationInsights.Web
- Microsoft.ApplicationInsights.WindowsServer
- Microsoft.ApplicationInsights.WindowsServer.TelemetryChannel
- Microsoft.AspNet.TelemetryCorrelation
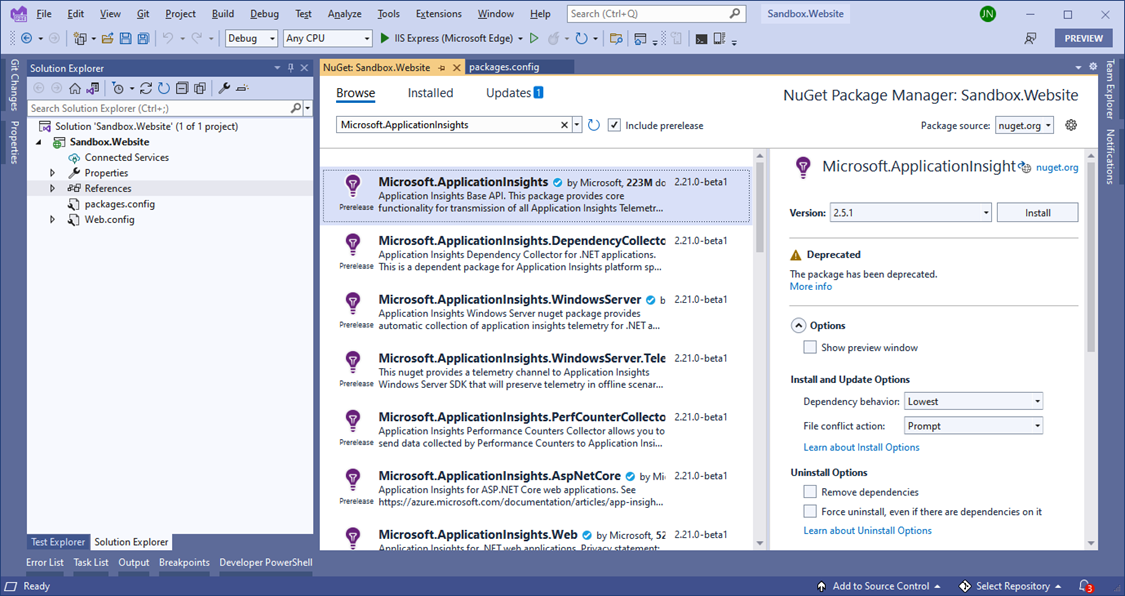
You can alternatively install these NuGet package via Package Manager Console. In Visual Studio, open the Package Manager Console (Tool > NuGet Package Manager > Package Manager Console) and run the following commands:
Install-Package Microsoft.ApplicationInsights -Version 2.5.1
Install-Package Microsoft.ApplicationInsights.Agent.Intercept -Version 2.4.0
Install-Package Microsoft.ApplicationInsights.DependencyCollector  -Version 2.5.1
Install-Package Microsoft.ApplicationInsights.PerfCounterCollector  -Version 2.5.1
Install-Package Microsoft.ApplicationInsights.TraceListener -Version 2.2.0
Install-Package Microsoft.ApplicationInsights.Web -Version 2.5.1
Install-Package Microsoft.ApplicationInsights.WindowsServer -Version 2.5.1
Install-Package Microsoft.ApplicationInsights.WindowsServer.TelemetryChannel -Version 2.5.1
Install-Package Microsoft.AspNet.TelemetryCorrelation -Version 1.0.0
Note: The selected versions in the example above are compatible with Sitecore 10.1 – Update 1.
Make sure the Microsoft.ApplicationInsights assemblies, and the ApplicationInsights.config file, are deployable both from your solution and from your CI/CD pipelines.
Next is the list of assemblies that should be deployed to the /bin folder in your Sitecore installation:
- Microsoft.AI.Agent.Intercept.dll
- Microsoft.AI.DependencyCollector.dll
- Microsoft.AI.PerfCounterCollector.dll
- Microsoft.AI.ServerTelemetryChannel.dll
- Microsoft.AI.Web.dll
- Microsoft.AI.WindowsServer.dll
- Microsoft.ApplicationInsights.dll
- Microsoft.ApplicationInsights.TraceListener.dll
- Microsoft.AspNet.TelemetryCorrelation.dll
Now, open the web.config located at the root folder of your Sitecore installation and carry out the following steps to enable Application Insights:
1. Under configuration/appSettings, add the following:
<add key="storeSitecoreCountersInApplicationInsights:define" value="false"/>
<add key="useApplicationInsights:define" value="true"/>
The setting useApplicationInsights:define enable/disable logging in Application Insights.
Sitecore custom performance counters are disabled by default and are not recorded in Application Insights. The storeSitecoreCountersInApplicationInsights:definesetting enables custom performance counters to synchronize with Application Insights every 5 minutes. See Configure Application Insights post deployment for more information.
2. Under configuration/system.web/httpModules, add the following:
<remove name="ApplicationInsightsWebTracking"/>
<add name="TelemetryCorrelationHttpModule" type="Microsoft.AspNet.TelemetryCorrelation.TelemetryCorrelationHttpModule, Microsoft.AspNet.TelemetryCorrelation" preCondition="integratedMode,managedHandler"/>
<add name="ApplicationInsightsWebTracking" type="Microsoft.ApplicationInsights.Web.ApplicationInsightsHttpModule, Microsoft.AI.Web" preCondition="managedHandler"/>
3. Under configuration/system.diagnostics, add the following:
<trace autoflush="true" indentsize="0">
	<listeners>
		<add name="myAppInsightsListener" type="Microsoft.ApplicationInsights.TraceListener.ApplicationInsightsTraceListener, Microsoft.ApplicationInsights.TraceListener" />
	</listeners>
</trace>
Note: Fresh Sitecore installations do not have the system.diagnostics section in the web.config. You can simply add it under the /configuration node as the following: <system.diagnostics>
</system.diagnostics>4. Under configuration/runtime/assemblyBinding, add the following:
<dependentAssembly>
	<assemblyIdentity name="Microsoft.AI.Agent.Intercept" publicKeyToken="31bf3856ad364e35" culture="neutral"/>
	<bindingRedirect oldVersion="0.0.0.0-2.4.0.0" newVersion="2.4.0.0"/>
</dependentAssembly>
<dependentAssembly>
	<assemblyIdentity name="Microsoft.ApplicationInsights" publicKeyToken="31bf3856ad364e35" culture="neutral"/>
	<bindingRedirect oldVersion="0.0.0.0-2.5.1.0" newVersion="2.5.1.0"/>
</dependentAssembly>
Creating an Application Insights resource
Before you move any further with the Sitecore setup, you must first create an Application Insights on your Azure subscription. Carry out the following actions to create an Application Insights resource on Azure:
- Sign into Microsoft Azure.
- In the Azure services, click the button Create a resource.
- In the Search services and marketplace search bar, type “Application Insights” and press Enter.
- In the Application Insights product page, click the button Create.
- Enter the appropriate values into the required fields, and then select Review + create.
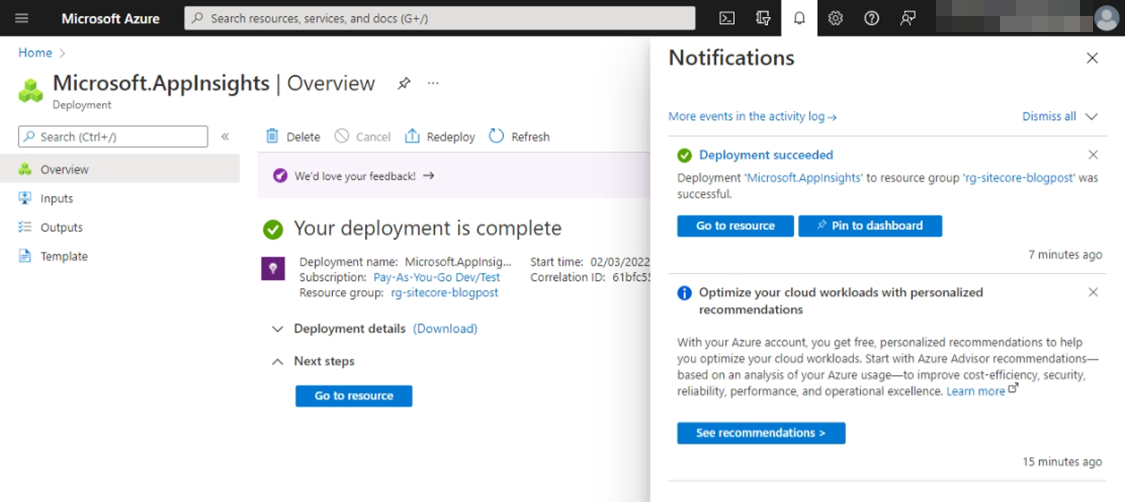
- Select Create. It takes a few minutes seconds to create an Application Insights resource.
- Select Notification(the bell icon) from the top, and then select Go to resource to open the newly created Application Insights resource.
Configuring Application Insights in the Core roles
After you deploy your solution to the Core roles as described in the steps above, you must carry out the following actions to enable Application Insights in the Core roles.
In the Application Insights page, click the menu Properties located in the Configure section. Copy the instrumentation key.
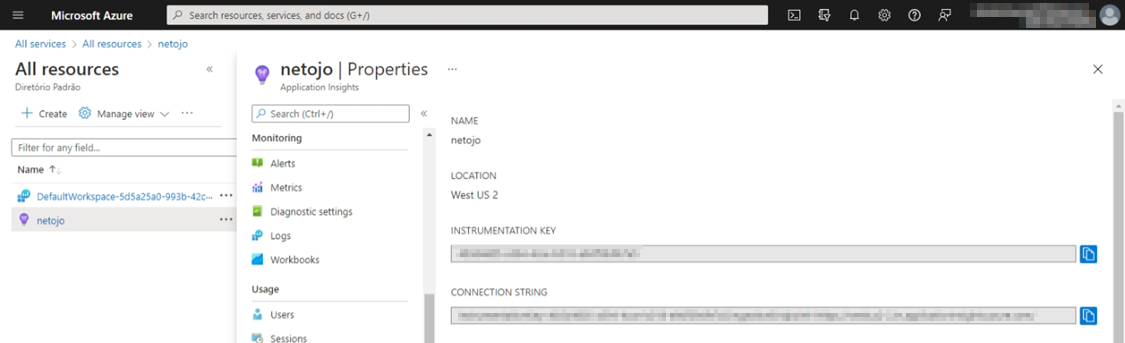
In the ConnectionStrings.config file, add the following instrumentation key entry.
<add name="appinsights.instrumentationkey" connectionString="YOUR INSTRUMENTATION KEY"/>Now, download the installation package for Azure AppService from the Sitecore Downloads Portal. You are going to copy the files Sitecore.Cloud.ApplicationInsights.config, and Sitecore.Cloud.ApplicationInsights.Counters, and Sitecore.Cloud.ApplicationInsights.dll, that are only available in the Sitecore Azure AppService installation packages.
Copy the file Sitecore.Cloud.ApplicationInsights.dll into your Sitecore installation /bin folder. In the installation package, the Sitecore.Cloud.ApplicationInsights.dll is located at "/Content/Website/bin/Sitecore.Cloud.ApplicationInsights.dll".
Next, copy the configuration files Sitecore.Cloud.ApplicationInsights.config and Sitecore.Cloud.ApplicationInsights.Counters.config into your Sitecore installation [Website]/App_Config/Include or [Website]/App_Config/Environment folder. In the installation package, these configuration files are located at the folder "/Content/Website/App_Config/Sitecore/Azure".
If you inspect the configuration file Sitecore.Cloud.ApplicationInsights.config, you will notice that it contains some interesting settings:
- ApplicationInsights.Role: This is name that will be used to group metric by server role. Ideally you should use values such as “Content Management”, “Content Delivery”, or anything that makes sense for you application.
- ApplicationInsights.Tag: Add here tags that you can use to identify the metrics from an instance. For example, if you share your Application Insights between several Sitecore instances, you can use tags to differentiate those.
For example, the setup below will produce the following result in the in the customDimensions field in the logs:
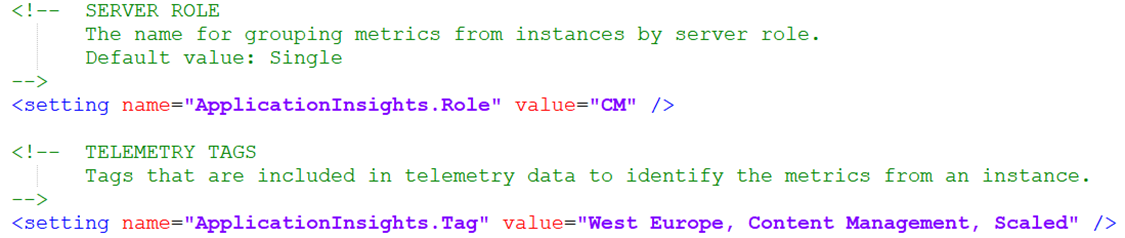
{
	"DeveloperMode": "true",
	"InstanceName": "LT-JONE-T-NL-xp1011.sc",
	"Tag": "West Europe, Content Management, Scaled",
	"UserName": "IIS APPPOOL\\xp1011.sc",
	"ThreadName": "34088",
	"LoggerName": "System.RuntimeType",
	"Category": "log",
	"Role": "CM",
	"Domain": "/LM/W3SVC/4/ROOT-2-132916634063916863"
}
- ApplicationInsights.DeveloperMode: Developer Mode in the .NET Application Insights SDK does a couple of things, primarily enabling debug messages and disabling batching of telemetry. You also get additional messages that help you trace any problems with the telemetry. Switch it off in production because it may slow down your app.
Configuring Application Insights in Sitecore Identity role
The Sitecore Identity Server (SIS) role was released in the version 9.1 (November 2018). It is based on the IdentityServer4 framework and used to request and handle identity, grant access, and refresh tokens. The Sitecore Identity role already contains all the necessary assemblies and configuration files to start using Application Insights.
To enable Application Insights in the Sitecore Identity role, carry out the following steps:
1. Update the InstrumentationKey in the file [Identity Server]\sitecorehost.xml:
<ApplicationInsights>
  <InstrumentationKey>YOUR INSTRUMENTATION KEY</InstrumentationKey>
</ApplicationInsights>
2. In the [Identity Server]\sitecorehost.xml file, add the Role setting under the node /Sitecore/Logging/Serilog/Properties as the following:
<Properties>
  <Application>XConnect</Application>
  <Role>Sitecore Identity</Role>
  <Tags>EMEA Region</Tags>
</Properties>
Note: Sitecore Identity role registers log messages into the customEvents tables.
Configuring Application Insights in the XP roles
Different than the Core roles, the XP roles already come with all the necessary assemblies and configuration files to start using Application Insights. In the following sections, you will learn how to enable Application Insights in each role.
xConnect Collection
The xConnect Collection role is responsible for receiving contacts and interactions, either individually or in a batch. It also allows reading of contact and interaction data by ID or identifier, and supports data extraction.
To enable Application Insights in the xConnect Collection role, carry out the following steps:
1. Make sure the following configuration files are enabled (without .disabled as extension):
- [Website]\App_Data\Config\Sitecore\CoreServices\sc.Serilog.AppInsights.xml
- [Website]\App_Data\Config\Sitecore\CoreServices\sc.Serilog.TraceSink.xml
2. Add the following entries to the file [Website]\App_Config\AppSettings.config:
  <add key="AppInsightsKey" value="YOUR INSTRUMENTATION KEY" />
  <add key="AppInsightsRoleName" value=" XConnect Collection" />
3. Make sure the following nodes are uncommented in the file [Website]\App_Data\config\sitecore\CoreServices\sc.AppInsights.Initializer.xml:
<instrumentationKeyAppSettingKey>AppInsightsKey</instrumentationKeyAppSettingKey>
<developerMode>False</developerMode>
<maxBuffer>5</maxBuffer>
<minimumLevel>Information</minimumLevel>
<sendingInterval>5</sendingInterval>
4. In the file [Website]\ App_Data\config\sitecore\CoreServices\sc.Serilog.xml, add the Role setting under the node /Settings/Serilog/Properties as the following:
<Properties>
  <Application>XConnect</Application>
  <Role>XConnect Collection</Role>
  <Tags>EMEA Region</Tags>
</Properties>
Marketing Automation Operations
The Marketing Automation Operations role allows you to manage contact enrollments or register live events using the Marketing Automation Operations API.
To enable Application Insights in the Marketing Automation Operations role, carry out the following steps:
1. Make sure the following configuration files are enabled (without .disabled as extension):
- [Website]\App_Data\Config\Sitecore\CoreServices\sc.Serilog.AppInsights.xml
- [Website]\App_Data\Config\Sitecore\CoreServices\sc.Serilog.TraceSink.xml
- [Website]\App_Data\jobs\continuous\AutomationEngine\App_Data\config\sitecore\CoreServices\sc.Serilog.AppInsights.xml
- [Website]\App_Data\jobs\continuous\AutomationEngine\App_Data\config\sitecore\CoreServices\sc.Serilog.TraceSink.xml
2. Add the following entries to the file [Website]\App_Config\AppSettings.config:
  <add key="AppInsightsKey" value="YOUR INSTRUMENTATION KEY" />
  <add key="AppInsightsRoleName" value=" Marketing Automation Operations" />
3. Add the following entries to the file [Website]\App_Data\jobs\continuous\AutomationEngine\App_Config\AppSettings.config:
  <add key="AppInsightsKey" value="YOUR INSTRUMENTATION KEY" />
  <add key="AppInsightsRoleName" value="Marketing Automation Engine" />
4. Make sure the following nodes are uncommented in the files [Website]\App_Data\config\sitecore\CoreServices\sc.AppInsights.Initializer.xml and [Website]\App_Data\jobs\continuous\AutomationEngine \App_Data\config\sitecore\CoreServices\sc.AppInsights.Initializer.xml:
<instrumentationKeyAppSettingKey>AppInsightsKey</instrumentationKeyAppSettingKey>
<developerMode>False</developerMode>
<maxBuffer>5</maxBuffer>
<minimumLevel>Information</minimumLevel>
<sendingInterval>5</sendingInterval>
5. In the file [Website]\ App_Data\config\sitecore\CoreServices\sc.Serilog.xml, add the Role setting under the node /Settings/Serilog/Properties as the following:
<Properties>
  <Application>XConnect</Application>
  <Role>Marketing Automation Engine</Role>
  <Tags>EMEA Region</Tags>
</Properties>
6. In the file [Website]\App_Data\jobs\continuous\AutomationEngine\App_Data\config\sitecore\CoreServices\sc.Serilog.xml, add the Role setting under the node /Settings/Serilog/Properties as the following:
<Properties>
  <Application>XConnect</Application>
  <Role>Marketing Automation Operations</Role>
  <Tags>EMEA Region</Tags>
</Properties>
Marketing Automation Reporting
The Marketing Automation Reporting role allows you to retrieve plan and enrollment statistics using the Marketing Automation Reporting API.
To enable Application Insights in the Marketing Automation Reporting role, carry out the following steps:
1. Make sure the following configuration files are enabled (without .disabled as extension):
- [Website]\App_Data\Config\Sitecore\CoreServices\sc.Serilog.AppInsights.xml
- [Website]\App_Data\Config\Sitecore\CoreServices\sc.Serilog.TraceSink.xml
2. Add the following entries to the file [Website]\App_Config\AppSettings.config:
  <add key="AppInsightsKey" value="YOUR INSTRUMENTATION KEY" />
  <add key="AppInsightsRoleName" value=" Marketing Automation Reporting" />
3. Make sure the following nodes are uncommented in the file [Website]\App_Data\config\sitecore\CoreServices\sc.AppInsights.Initializer.xml:
<instrumentationKeyAppSettingKey>AppInsightsKey</instrumentationKeyAppSettingKey>
<developerMode>False</developerMode>
<maxBuffer>5</maxBuffer>
<minimumLevel>Information</minimumLevel>
<sendingInterval>5</sendingInterval>
4. In the file [Website]\ App_Data\config\sitecore\CoreServices\sc.Serilog.xml, add the Role setting under the node /Settings/Serilog/Properties as the following:
<Properties>
  <Application>XConnect</Application>
  <Role>Marketing Automation Reporting</Role>
  <Tags>EMEA Region</Tags>
</Properties>
xConnect Collection Search
The xConnect Collection Search role allows you to search contacts and interactions using the xConnect Client API or another API that consumes the oData service. This role can also collect data.
To enable Application Insights in the xConnect Collection Search role, carry out the following steps:
1. Make sure the following configuration files are enabled (without .disabled as extension):
- [Website]\App_Data\Config\Sitecore\CoreServices\sc.Serilog.AppInsights.xml
- [Website]\App_Data\Config\Sitecore\CoreServices\sc.Serilog.TraceSink.xml
- [Website]\App_Data\jobs\continuous\IndexWorker\App_Data\config\sitecore\CoreServices\sc.Serilog.AppInsights.xml
- [Website]\App_Data\jobs\continuous\IndexWorker\App_Data\config\sitecore\CoreServices\sc.Serilog.TraceSink.xml
2. Add the following entries to the file [Website]\App_Config\AppSettings.config:
  <add key="AppInsightsKey" value="YOUR INSTRUMENTATION KEY" />
  <add key="AppInsightsRoleName" value=" XConnect Collection Search" />
3. Add the following entries to the file [Website]\App_Data\jobs\continuous\IndexWorker\App_Config\AppSettings.config:
  <add key="AppInsightsKey" value="YOUR INSTRUMENTATION KEY" />
  <add key="AppInsightsRoleName" value="XConnect Search Indexer" />
4. Make sure the following nodes are uncommented in the files [Website]\App_Data\config\sitecore\CoreServices\sc.AppInsights.Initializer.xml and [Website]\App_Data\jobs\continuous\IndexWorker\App_Data\config\sitecore\CoreServices\sc.AppInsights.Initializer.xml:
<instrumentationKeyAppSettingKey>AppInsightsKey</instrumentationKeyAppSettingKey>
<developerMode>False</developerMode>
<maxBuffer>5</maxBuffer>
<minimumLevel>Information</minimumLevel>
<sendingInterval>5</sendingInterval>
5. In the file [Website]\ App_Data\config\sitecore\CoreServices\sc.Serilog.xml, add the Role setting under the node /Settings/Serilog/Properties as the following:
<Properties>
  <Application>XConnect</Application>
  <Role>XConnect Collection Search</Role>
  <Tags>EMEA Region</Tags>
</Properties>
6. In the file [Website]\App_Data\jobs\continuous\IndexWorker\App_Data\config\sitecore\CoreServices\sc.Serilog.xml, add the Role setting under the node /Settings/Serilog/Properties as the following:
<Properties>
  <Application>XConnect</Application>
  <Role>XConnect Search Indexer</Role>
  <Tags>EMEA Region</Tags>
</Properties>
Sitecore Cortex Processing
The Sitecore Cortex Processing role manages data blobs created by custom workers or projected data blobs. It also is used to access data such as data projection results in blob storage. See Sitecore Cortex Processing service for more information.
To enable Application Insights in the Sitecore Cortex Processing role, carry out the following steps:
1. Make sure the following configuration files are enabled (without .disabled as extension):
- [Website]\App_Data\Config\Sitecore\CoreServices\sc.Serilog.AppInsights.xml
- [Website]\App_Data\Config\Sitecore\CoreServices\sc.Serilog.TraceSink.xml
- [Website]\App_Data\jobs\continuous\ProcessingEngine\App_Data\Config\Sitecore\CoreServices\sc.Serilog.AppInsights.xml
- [Website]\App_Data\jobs\continuous\ProcessingEngine\App_Data\Config\Sitecore\CoreServices\sc.Serilog.TraceSink.xml
2. Add the following entries to the file [Website]\App_Config\AppSettings.config:
  <add key="AppInsightsKey" value="YOUR INSTRUMENTATION KEY" />
  <add key="AppInsightsRoleName" value=" Sitecore Cortex Processing" />
3. Add the following entries to the file [Website]\App_Data\jobs\continuous\ProcessingEngine\App_Config\AppSettings.config:
  <add key="AppInsightsKey" value="YOUR INSTRUMENTATION KEY" />
  <add key="AppInsightsRoleName" value="Sitecore Cortex Processing Engine" />
4. Make sure the following nodes are uncommented in the files [Website]\App_Data\config\sitecore\CoreServices\sc.AppInsights.Initializer.xml and [Website]\App_Data\jobs\continuous\ProcessingEngine\App_Data\config\sitecore\CoreServices\sc.AppInsights.Initializer.xml:
<instrumentationKeyAppSettingKey>AppInsightsKey</instrumentationKeyAppSettingKey>
<developerMode>False</developerMode>
<maxBuffer>5</maxBuffer>
<minimumLevel>Information</minimumLevel>
<sendingInterval>5</sendingInterval>
5. In the file [Website]\ App_Data\config\sitecore\CoreServices\sc.Serilog.xml, add the Role setting under the node /Settings/Serilog/Properties as the following:
<Properties>
  <Application>XConnect</Application>
  <Role>Sitecore Cortex Processing</Role>
  <Tags>EMEA Region</Tags>
</Properties>
6. In the file [Website]\App_Data\jobs\continuous\ProcessingEngine\App_Data\config\sitecore\CoreServices\sc.Serilog.xml, add the Role setting under the node /Settings/Serilog/Properties as the following:
<Properties>
  <Application>XConnect</Application>
  <Role>Engine Sitecore Cortex Processing</Role>
  <Tags>EMEA Region</Tags>
</Properties>
Sitecore Cortex Reporting
The Sitecore Cortex Reporting roles provides a service for storing and querying reporting data. The service is only used by the Experience Optimization feature to write personalization rules to the xDB Reporting database.
To enable Application Insights in the Sitecore Cortex Reporting role, carry out the following steps:
1. Make sure the following configuration files are enabled (without .disabled as extension):
- [Website]\App_Data\Config\Sitecore\CoreServices\sc.Serilog.AppInsights.xml
- [Website]\App_Data\Config\Sitecore\CoreServices\sc.Serilog.TraceSink.xml
2. Add the following entries to the file [Website]\App_Config\AppSettings.config:
  <add key="AppInsightsKey" value="YOUR INSTRUMENTATION KEY" />
  <add key="AppInsightsRoleName" value=" Sitecore Cortex Reporting" />
3. Make sure the following nodes are uncommented in the file [Website]\App_Data\config\sitecore\CoreServices\sc.AppInsights.Initializer.xml:
<instrumentationKeyAppSettingKey>AppInsightsKey</instrumentationKeyAppSettingKey>
<developerMode>False</developerMode>
<maxBuffer>5</maxBuffer>
<minimumLevel>Information</minimumLevel>
<sendingInterval>5</sendingInterval>
4. In the file [Website]\ App_Data\config\sitecore\CoreServices\sc.Serilog.xml, add the Role setting under the node /Settings/Serilog/Properties as the following:
<Properties>
  <Application>XConnect</Application>
  <Role>Sitecore Cortex Reporting</Role>
  <Tags>EMEA Region</Tags>
</Properties>
Reference Data
The Reference Data role allows you to create or retrieve reference data such as event definitions and airport codes using the Reference Data Client API.
To enable Application Insights in the Reference Data role, carry out the following steps:
Make sure the following configuration files are enabled (without .disabled as extension):
- [Website]\App_Data\Config\Sitecore\CoreServices\sc.Serilog.AppInsights.xml
- [Website]\App_Data\Config\Sitecore\CoreServices\sc.Serilog.TraceSink.xml
Add the following entries to the file [Website]\App_Config\AppSettings.config:
<add key="AppInsightsKey" value="YOUR INSTRUMENTATION KEY" />
<add key="AppInsightsRoleName" value=" Reference Data" />
Make sure the following nodes are uncommented in the file [Website]\App_Data\config\sitecore\CoreServices\sc.AppInsights.Initializer.xml:
<instrumentationKeyAppSettingKey>AppInsightsKey</instrumentationKeyAppSettingKey>
<developerMode>False</developerMode>
<maxBuffer>5</maxBuffer>
<minimumLevel>Information</minimumLevel>
<sendingInterval>5</sendingInterval>
In the file [Website]\ App_Data\config\sitecore\CoreServices\sc.Serilog.xml, add the Role setting under the node /Settings/Serilog/Properties as the following:
<Properties>
  <Application>XConnect</Application>
  <Role>Reference Data</Role>
  <Tags>EMEA Region</Tags>
</Properties>
Note: The file sc.AppInsights.Initializer.xml.disabled is used to enable the Application Map for Application Insights for xConnect. You use the Application Map (part of Azure Application Insights) to get a visual representation of the dependency relationship of components of your application. Each node in the map represents an application component (application node) or its dependency (dependency node). See Walkthrough: Enabling Application Map for Application Insights for xConnect for more information.Disabling file rollout
If you want to disable the file rollout, which creates log files inside your app services (XP roles), simply comment the FileSink node in the sc.Serilog.xml file:
<?xml version="1.0" encoding="utf-8"?>
<Settings>
  <Serilog>
    <Using>
      <FileSinkAssembly>Serilog.Sinks.File</FileSinkAssembly>
      <RollingFileSinkAssembly>Serilog.Sinks.RollingFile</RollingFileSinkAssembly>
    </Using>
    <MinimumLevel>
      <Default>Information</Default>
    </MinimumLevel>
    <WriteTo>
<!--       <FileSink>
        <Name>RollingFile</Name>
        <Args>
          <pathFormat>App_Data\\Logs\\xconnect-log-${MachineName}-${InstanceName}-{Date}.txt</pathFormat>
          <retainedFileCountLimit>7</retainedFileCountLimit>
          <buffered>False</buffered>
        </Args>
      </FileSink> -->
    </WriteTo>
    <Properties>
      <Application>XConnect</Application>
      <Role>XConnect Collection</Role>
    </Properties>
  </Serilog>
</Settings>
Querying and visualizing Sitecore log data on Application Insights
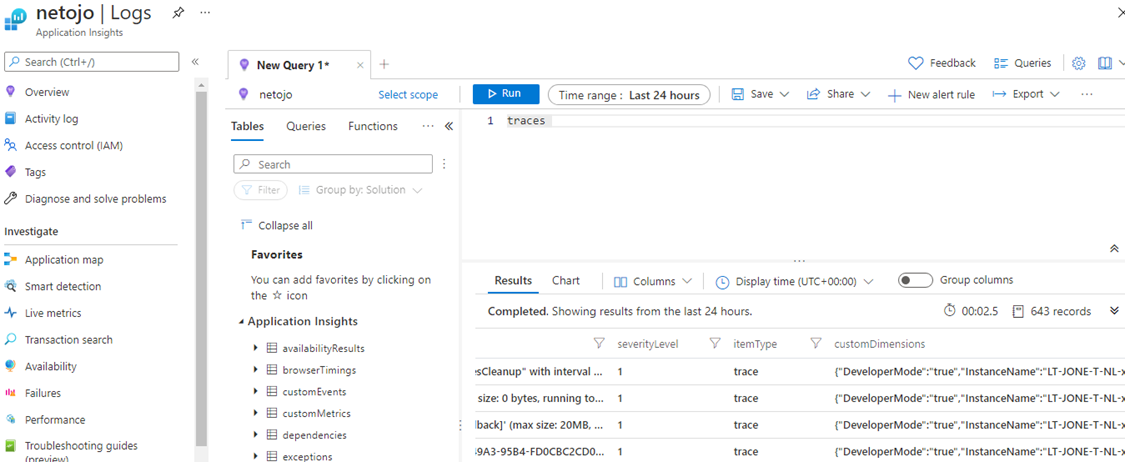
To visualize the Sitecore data on Application Insights, carry out the following steps:
- Sign into Microsoft Azure
- In the Azure Portal page, type “Application Insights” in the search bar and press Enter.
- In the search results page, open your Application Insights resource by clicking it.
- In the left bar, under Monitoring, click on the Logs menu.
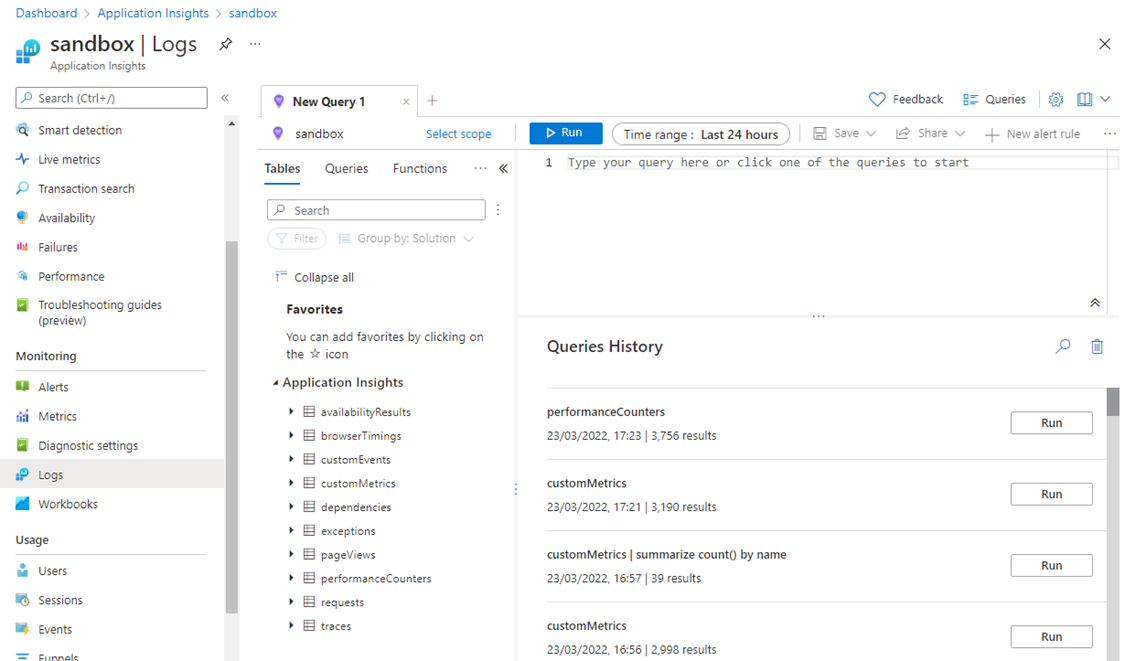
5. Double-click the traces table, for example, and click the Run button.
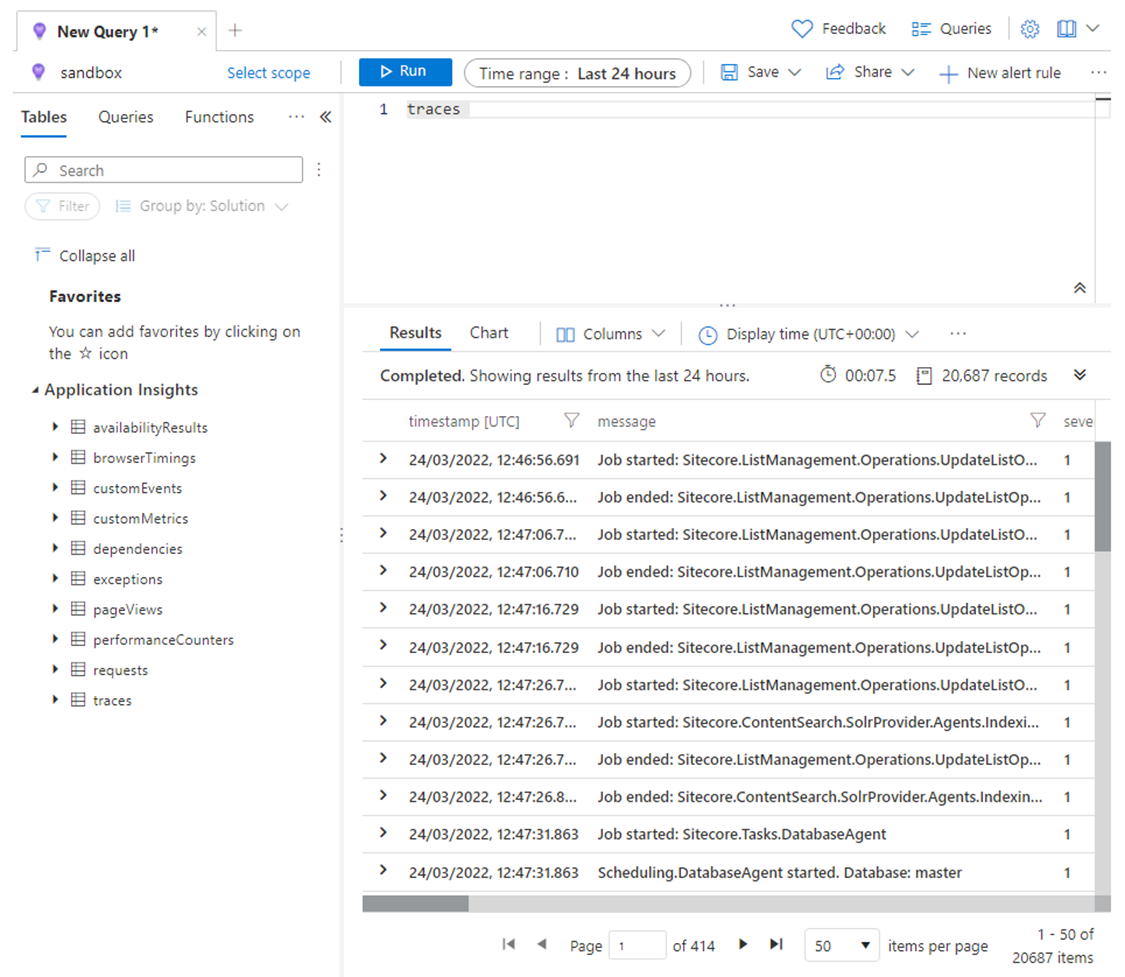
Azure log queries are written using Kusto query language (KQL). The complete documentation for KQL is available here Kusto Query Language (KQL) overview- Azure Data Explorer. However, you can find below some examples:
1) Read log entries but display only specific columns in the results:
traces
| project timestamp, message, severityLevel, customDimensions.Role, customDimensions.InstanceName
| order by timestamp desc
2) Read log entries from the past 15 minutes and in the results create a new column with the Sitecore role:
traces
|where timestamp > ago(15m)
| order  by  timestamp desc
| extend Role_ = tostring(customDimensions.Role)
3) Find log messages for a specific Sitecore role:
traces
| where customDimensions.Role == "Content Management"
| order by timestamp desc
4) Find log messages by level of severity:
traces
| where severityLevel  == 1
| order by timestamp desc
Note: 1=Information, 2=Warning, 3=Error
5) Find the number of exceptions per Sitecore role and problem in the last 24 hours:
exceptions
| where timestamp > ago(24h)
| summarize count() by tostring(customDimensions.Role), problemId
Full-text search log data on Application Insights
Application Inisights contains a feature called Transaction search that allows you to find and explore individual telemetry items, such as page views, exceptions, or web requests.
You can open transaction search from the Application Insights Overview tab of your application (located at in the top bar) or under investigate on the left.
For example, you can search for the keyword “cache” to see all logs entries related to caching:
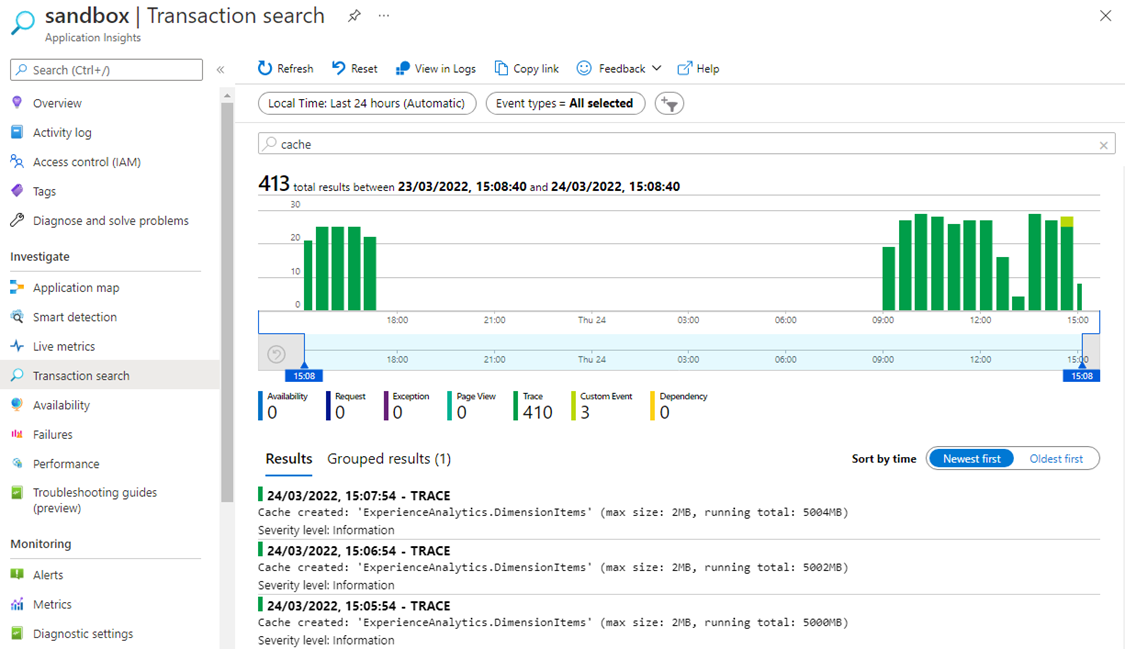
You can also use it to find specific log messages that you coded to help you troubleshoot your application.
Understanding Application Insights schema
According to the Azure Monitor Application Insights workspace-based resource schema - Azure Monitor, here’s what each table means:
The availabilityResults is a table that contains data from availability tests. These tests are useful for monitoring availability and responsiveness of your web app or website. Availability tests are setup in the Availability menu under the Investigate section. Sitecore installations do not setup any availability tests. Sitecore do not populate this table.
The browserTimings contains data about client performance, such as the time taken to process the incoming data. Sitecore do not populate this table.
The Dependencies table registers calls from the application to other components (including external components) recorded via TrackDependency() – for example, calls to REST API, database or a file system. Sitecore do not populate this table.
In the customEvents table you will find logs from the Sitecore Identity role. You can also find some data from the Reference Data role.
The customMetrics table contains metrics about your Sitecore installation. You will see only Heartbeat-related logs at first. Once you enable performance counters, you will start to see entries such as cache clearings, cache misses, cache hits, aggregations, interactions, contact processing, etc.
The pageViews table contains data about each website view with browser information. Sitecore do not populate this table. The page views from your website are stored in the Shards tables in the SQL Server.
In the performanceCounters table, you will find performance measurements from the compute resources supporting the application. The counters keep track of how many times an item was accessed, the number of operations against the database, the number of messages sent to the log, and more. For example, you can find entries such as % Processor Time, Private Bytes, IO Data Bytes/sec, etc.
The requests table stores requests received by your application. From pages in the Content Management role, to styles and scripts files in the Content Delivery role, everything requested will be stored in this table. By far, this table is the most populated.
The exceptions andtraces tables are the most important tables when you need to troubleshoot issues. The exceptions table contains errors on the server side. In the tracestable is where you will find the rest of the Sitecore logging.
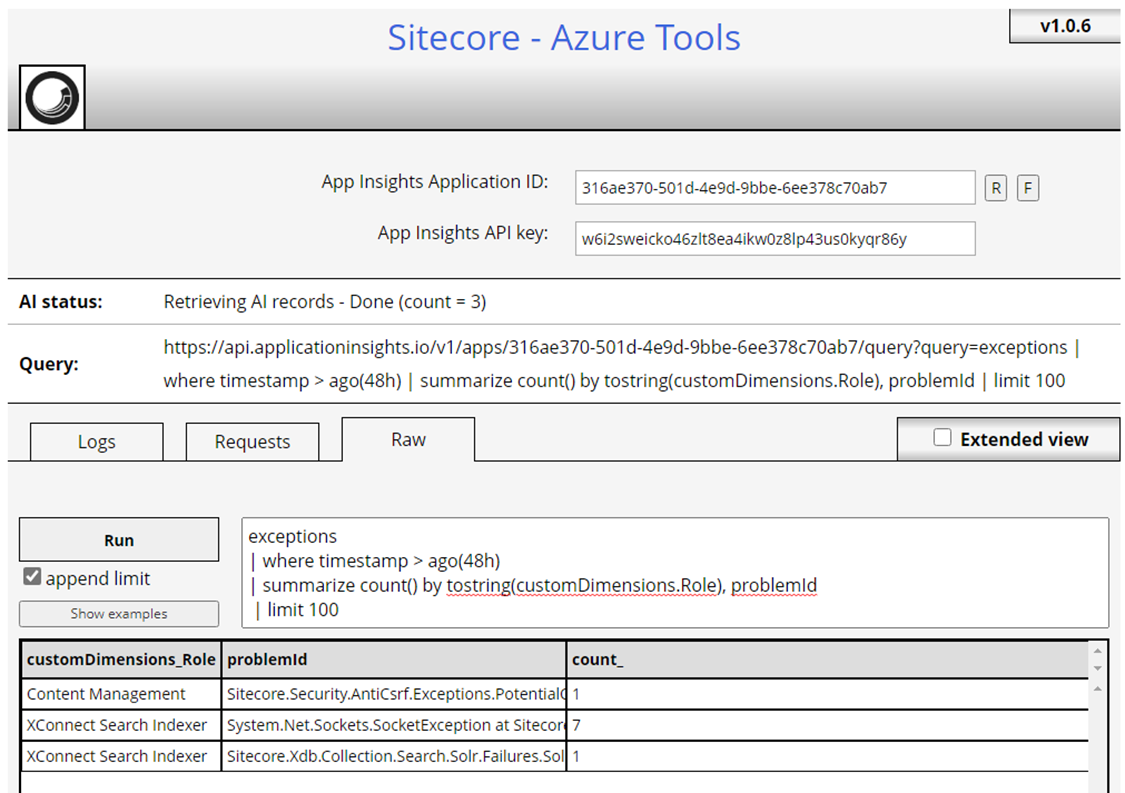
Using Sitecore Azure Tools
You can access Application Insights logs and diagnostics data directly from your Sitecore instance. In the link How-to's - Access logs and diagnostics data in Sitecore XP on Azure Web Apps you can download a custom admin page called AzureTools.aspx and install it on your Sitecore instance. In this same link, you will find instruction on how to configured the AzureTools page.
The AzureTools page allows you to preview and download application insights logs directly from your Sitecore instance. This is useful when developers do not have access to Azure resources, but still need to troubleshoot issues on live and acceptance environments.
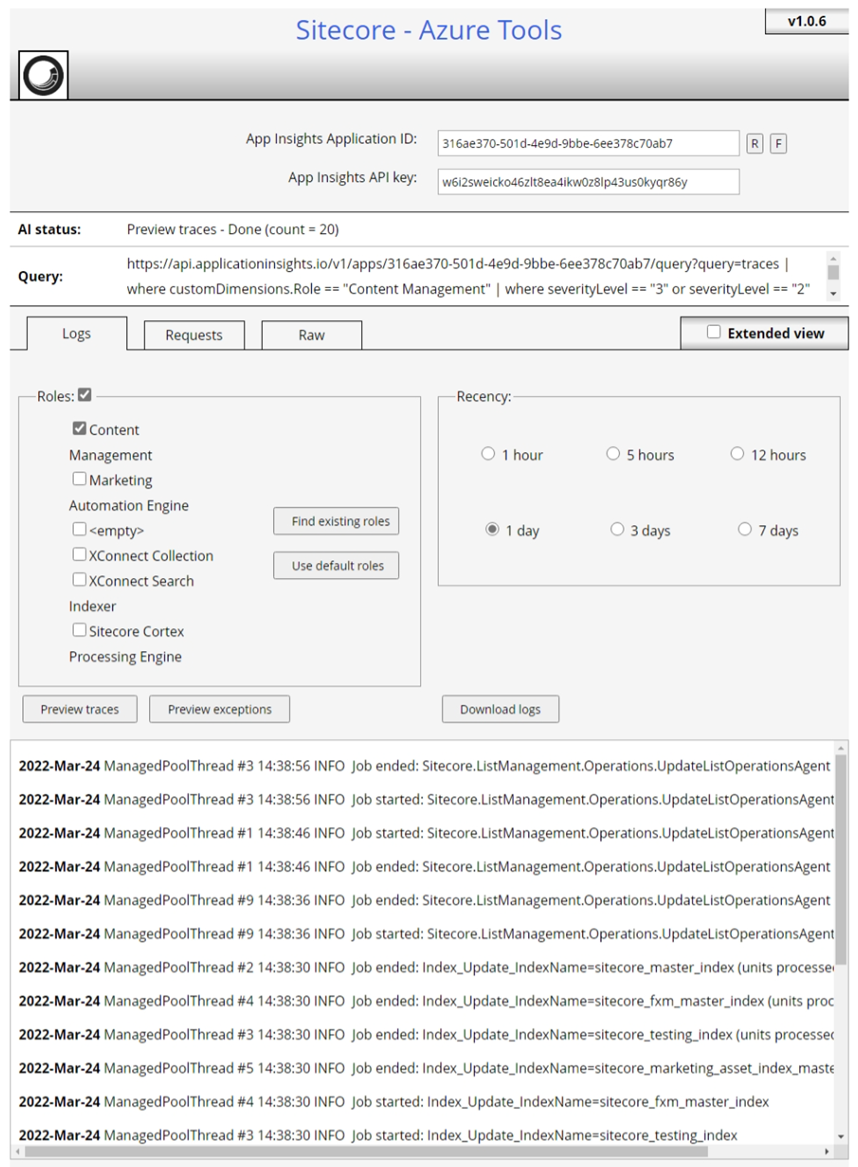
In the Raw tab you can write your own queries using KQL syntax:
Troubleshooting
This last section is intended to support you during the process of configuring Application Insights and querying log data. These are the issues that I incurred while writing this article.
You can’t see any logs on Application Insights Portal Page
Check if the assemblies, ApplicationInsights.config and Sitecore configuration files, and web.config changes have been successfully deployed.
See Troubleshooting no data - Application Insights for .NET - Azure Monitor for more information.
Sitecore Azure Tools is not working
Check if requests to Application Insights API are being blocked by a content security policy. In your browser, track the requests being made and inspect the response:
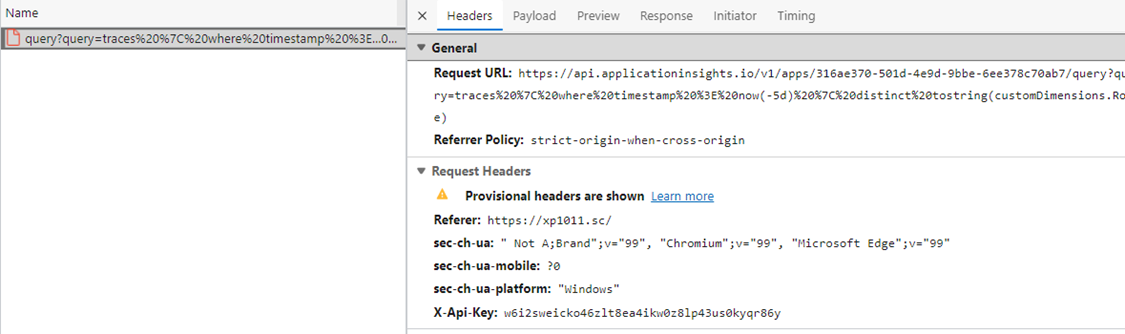
You must enable request to the Application Insights API (api.applicationinsights.io) by updating the web.config as the following:
<location path="sitecore">
	<system.webServer>
		<httpProtocol>
			<customHeaders>
				<add name="Content-Security-Policy" value="default-src 'self' api.applicationinsights.io 'unsafe-inline' 'unsafe-eval'; img-src 'self' data:; style-src 'self' 'unsafe-inline' https://fonts.googleapis.com; font-src 'self' 'unsafe-inline' https://fonts.gstatic.com; upgrade-insecure-requests; block-all-mixed-content;" />
			</customHeaders>
		</httpProtocol>
	</system.webServer>
</location>
Summary
In this article, you learned how to install Application Insights on your solution. You also learned how to configure the XP and XM roles to start sending metrics data to Application Insights. To demonstrate the simplicity of visualizing and querying log data, you learned what each table in Application Insights stores and how to query data from it using Kusto query language (KQL).
With the new skills learned in this article, you can start monitoring performance and troubleshooting issues in your production environments by using Application Insights.
