
This is the fourth part of a devlog I started some time ago. Today, I am covering the installation and configuration of Sitecore XP 10.1.0, upgrading SXA, third-party modules and more issues.
Disclaimer: This series of blog posts do not release you from reading the Upgrade Guide. There is quite a lot of material that I do not cover here.
As I mentioned in the previous blog post, I am upgrading a Sitecore XP + SXA from version 9.0.2 to 10.1.0.
Install a new instance of Sitecore XP 10.1.0
The next step in the upgrade is to install and configure Sitecore XP 10.1.0. As mentioned before, this step has been introduced recently. When the installation is finished, modify the ConnectionStrings.config file to connect the new Sitecore XP 10.1.0 instance to the databases from previous Sitecore XP version that you upgraded.
Next, you should upgrade SXA.
Upgrade SXA
Upgrading SXA is an easy process. You simply have to install the Sitecore.PowerShell.Extensions-6.2 (aka SPE) and then the SXA installation package.
Install the Sitecore.PowerShell.Extensions-6.2 package
If you have installed a new Sitecore XP 10.1.0 instance, simply install the SPE package. Now, if you already copied what you had in the /bin, you might need to delete some configs and assemblies, since newer versions of SPE have those files renamed.
Install the SXA package
In the SXA 10.1.0 Upgrade Guide, there are some manual steps you need to follow before installing the package. Ideally, this should be automated with some SPE scripts, since there are some items in the core database that need to be manually deleted as per instruction.
While installing the latest SXA package, we had one issue. The installation failed with the message:
The item name "ExecuteScript" is already defined on this level.
In the Sitecore logs, there were more details:
ManagedPoolThread #11 13:16:33 ERROR Error installing items/master/sitecore/templates/Foundation/Experience Accelerator/Scaffolding/Actions/Site/OBSOLETE/ExecuteScript/{B06460C2-8B7B-47A5-9E2C-F966F689B6CA}/en/1/xml
Exception: Sitecore.Exceptions.DuplicateItemNameException
Message: The item name "ExecuteScript" is already defined on this level.
Source: Sitecore.Kernel
   at Sitecore.Data.Items.ItemUtil.AssertDuplicateItemName(Item destinationItem, Item sourceItem, String name)
   at Sitecore.Data.Items.Item.MoveTo(Item destination)
To solve this problem, as suggested by the Sitecore Support, we had to change the setting AllowDuplicateItemNamesOnSameLevel to true.
<configuration xmlns:patch="http://www.sitecore.net/xmlconfig/">
  <sitecore>
    <settings>
      <setting name="AllowDuplicateItemNamesOnSameLevel">
        <patch:attribute name="value">true</patch:attribute>
      </setting>
    </settings>
  </sitecore>
</configuration>
The AllowDuplicateItemNamesOnSameLevel setting controls whether Sitecore allows to create items with the same name on the same level. Since version 9.3, the default value for AllowDuplicateItemNamesOnSameLevel is false. Previous versions had this set to true as default.
You can switch this setting to false after installing the SXA package - even if there are items with the same name on the same level. This setting is only applied when creating new items. The existing items with the same name should work properly.
Now, retry the package installation.
After installing the SXA package
Create two new cores for SXA indexes on Solr 8.4.0 (if you do not already have them).
- sitecore_sxa_master_index
- sitecore_sxa_web_index
If you the Solr cores with a name different than the default ones, update the core names in the \App_Config\Modules\SXA\z.Foundation.Overrides\Sitecore.XA.Foundation.Search.Solr.config file.
Rebuild the Search Indexes.
Publish the site by clicking Publish Site. Use the Smart Publish option.
Updating existing SXA sites
As a final post-installation step, you need to run a procedure to update existing SXA sites. Behind the scenes it's just some Powershell scripts that make some changes in your sites.
In the content editor, click on any item. You should see a notification like the one below.
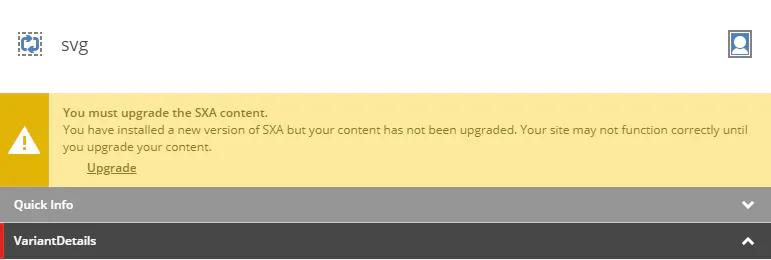
In the message, click Upgrade to start the upgrade procedure.
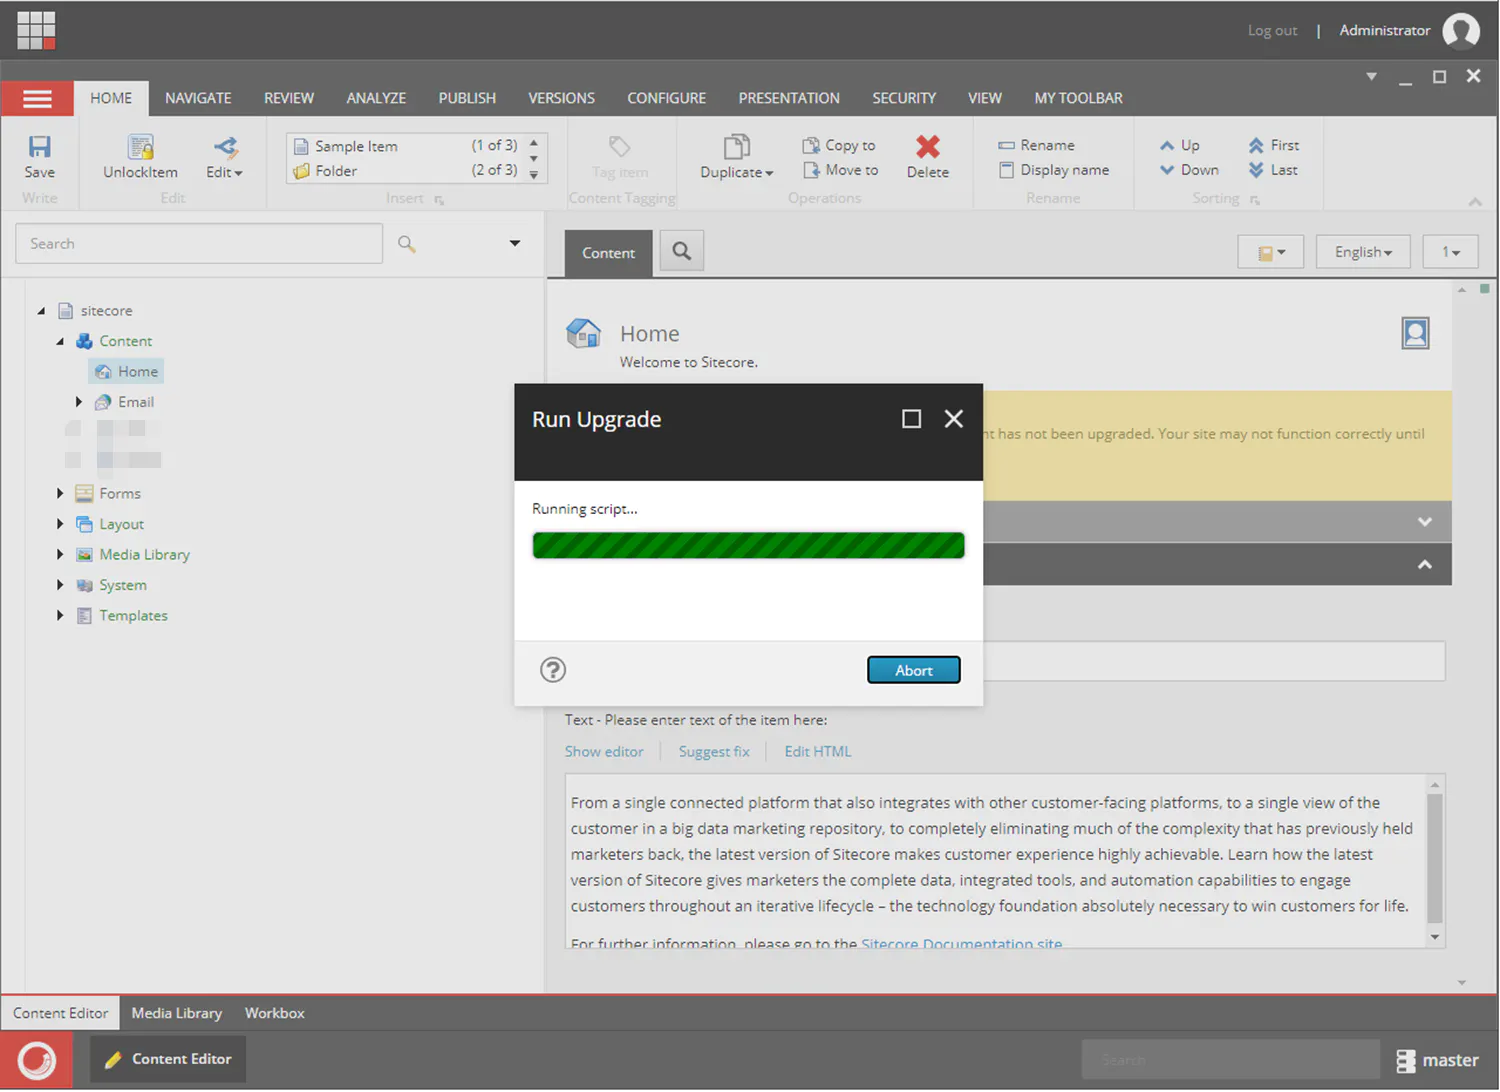
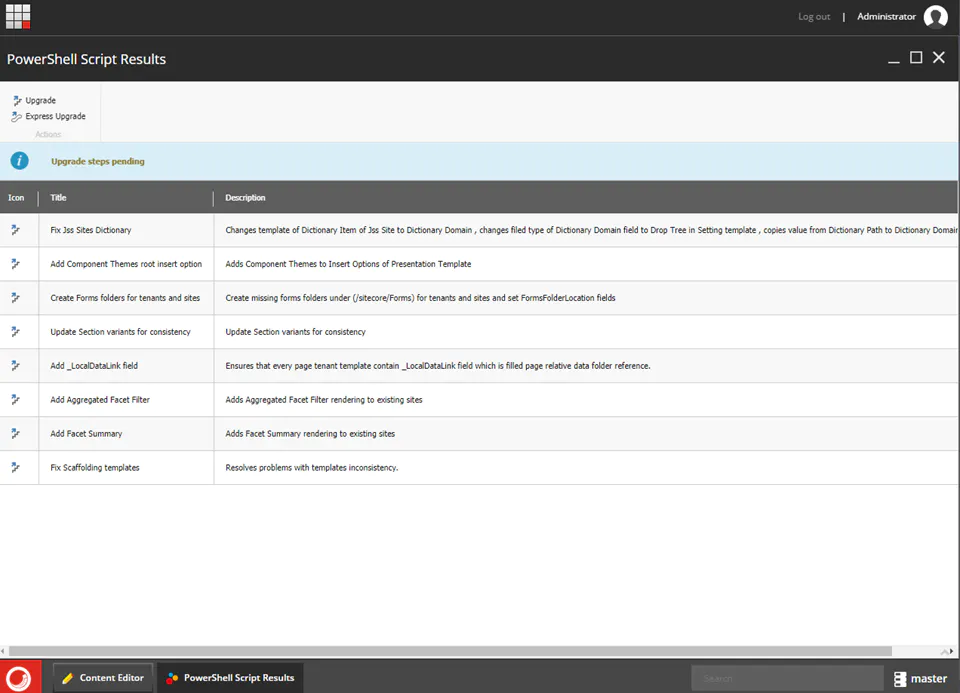
The PowerShell Script Results dialog displays all the upgrade steps for your installation. Every upgrade step comes with a title, a description, and additional options (if any).
Click the Upgrade button.
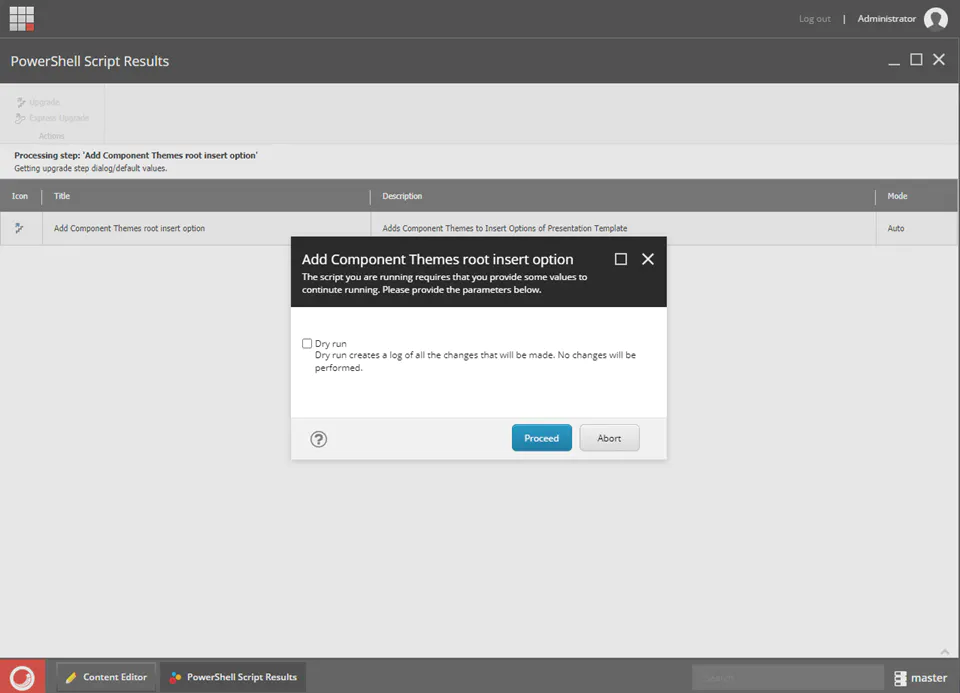
Before executing each upgrade step, you can decide to have a Dry run. A dry run tests this upgrade step and creates a log of all content changes before the upgrade script starts. To apply the changes click Proceed.
Repeat the upgrade procedure for each step.
Once the upgrade procedure is finished, you should see a message saying that your content is up to date.
Issues after the SXA upgrade
Here's one of the issues we had after upgrading SXA.
Broken Site/Data/Form folder
Broken Data/Form folder due to the removal of the template /Feature/Experience Accelerator/Forms/Datasource/Forms - template id is 7f9d1a45-f31e-4714-ac66-1e300ae1b792.
This template is related to the legacy WFFM.
We created an script to remove these folders and its content.
Back to step install and configure Sitecore XP 10.1.0
Now, going back to the Sitecore Upgrade Guide, here's some additional things we had to do.
Upgrade Sitecore modules
I’ve decided to upgrade the Sitecore modules before deploying the solution due to dependencies (assemblies e configs) in the solution with the third party modules.
Sitecore Forms Extensions for SC10.1
Simply install the latest module available, but read the release notes before as you might have some breaking changes. For example, the FileUpload Component was removed in favor of the built-in component. If you are using it, you should migrate the forms that use this custom field.
Sitecron
Not compatible with Sitecore 10.1 due the following:
- In newer Sitecore releases, the class
JobOptionshas been renamed toDefaultJobOptions. - Sitecron depends on SPE version 4.5.2. SXA 10.1 requires 6.2.0.
DefaultQuartzScheduler_Worker-3 14:53:49 ERROR SiteCron: Powershell.ExecuteScript: ERROR something went wrong - Could not load file or assembly 'Cognifide.PowerShell, Version=4.5.0.26896, Culture=neutral, PublicKeyToken=null' or one of its dependencies. The system cannot find the file specified.

Exception: System.IO.FileNotFoundException

Message: Could not load file or assembly 'Cognifide.PowerShell, Version=4.5.0.26896, Culture=neutral, PublicKeyToken=null' or one of its dependencies. The system cannot find the file specified.

Source: SiteCron
   at Sitecron.Jobs.PowerShell.ExecuteScript.Run(Item speScript, NameValueCollection parameters, IJobExecutionContext context)
   at Sitecron.Jobs.PowerShell.ExecuteScript.Execute(IJobExecutionContext context)
I have forked and updated the module in my Github. Until a new version is release, you use the one from https://github.com/netojoa/Sitecron.git or take it from the master branch since my PR was accepted.
Unicorn
Just update the Nuget packages.
Sitecore 10.1 introduces a change in the way data providers are registered.
You must disable the Unicorn.DataProvider.config and enable Unicorn.DataProvider.10.1.config.
Deploy your Sitecore solution
Now, finally we moved with the step to deploy the Visual Studio solution into the clean Sitecore 10.1.0 installation. Before that, we had to fix some more issues.
The solution we worked on had some code copied from the Habitat sample site. It's okay to copy some code from there, as long as you know what you are doing, and DON'T EVER use it as a starter kit.
Fixing Gulp
The Habitat site uses the Node.Js module called Gulp.js for automating deployment. Due to latest updates in the NodeJs, the Gulp script available in the repository no longer works. You'll see the following error message when you try to run it.
C:\Git\code> cmd.exe /c gulp -b "C:\Git\code" --color --gulpfile "C:\Git\code\Gulpfile.js" quick-deploy
[12:33:21]
[12:33:21] 'quick-deploy' errored after 1.88 ms
[12:33:21] TypeError: gulp.hasTask is not a function
[12:33:21]  --------------------  ------------------
    at C:\Git\code\node_modules\run-sequence\index.js:19:22
[12:33:21]    Source code build
    at Array.forEach (<anonymous>)
[12:33:21]    SXA Solution
[12:33:21]  --------------------  ------------------
    at verifyTaskSets (C:\Git\code\node_modules\run-sequence\index.js:13:11)
[12:33:21]
[12:33:21]
    at runSequence (C:\Git\code\node_modules\run-sequence\index.js:92:2)
[12:33:21] Using gulpfile C:\Git\code\Gulpfile.js
[12:33:21] Starting 'quick-deploy'...
    at C:\Git\code\Gulpfile.js:53:10
    at quick-deploy (C:\Git\code\node_modules\undertaker\lib\set-task.js:13:15)
    at bound (domain.js:426:14)
    at runBound (domain.js:439:12)
    at asyncRunner (C:\Git\code\node_modules\async-done\index.js:55:18)
    at processTicksAndRejections (internal/process/task_queues.js:79:11)
Process terminated with code 1.
There’s a breaking change introduced in Gulp 4 and Node.Js 15.
The solution is to either:
- Replace run-sequence with Gulp4's gulp.series and gulp.parallel with your gulp tasks, instead of run-sequence. See Gulp error: gulp.hasTask is not a function.
- Uninstall NodeJs, clear npm and node installation folders, install the Node Version Manager (NVM), and install both NodeJs 14 and 15. See Side by Side install of multiple versions of NodeJS and NPM with NVM on Windows 10.
More on option 1
If you want to simply fix the Gulp script, then make sure you update all dependencies.
In my case I run the following command to update the packages my solution depended on:
npm i async@latest gulp@latest gulp-debug@latest gulp-msbuild@latest gulp-nuget-restore@latest gulp-rename@latest gulp-rimraf@latest rimraf@latest run-sequence@latest simple-get@latest
You can run npm outdated to see the complete list of outdated dependencies.Now, in the gulp file, I replaced the following:
gulp.task("quick-deploy", function (callback) {
  config.runCleanBuilds = true;
  return runSequence(
    "Copy-Sitecore-Lib",
    "Nuget-Restore",
    "Publish-All-Projects",
    "Apply-Xml-Transform",
    "Publish-Transforms",
    "Publish-xConnect-Project",
    "Copy-SitecoreSupport-Lib",
    callback
  );
});
With the following:
gulp.task(
  "quick-deploy",
  gulp.series(
    "Copy-Sitecore-Lib",
    "Nuget-Restore",
    "Publish-All-Projects",
    "Apply-Xml-Transform",
    "Publish-Transforms",
    "Publish-xConnect-Project",
    "Copy-SitecoreSupport-Lib",
    function (done) {
      done();
    }
  )
);
If you are using gulp-msbuild and Visual Studio 2019, make sure you set the toolsVersion parameter to ‘16’, or the build will fail.
C:\Program Files (x86)\Microsoft Visual Studio\2017\BuildTools\MSBuild\15.0\Bin\amd64\Microsoft.Common.CurrentVersion.targets(1657,5):
error MSB4036: The "GetReferenceNearestTargetFrameworkTask" task was not found.
Check the following:
1.) The name of the task in the project file is the same as the name of the task class.
2.) The task class is "public" and implements the Microsoft.Build.Framework.ITask interface.
3.) The task is correctly declared with <UsingTask> in the project file, or in the *.tasks files located in the "C:\Program Files (x86)\Microsoft Visual Studio\2017\BuildTools\MSBuild\15.0\Bin\amd64" directory.
Here's where you set the toolsVersion (use a configuration file, don't hardcode the version):
return gulp.src(solution).pipe(
    msbuild({
        // [...]
        nodeReuse: false,
        toolsVersion: 16,
        // [...]
    })
);
We also had another error related to MSBuild.
TransformXML error
C:\Git\code\scripts\applytransform.targets(14,5): error MSB4062: The "TransformXml" task could not be loaded from the assembly C:\Program Files (x86)\Microsoft Visual Studio\2019\Professional\MSBuild\Microsoft\VisualStudio\vCurrent\Web\Microsoft.Web.Publishing.Tasks.dll.
Could not load file or assembly 'file:///C:\Program Files (x86)\Microsoft Visual Studio\2019\Professional\MSBuild\Microsoft\VisualStudio\vCurrent\Web\Microsoft.Web.Publishing.Tasks.dll' or one of its dependencies.
The system cannot find the file specified.
Confirm that the <UsingTask> declaration is correct, that the assembly and all its dependencies are available, and that the task contains a public class that implements Microsoft.Build.Framework.ITask.
To fix that, in the applytransform.targets replace v$(MSBuildToolsVersion) ...
<UsingTask TaskName="TransformXml" AssemblyFile="$(MSBuildExtensionsPath32)\Microsoft\VisualStudio\v$(MSBuildToolsVersion)\Web\Microsoft.Web.Publishing.Tasks.dll" />
With v$(VisualStudioVersion) ...
<UsingTask TaskName="TransformXml" AssemblyFile="$(MSBuildExtensionsPath32)\Microsoft\VisualStudio\v$(VisualStudioVersion)\Web\Microsoft.Web.Publishing.Tasks.dll" />
Adding customization to Web.config
In some projects, some changes are made to the original Web.config. A new section might be added, some redirects, etc.
Since you have a clean installation, now you might want to add/modify it with the custom changes made in the original version.
Using a tool to compare both files can speed up this process. Suggested tools: WinMerge, Notepad++ with the compare plugin.
Before comparing, I like to copy both files into a separate folder and run a Powershell script to tidy up the configuration files. This remove comments and re-indent them in a way that my comparison can run clean of clutters.
function tidyConfigFile
{
    param(
        [string]$file
    )

    Write-Host "Modifying $file"

    $settings = New-Object System.Xml.XmlReaderSettings
    $settings.IgnoreComments = $true
    $settings.ConformanceLevel = "Fragment"

    $reader = [System.Xml.XmlReader]::Create($file, $settings)

    $xml = New-Object System.Xml.XmlDocument
    $xml.Load($reader)

    $reader.Dispose()

    $xml.Save($file)
}

function processFolder
{
    param(
        [string]$directory
    )

    Write-Host "Processing $directory"

    $files = Get-ChildItem $directory -Filter *.config -Recurse | Select -ExpandProperty FullName

    foreach($file in $files)
    {
        tidyConfigFile $file
    }

    $children = Get-ChildItem $directory -Directory -Recurse | Select -ExpandProperty FullName

    foreach($child in $children)
    {
        processFolder $child
    }
}

tidyconfigfile "C:\temp\9.0.2.Web.config"
tidyconfigfile "C:\temp\10.1.0.Web.config"
# processFolder "C:\inetpub\wwwroot\site.sc\App_Config"
Fixing Dependency Injection code
Once solution was deployed, the Sitecore instance stopped working with the following error message:
Could not load file or assembly 'Sitecore.Horizon.Integration, Version=4.0.0.0, Culture=neutral, PublicKeyToken=null' or one of its dependencies. The system cannot find the file specified.
Description: An unhandled exception occurred during the execution of the current web request. Please review the stack trace for more information about the error and where it originated in the code.

Exception Details: System.IO.FileNotFoundException: Could not load file or assembly 'Sitecore.Horizon.Integration, Version=4.0.0.0, Culture=neutral, PublicKeyToken=null' or one of its dependencies. The system cannot find the file specified.

Source Error:
Line 187:            try
Line 188:            {
Line 189:                return assembly.GetExportedTypes();
Line 190:            }
Line 191:            catch (NotSupportedException)
We had some code for Dependency Injection that was copied from the Habitat example. This exception occurred because the code tried to load the external dependencies from the Sitecore SXA assemblies:
- The Sitecore Experience Accelerator 10.1.0.3751.zip package comes with the Sitecore.XA.Feature.Horizon assembly which has dependency on the Sitecore.Horizon.Integration assembly.
- The Sitecore.Horizon.Integration assembly is part of the Horizon installation package.
As a workaround, we made the DI ignore assemblies that start with the Sitecore prefix.
return assemblies
    .Where(assembly => !assembly.IsDynamic)
    .Where(assembly => !assembly.FullName.StartsWith("Sitecore."))
    .SelectMany(GetExportedTypes)
    .Where(type => !type.IsAbstract && !type.IsGenericTypeDefinition && targetType.IsAssignableFrom(type))
    .ToArray();
Instance was back on track after this fix. However, the logs started being filled with some reporting exceptions.
System.Exception: Invalid object name 'Fact_ChannelTypeMetrics'
3584 10:21:21 ERROR [Experience Analytics]: System.Exception: Invalid object name 'Fact_ChannelTypeMetrics'. ---> System.Data.DataException: Error executing SQL command:
WITH WorkingSubset AS
(
SELECT Fact_ChannelTypeMetrics.[bounces], Fact_ChannelTypeMetrics.[conversions], Fact_ChannelTypeMetrics.[pageViews], Fact_ChannelTypeMetrics.[timeOnSite], Fact_ChannelTypeMetrics.[value], Fact_ChannelTypeMetrics.[visits], Fact_ChannelTypeMetrics.[outcomeOccurrences], Fact_ChannelTypeMetrics.[monetaryValue],
You might experience this same exception after deploying the solution.
It turns out, there’s one more script that you should run on the reporting database, but this script is only described in the post upgrade steps.
Run the script SXP_reporting_migrate_experience_analytics_data.sql against the reporting database to fix this issue.
Next, we attempt to reserialize the items in the database using Unicorn, but we had one issue with the path max length.
“[...] You should increase the Rainbow.SFS.SerializationFolderPathMaxLength…”
The physical root path of this SFS tree, C:\inetpub\wwwroot\...\App_Data\unicorn\foundation\serialization\serialization\Security\..., is longer than the configured max base path length 110. If the tree contains any loopback paths, unexpected behavior may occur. You should increase the Rainbow.SFS.SerializationFolderPathMaxLength setting in Rainbow.config to greater than 121 and perform a reserialization from a master content database.
Despite having a patch file that increases the configured max base path length, for some odd reason, the patch was not taking effect. We then, figure out the reason why it was not taking effect.
The \App_Config\Layers.config has been changed. Now it specifies the order in which the folders should be patched. After the Helix folders are processed, then it processes everything else. Since Rainbow.config is at the root of App_Config\Include, it is processed later. In other words, it is processed after our patch.
To fix this simply update the Layers.config adding Rainbow.config as file to load before the Helix folders:
<layer name="Custom" includeFolder="/App_Config/Include/">
    <loadOrder>
      <add path="Rainbow.config" type="File" />
      <add path="Foundation" type="Folder" />
      <add path="Feature" type="Folder" />
      <add path="Project" type="Folder" />
    </loadOrder>
  </layer>
Conclusion
This ends the fourth part.
We started with installation of Sitecore XP 10.1.0, upgrading SXA, third-party modules and then closed with some issues we had.
Coming next, the final part, I'll be writing about post upgrade, xDb maintanance, NVelocity migration to Scriban templates, testing the upgrade, and finally, the content merge nightmare.
Credits
Photo by OpticalNomad on Unsplash
