I had some clients asking me how to send an e-mail based on a value selected in a field using the Sitecore Forms. Let us say, you have a field named “Topic” and if the visitor selects the option named “Gifts” he gets an email offering a free voucher for a Gift. If this same visitor selects the option “Books”, he gets a totally different email.
In this tutorial, I share how you can achieve this by using EXM, Forms, and Marketing Automation.
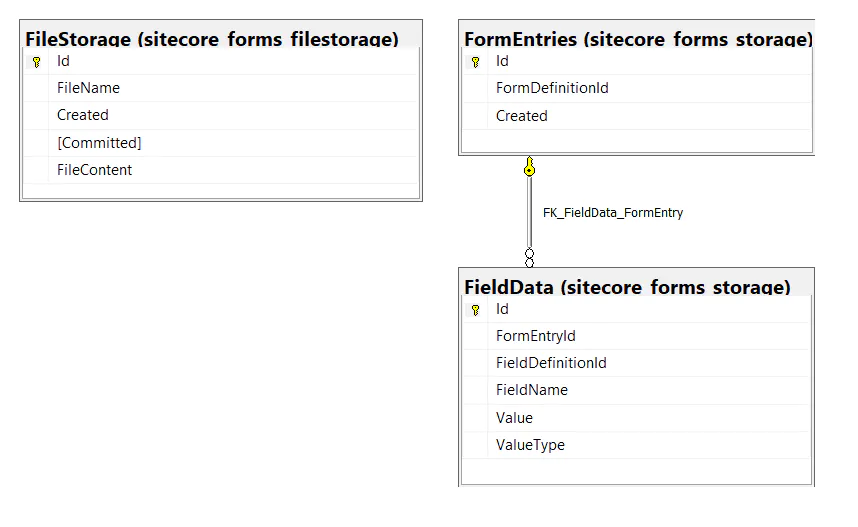
The first challenge I faced while working on it is that there is no link between a submitted form and a Xdb contact. If you look at the Sitecore Forms databases schema, you will notice that there is no field indicating which Xdb contact submitted that form.
So, how did I solve that?
First, I created a custom Xdb event model named Form Submission to populate the submitted form data. This way, I can link the contact with the submitted form.
Next, I extended the forms.executeSubmit pipeline with a custom processor that registers the Form Submissionb event in every form submitted. It also stores the form fields and their respective values.
Finally, a custom predicate (condition rule) was created to check if the existing contact’s events contains a Form Submission event with a specific field and value.

This post is a detailed tutorial containing all the steps I did. If you are a seasoned Sitecore developer and has experience in using the Forms, EXM and Marketing Automation features, then feel free skip this tutorial and download the complete code and the Sitecore package in my Github repository.
Create a custom event model for the Form Submission
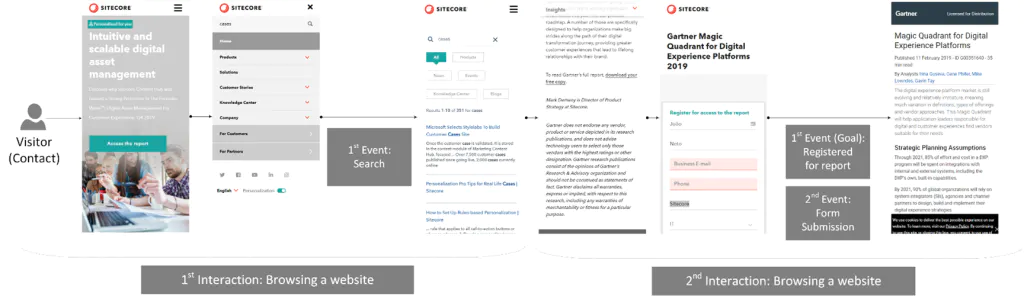
To understand events, we first need to talk about interactions.
An interaction describes any point at which a contact interfaces with a brand, either online or offline. Examples of interactions include:
- Using an app
- Browsing a website
- A phone conversation
An event is anything significant that occurs within the context of an interaction, such searching for content and registering for a report.
- An event needs to be associated with an interaction.
- An interaction can have one or more events.
- Interactions must have at least one event.
- You track interactions and events by using the XConnect API.
See the illustration below for two interactions where in the first the visitor searches for a contact and in the second he registers for a report.
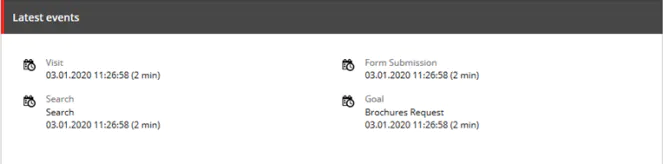
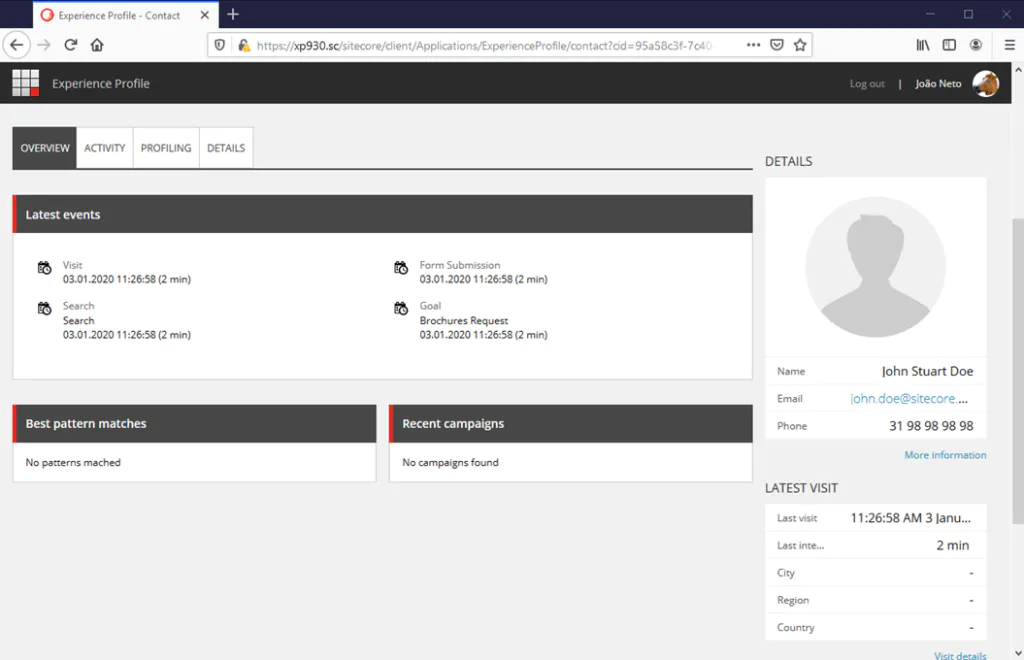
Events can be viewed in the Experience Profile.
Besides an event, every interaction requires 4 attributes:
- Contact: the visitor of your site, the person you spoke with, a user on your mobile app, etc.
- Initiator: the participant sending the first message of an interaction. There are current three options available: Contact, Brand, Unknown. Examples:
- When a visitor is browsing your site (Contact)
- When you are sending e-mails to a contact (Brand)
- When you are making phone calls to a contact (Brand)
- When a contact is calling a customer service (Contact)
- Channel: paths that contacts use to interact with your brand, such as webinars, e-mail campaigns, or a face-to-face conversation at a trade show. Channels can be either Online or Offline. In Sitecore, channels are stored in the Content Tree path /sitecore/system/Marketing Control Panel/Taxonomies/Channel. Sitecore comes with many out-of-the-box channels, but you can create your own.
- User Agent: what the contact used to interact with your brand. Usually, it is the device user-agent and it must follow the format set out in the RFC. For example, the Nintendo Switch user agent is Mozilla/5.0 (Nintendo Switch; ShareApplet) AppleWebKit/601.6 (KHTML, like Gecko) NF/4.0.0.5.9 NintendoBrowser/5.1.0.13341. For offline interactions, or interactions that are initiated by the Brand, you can use as a User Agent, for example, “Experience Forms”, “Seminar Conference”, etc.
For more information about interactions such as duration, venues (for offline interactions) and campaigns, please refer to the official documentation Interactions.
Create the event definition item
Event definitions are items in Sitecore that give contextual meaning to an event in a reporting context. Marketers can use them to define properties such as the event name, description, classification, and engagement points.
When an event is triggered programmatically, the ID of an event definition needs to be passed into the constructor.
The following list contains the types of events that are available and their location in the Sitecore tree:
- Goals: /sitecore/system/Marketing Control Panel/Goals
- Outcomes: /sitecore/system/Marketing Control Panel/Outcomes
- Generic events: /sitecore/system/Marketing Control Panel/Events
- Page events: /sitecore/system/Settings/Analytics/Page Events
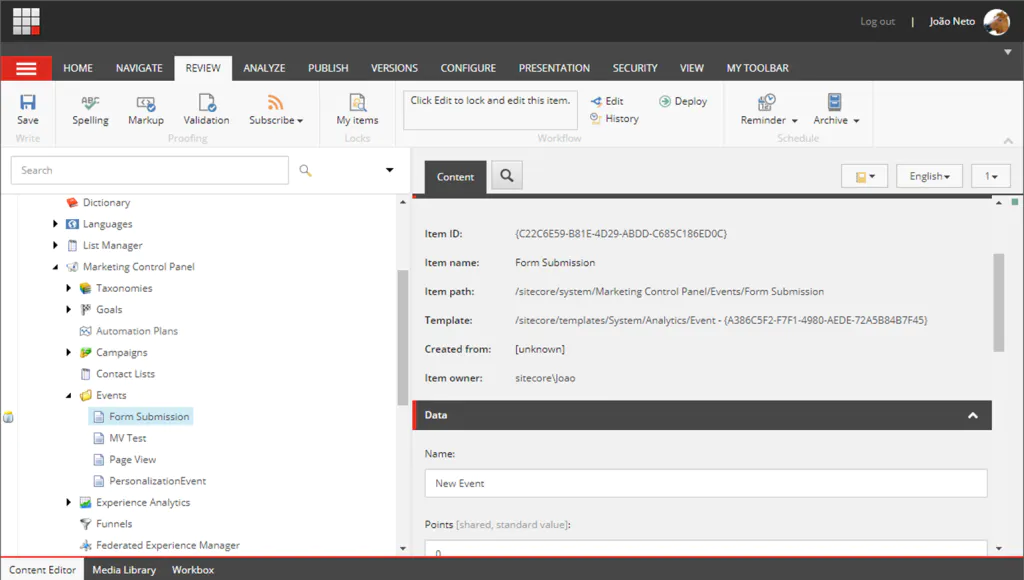
We are going to create a generic event called Form Submission.
- In the Content Tree, navigate to the path /sitecore/system/Marketing Control Panel/Events
- Right-click the Events folder > Insert > Event. Name it “Form Submission”.
- Enter the following values for the properties of the event you have just created
- Name: Form Submission
- Points: 20
- Description: Indicates a form was submitted during a web session
- IsLiveEvent: checked
4. Deploy the event. In the Review tab, click the Deploy button in the Workflow section. This publishes the definition to the web database and deploys it to the Reference Data Service database.
The IsLiveEvent property is used by Marketing Automation to determine if an event should be processed immediately rather than on session end.
Note: Although you can create events in the code without needing to create an event definition in the Content Tree, it is very important to have an event definition item so that marketers can change some of its properties without having you to recompile and deploy code every time.
Create a custom event model
In Visual Studio, create a new project using the template ASP .NET Web Application (.NET Framework). Name it “Custom.Foundation.Xdb”, for example. Because I am running a Sitecore XP 9.3 instance, I selected the 4.8 version of the .NET Framework.
Because we are going to deploy the generated assembly to the XP and XConnect sites, as well as, the ProcessingEngine, AutomationEngine, and IndexWorker services, I strongly recommend you keeping in this project only the code related to the custom event model.
Next, install the following NuGet packages (without dependencies):
- Sitecore.XConnect, 9.3.0
- Sitecore.XConnect.Collection.Model, 9.3.0
- Sitecore.XConnect.Core, 9.3.0
In my example, I am using the Sitecore XP 9.3 Nuget Package versions.
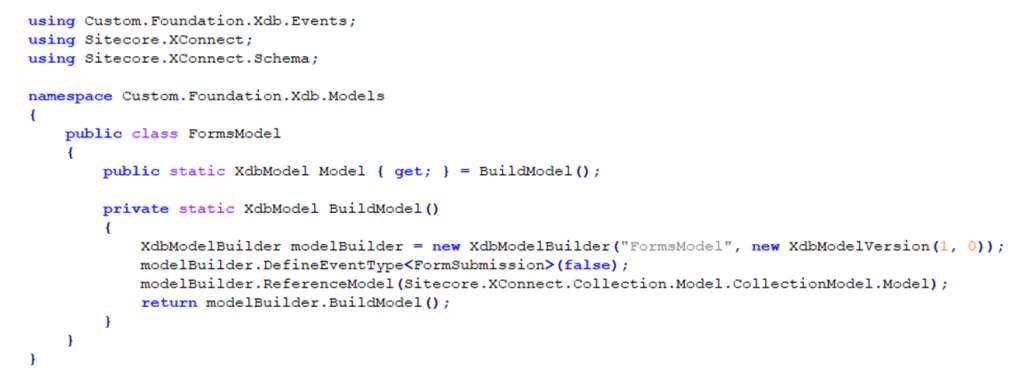
In a folder named Events, create a class named FormSubmission extending the base class Sitecore.XConnect.Event. Add the following code:
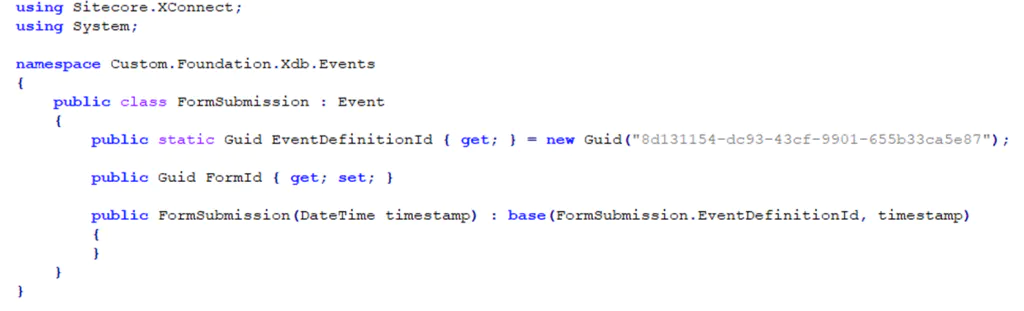
The EventDefinitionId property must match to the ID of the Event Definition item we have created previously.
Next add a class named FormsModel in a folder named “Models”. Add the following code:
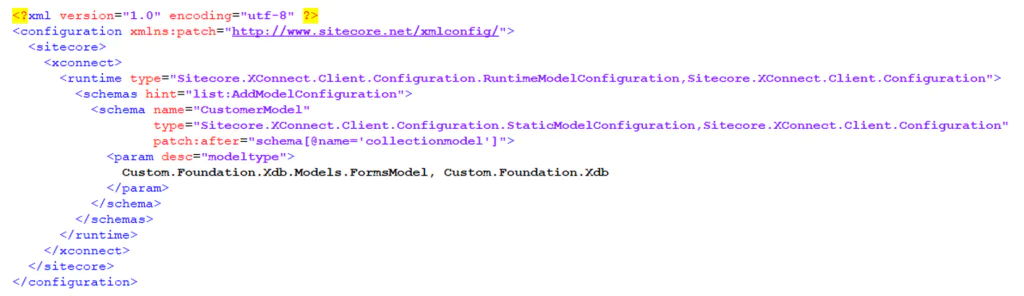
Create a configuration file under the folder App_Config/Include/Foundation. Name it Xdb.Models.config. Add the following text:
Deploy the Custom.Foundation.Xdb.dll assembly as well as the configuration file to your Sitecore XP instance.
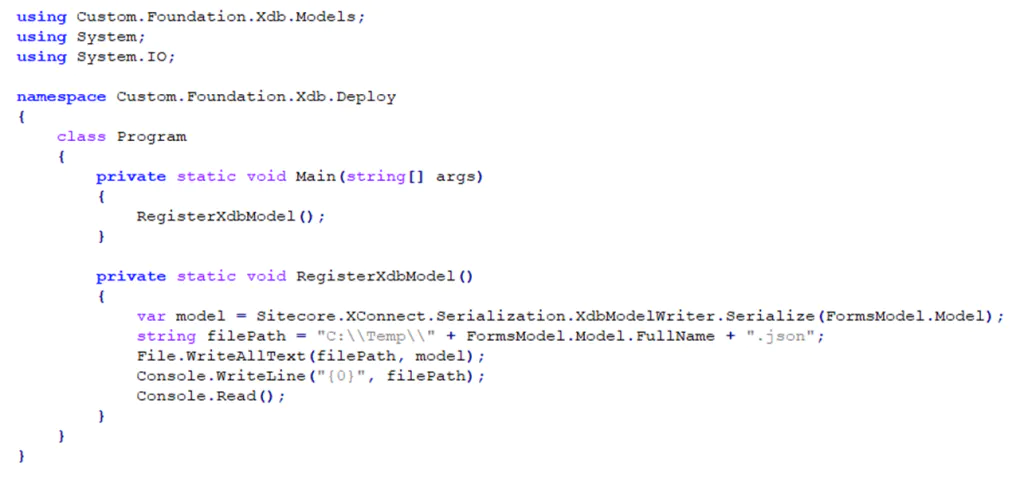
Now, we need to create a new project to generate a JSON file that needs to be deployed to the XConnect and IndexWorker services.
In Visual Studio, create a new project using the template Console App (.NET Framework). Name it “Custom.Foundation.Xdb.Deploy”, for example. Because I am running a Sitecore XP 9.3 instance, I selected the 4.8 version of the .NET Framework.
Next, install the Sitecore.XConnect NuGet package with the lowest dependencies. At the end, you should have the following Nuget packages installed:
- Microsoft.Extensions.DependencyInjection.Abstractions, 2.1.1
- Newtonsoft.Json, 11.0.2
- Remotion.Linq, 2.2.0
- Sitecore.Framework.Conditions, 4.0.0
- Sitecore.XConnect, 9.3.0
- Sitecore.XConnect.Core, 9.3.0
- Sitecore.XConnect.Diagnostics, 9.3.0
- Sitecore.XConnect.Search, 9.3.0
- System.Interactive.Async, 3.1.1
- System.Interactive.Async.Providers, 3.1.1
In my example, I am using the Sitecore XP 9.3 Nuget Package versions.
Add reference to the Custom.Foundation.Xdb solution.
Finally, in the Program.cs class, add the following code:
Set the console app as the startup project (Right-click > set as Startup Project) and run it.
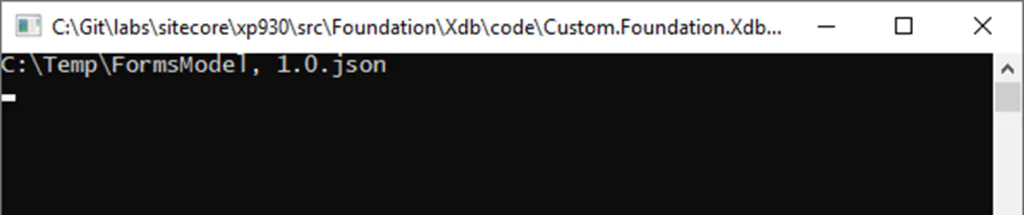
Note: Before running the Console app make sure you have a Temp folder at the root of the C:\ drive.
Now, copy the file named FormsModel, 1.0.json to the following locations:
- \App_data\Models
- \App_data\jobs\continuous\IndexWorker\App_data\Models
Also, copy the assembly file Custom.Foundation.Xdb.dll to the following location:
- \App_data\jobs\continuous\AutomationEngine\
- \App_data\jobs\continuous\IndexWorker\
- \bin
- \bin
Restart the MarketingAutomationService and IndexWorker Windows services.
That’s all we need to have our custom event for the form submission done and properly configured.
Now, let’s implement the Forms part.
Create a Pipeline processor to register the Form Submission Event
We want that every time a form is submitted, the event Form Submission is registered, and the fields and values of this form are stored in the XConnect database. This way we can have a link between the form and the contact that submitted it.
In Visual Studio, create a new project using the template ASP .NET Web Application (.NET Framework). Name it “Custom.Foundation.Forms”, for example. Because I am running a Sitecore XP 9.3 instance, I selected the 4.8 version of the .NET Framework.
Next, install the following NuGet packages (without dependencies):
- Microsoft.Extensions.DependencyInjection, 2.1.1
- Microsoft.Extensions.DependencyInjection.Abstractions , 2.1.1
- Sitecore.Analytics, 9.3.0
- Sitecore.Analytics.Model, 9.3.0
- Sitecore.Analytics.XConnect, 9.3.0
- Sitecore.ExperienceForms, 9.3.0
- Sitecore.ExperienceForms.Mvc, 9.3.0
- Sitecore.Kernel, 9.3.0
- Sitecore.Mvc, 9.3.0
- Sitecore.XConnect, 9.3.0
- Sitecore.XConnect.Client, 9.3.0
- Sitecore.XConnect.Client.Configuration, 9.3.0
- Sitecore.XConnect.Collection.Model, 9.3.0
- Sitecore.XConnect.Core , 9.3.0
Add reference to the Custom.Foundation.Xdb solution.
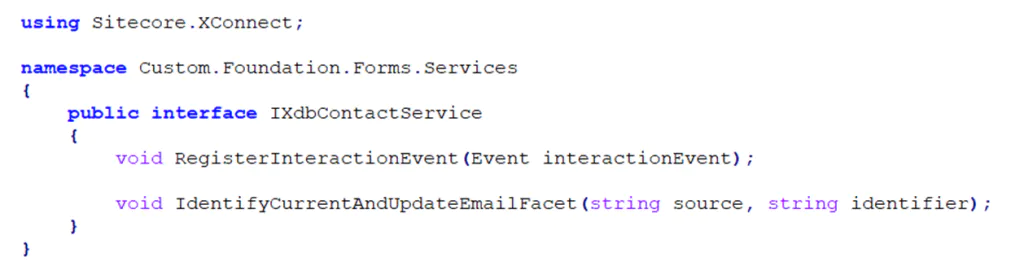
Create an interface named IXdbContactService in a folder named Services. Add the following code:
In my example, I have abstracted all the XConnect API into a class named XdbContactService which extends the interface IXdbContactService. I will not go into details of its implementation, but you can find the complete code in my Github repository. Please, copy the implementation (or add your own) before you proceed with this tutorial.
Create a configuration file under the folder App_Config/Include/Foundation. Name it Forms.DI.config. Add the following text:

The configuration file above registers both the IXdbContactService and the XdbContactService for the Dependency Injection resolver. To learn more about the embedded Sitecore Dependency injection, please refer to the official documentation Dependecy Injection.
Next, add a class named RegisterInteraction in a folder named Pipelines/ExecuteSubmit. Extend the base class Sitecore.Mvc.Pipelines.MvcPipelineProcessor and add the following code:
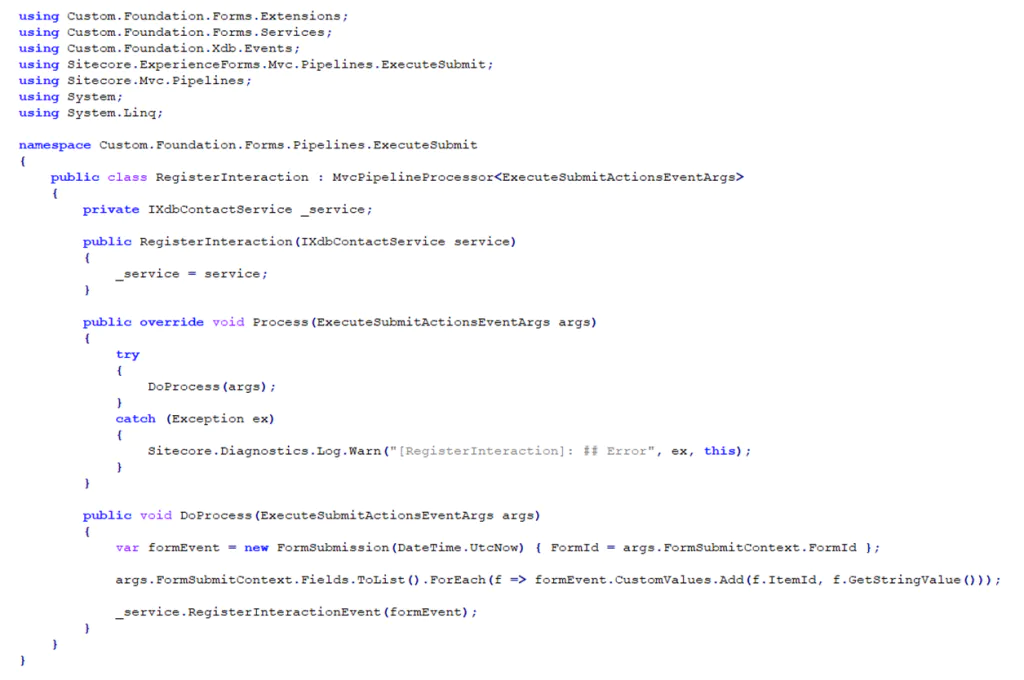
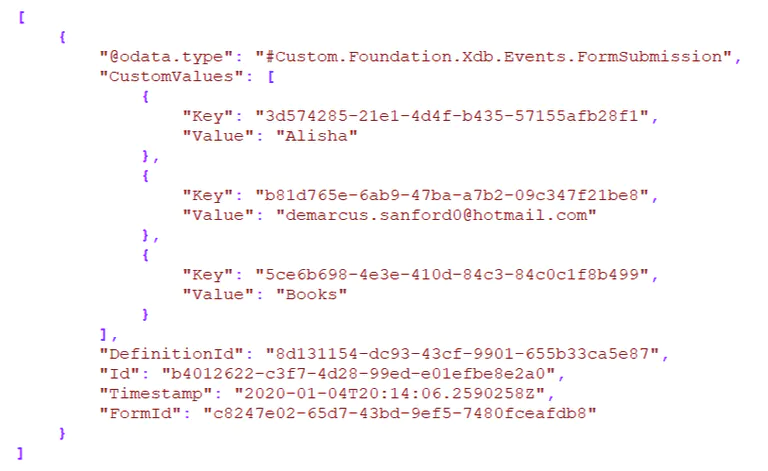
The code above is quite straightforward. The only thing I want to comment is that I am storing the form fields and their values into the CustomValues property. This property is member of the base class Sitecore.XConnect.Event (which the FormSubmission class extends).
The reason why I am doing it, instead of having created a custom field, is because the Marketing Automation service always returns Events as the base class type Sitecore.XConnect.Event and never returns any derived class.
Create a configuration file under the folder App_Config/Include/Foundation. Name it Forms.Mvc.Pipelines.config. Add the following text:

Deploy the Custom.Foundation.Forms.dll assembly as well as the configuration file to your Sitecore XP instance.
Identify the Contact when Form is submitted
In order to be able to send e-mails to a contact through EXM and Marketing Automation we need it to be identified.
Contact identification is the process of connecting the current session, device, and contact session to an identifier. A contact is identified through the XConnect API. e.g. Sitecore.Analytics.Tracker.Current.Session.IdentifyAs("source", "[email protected]");.
To learn more about identifying a contact, please refer to the official documentation Identifying contacts .
The contact also needs to have a valid e-mail address registered (EmailAddressList facet).
As per the Sitecore XP 9.3 release, Sitecore Forms does not come with an out-of-the-box feature for identifying contacts. However, you can install the Sitecore Forms Extensions module developed by Bart Verdonck which comes with a identify contact submit action.
In my sample code, I have implemented a custom identify contact submit action that I copied from Bart’s module and adapted for my example. You can use it as well.
Create a sample form
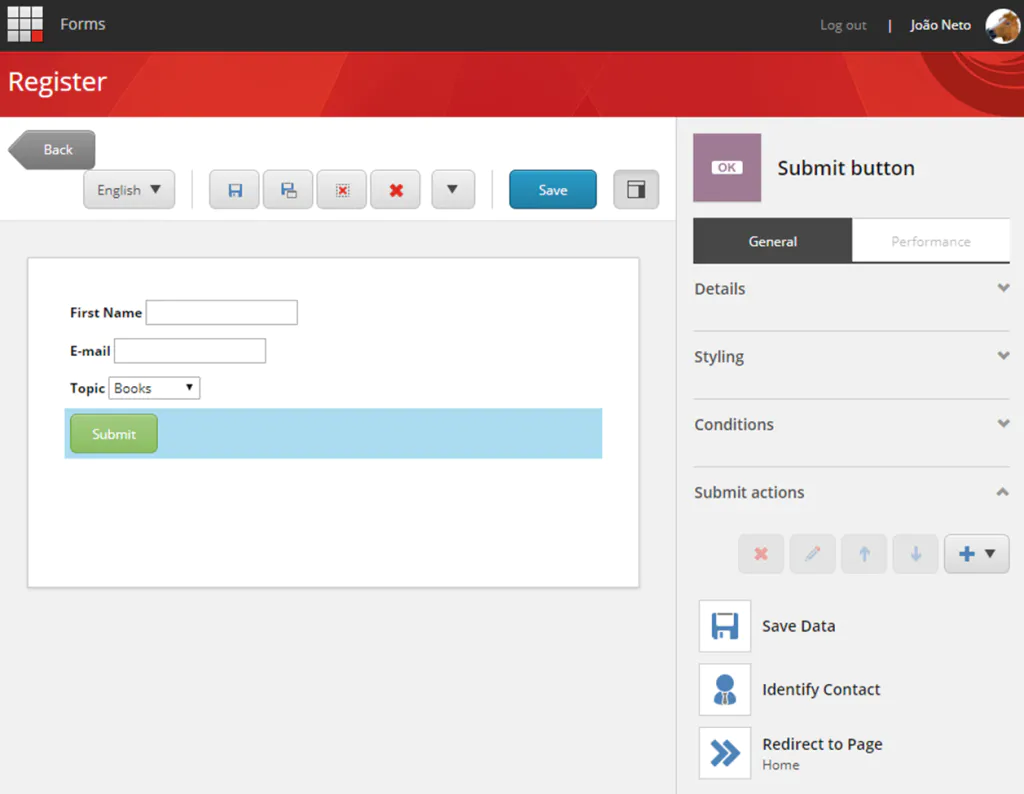
Before going further, create a sample form with the following fields:
- First name: Single-line text field
- Topic: Dropdown list with static options “Gifts”, “Books”, “Magazines”
- Email address: E-mail field
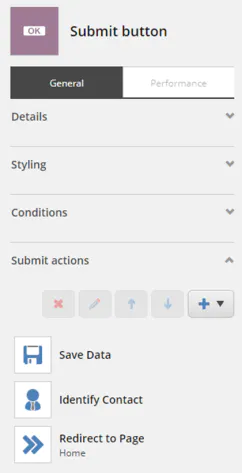
Also add a Submit Button with the following submit actions:
- Save Data
- Identify Contact: use the E-mail address field as the identifier field
- Redirect to Page: any page
Save and publish the form.
Note: You need to add this form to a page in order to be able to test it. Please refer to the official documentation Add a form to a webpage .
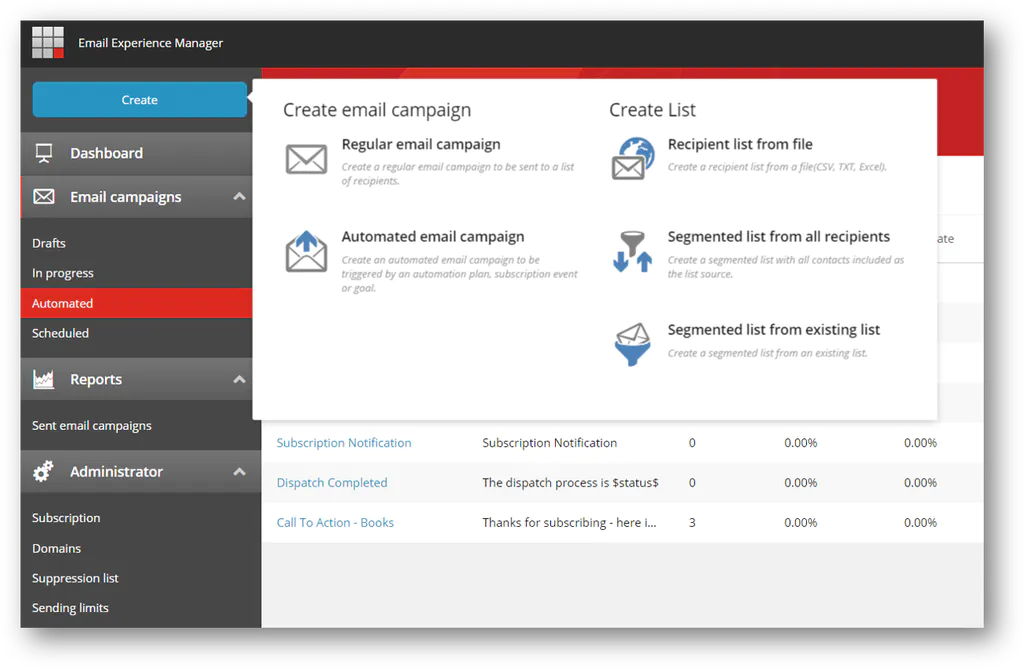
Create two EXM automated email campaigns
For this tutorial, I have create two automated email campaigns with slightly different messages. One contains the word “Gifts”, while the other contains “Books”.
I won’t go into details about the creation of an email campaign, but you can follow through by referring to the official documentation Create an email campaign .
When creating the e-mails, make sure you select the option Service email campaign option. This will make an email message be sent to all recipients regardless of whether they are part of an opt-out or suppression list. This is useful, for example, when you want to send a subscription confirmation to contacts who sign up for a newsletter or to send a Forgot Password email message. See more at The service messages.

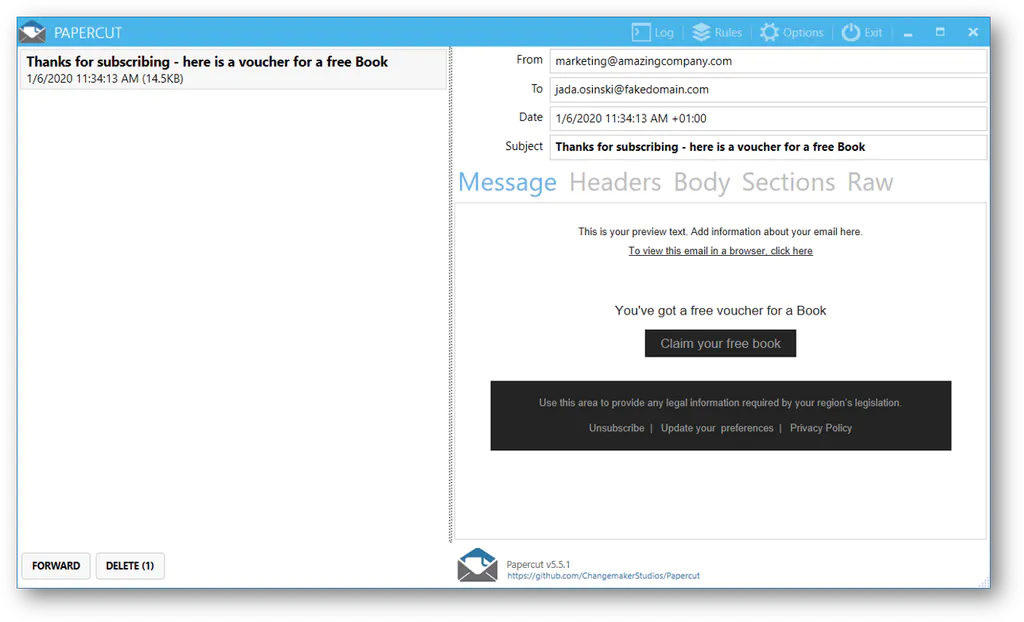
If you want to test e-mails locally, you can install a local SMTP server such as Papercut and smtp4dev. Also, please refer to the official documentation Use a Custom SMTP for email delivery for more information about configuring a local SMTP server.
For more information, I strongly recommend Pete Navarra’s series on Marketing Automation with EXM if you want to get started with EXM.
Create a custom predicate for the checking the field value in the submitted form
In Visual Studio, create a new project using the template ASP .NET Web Application (.NET Framework). Name it “Custom.Foundation.AutomationEngine”, for example. Because I am running a Sitecore XP 9.3 instance, I selected the 4.8 version of the .NET Framework.
Next, install the following NuGet packages (without dependencies):
- Sitecore.Framework.Conditions, 4.0.0
- Sitecore.Framework.Rules.Abstractions, 3.3.0
- Sitecore.XConnect.Collection.Model”, 9.3.0
- Sitecore.XConnect.Core, 9.3.0
- Sitecore.XConnect.Segmentation.Predicates.Model, 9.3.0
Add reference to the Custom.Foundation.Xdb solution.
Next add a class named FieldValueCondition in a folder named Predicates/Forms. Add the following code:
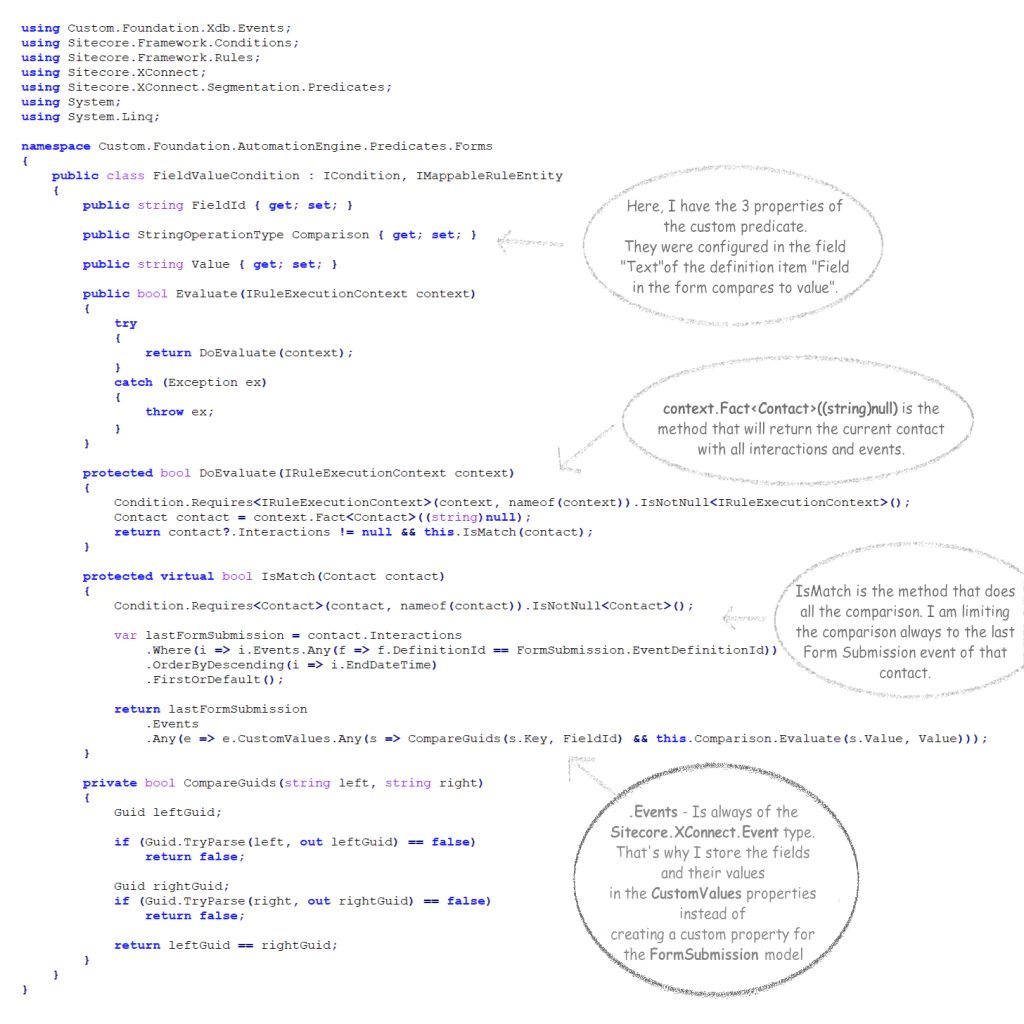
Update (January 22, 2020): I mention above that the .Events property is always of the Sitecore.XConnect.Event type, but you can change it by configuring your Xdb Model in the following configuration file: \App_Data\jobs\continuous\AutomationEngine\App_Data\Config\sitecore\XConnect\sc.XConnect.Client.xml.
Deploy the assembly file Custom.Foundation.AutomationEngine.dll to the following location:
- \App_data\jobs\continuous\AutomationEngine\
- \bin
In the folder \App_Data\jobs\continuous\AutomationEngine\App_Data\Config\sitecore\Segmentation, create a file named sc.Custom.Forms.Predicates.xml. Add the following text:
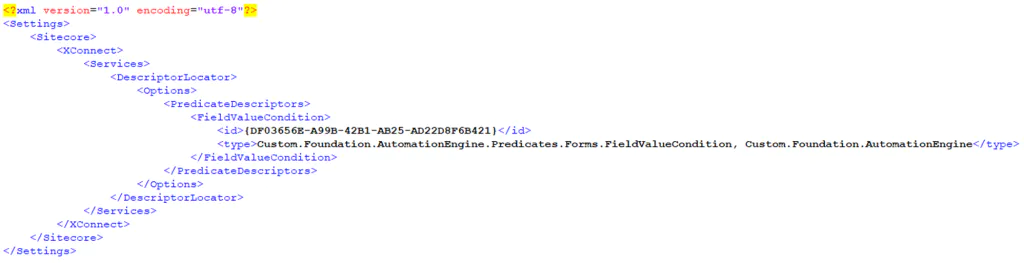
Note: Sitecore Automation Engine expects configuration files to be prefixed by “sc.”. You can rename the file however you want as long as you keep the prefix “sc.”.
Restart the MarketingAutomationService.
Tip: If you want to debug the FieldValueCondition class, copy both the Custom.Foundation.AutomationEngine.dll and Custom.Foundation.AutomationEngine.pdb files to \App_data\jobs\continuous\AutomationEngine\. Also, while running Visual Studio as administrator, attach to the Sitecore.MAEngine.exe process.
Create the condition descriptor item
- In the Content Tree, navigate to the path /sitecore/system/Settings/Rules/Definitions/ElementGroups
- Right-click the ElementGroups item > Insert > Group. Name it “Forms”.
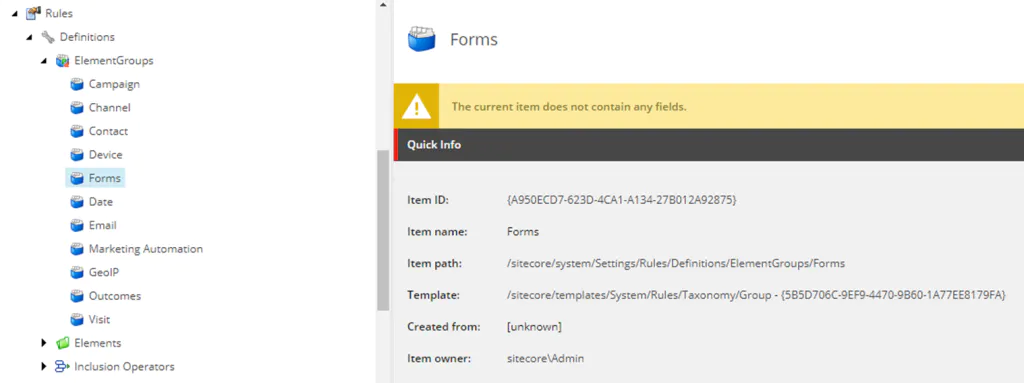
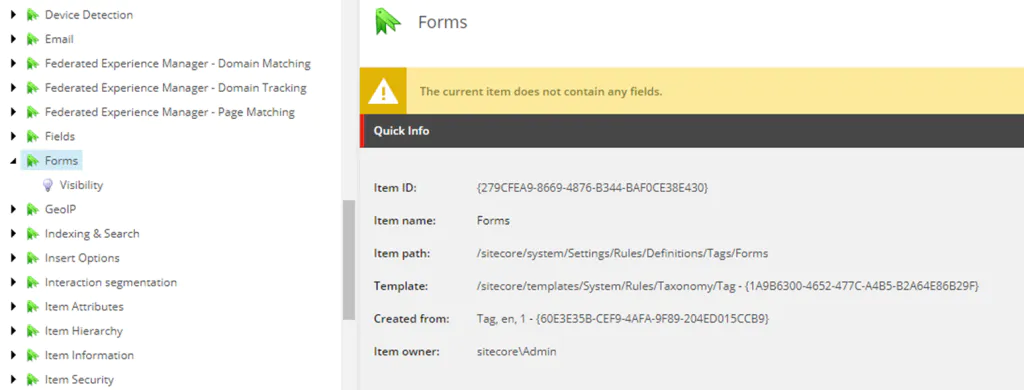
- Navigate to the path /sitecore/system/Settings/Rules/Definitions/Tags
- Right-click the Tags item > Insert > Tag. Name it “Forms”.
- Navigate to the path /sitecore/system/Settings/Rules/Definitions/Elements
- Right-click the Elements item > Insert > Element Folder. Name it “Forms – Conditions”.
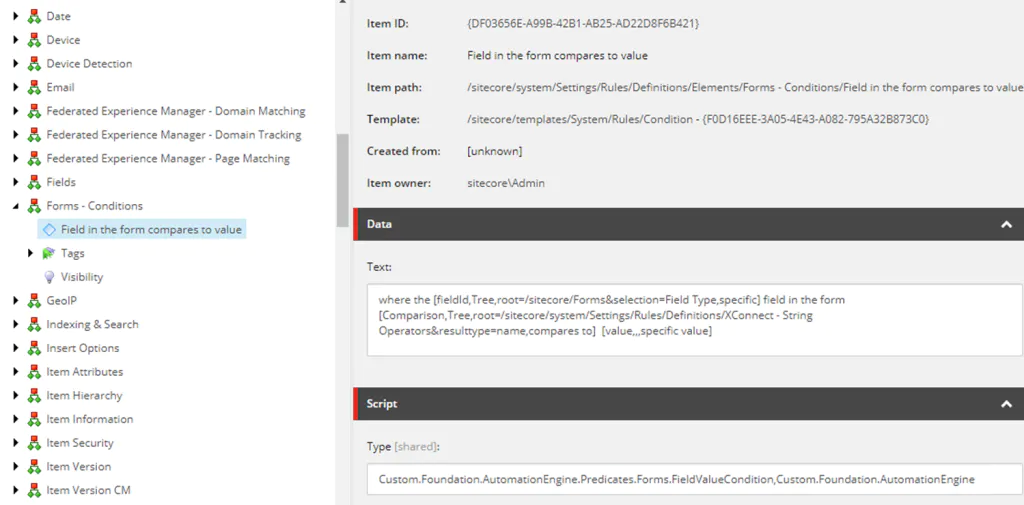
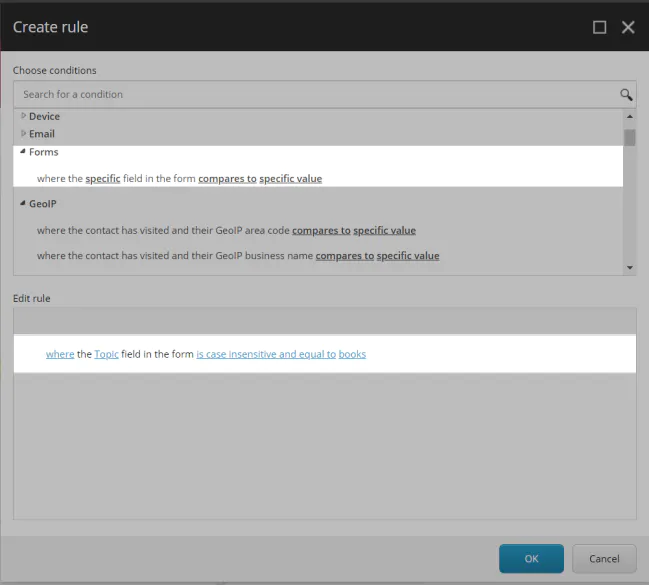
- Right-click the Forms – Conditions item > Insert > Condition. Name it “Field in the form compares to value”.
- Enter the following values for the properties of the condition you have just created
- Text:
where the [fieldId,Tree,root=/sitecore/Forms&selection=Field Type,specific] field in the form [Comparison,Tree,root=/sitecore/system/Settings/Rules/Definitions/XConnect - String Operators&resulttype=name,compares to] [value,,,specific value] - Type:
Custom.Foundation.AutomationEngine.Predicates.Forms.FieldValueCondition,Custom.Foundation.AutomationEngine
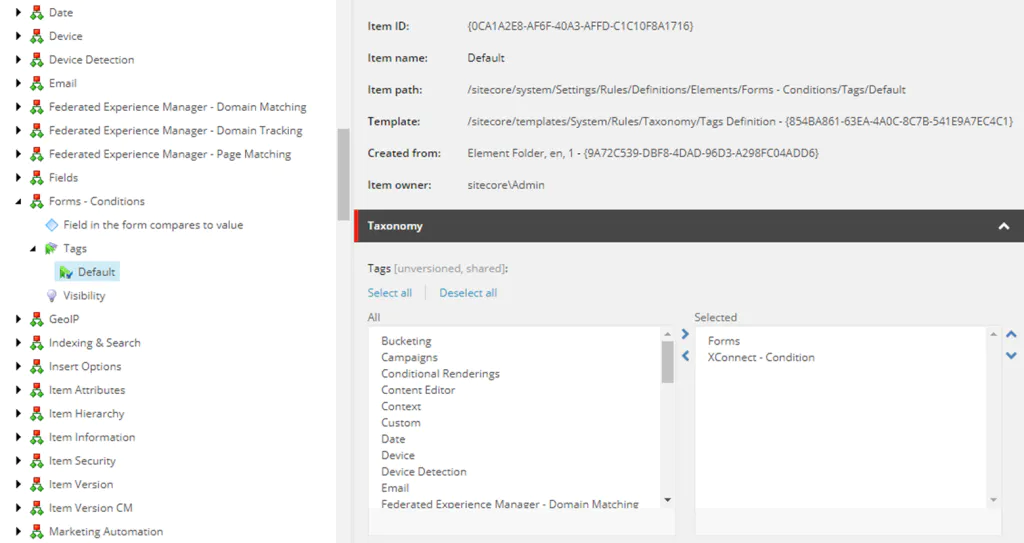
- Navigate to the /sitecore/system/Settings/Rules/Definitions/Elements/Forms - Conditions/Tags/Default and update the property Tags with the following values: Forms and XConnect – Condition.
- Navigate to the /sitecore/system/Settings/Rules/XConnect - Conditions/Tags/Default and select the item Forms in the property Tags.
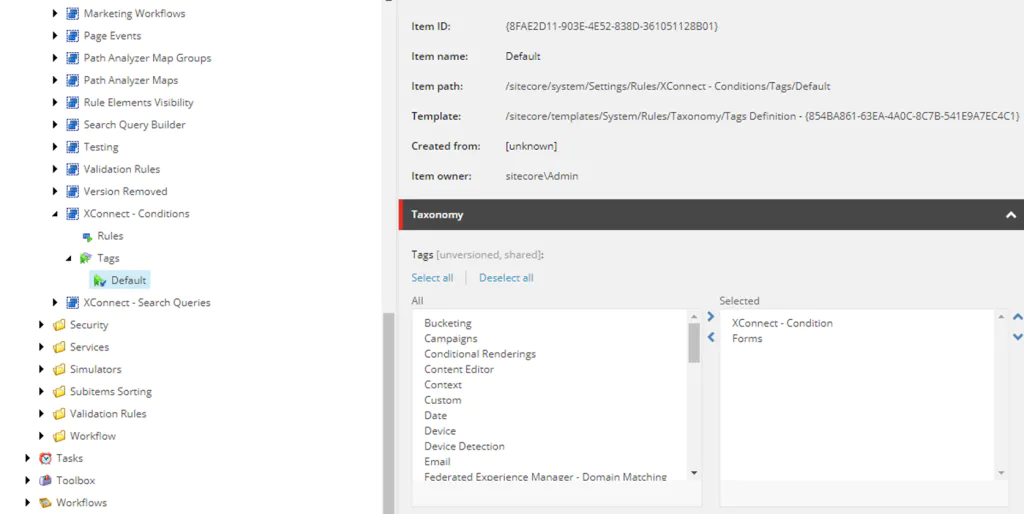
This last action is what actually makes our custom condition descriptor item visible in the Marketing Automation rule set editor.
Create a sample marketing automation plan
I have created the following marketing automation plan containing two possible routes. One is when the visitor submits a form with the “Gifts” topic selected. The other is when he selects the option “Books”.

For more information, please refer to the official documentation Create a marketing automation campaign.
And the end result should be you getting an e-mail after filling the form and selecting the “Books” topic.