
The scope of this post is to walk you through a detailed process of how to create a custom Form element. You can achieve the same by following the Walkthrough: Creating a custom form element page. However, I want to share a step by step process with some extra explanations and tips.
Over the past weeks, I have been working on a migration of Web Forms for Marketers to Forms. I found it would be interesting to start a series of blogs to share some of the experiences I achieved throughout this process.
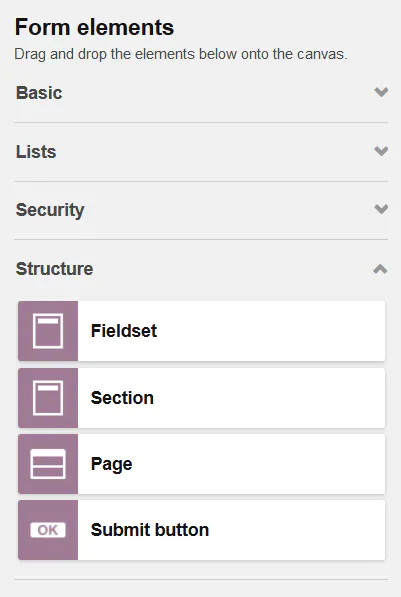
Today, we are going to create HTML element that is used to group several controls as well as labels. You find an example below:
<form>
  <fieldset>
    <legend>Choose your favorite monster</legend>
    … Some HTML here …
  </fieldset>
</form>
The complete code can be found in my Github repository. The Sitecore package can be downloaded here .
Note: In Forms, fields are called elements.
Create a field template
When you create a Forms element, you must create a template first. The template stores values for that Forms element. For the HTML
element, we just need a template with a label and CSS-related fields.
- In the Sitecore Content Editor, navigate to /sitecore/Templates and create a new template. You can create the new template wherever you prefer. However, it is recommended that you follow the structure as described in the Helix principles.
- Click the /sitecore/Templates/Feature folder, add a new folder named Forms, and then add a new Template.
- Give the template the name “Fieldset” and select as Base template: /Templates/System/Forms/Fields/Field.
- After the template creation, add the following additional base template /Templates/System/Forms/Label Settings template.
- Finally create the Standard values on the Fieldset template.
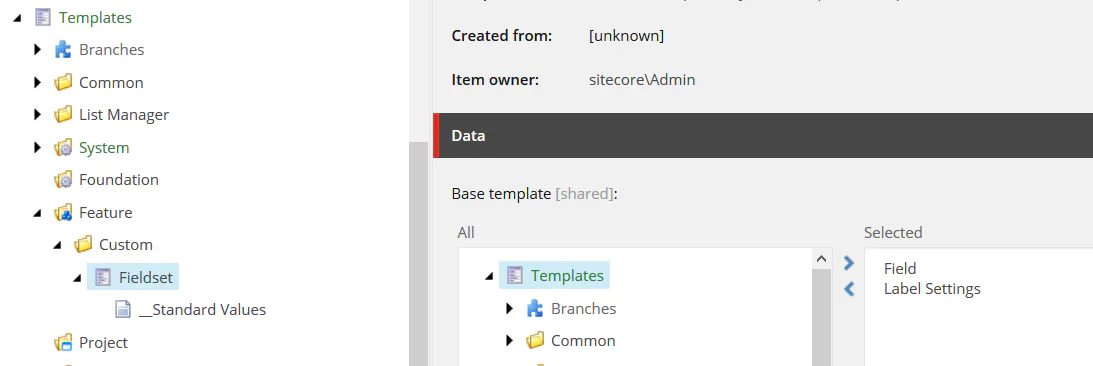
Every field should inherit from the /Templates/System/Forms/Fields/Field template. This is required. Now, if you want to have the fields Title and Css Label, you can reuse the base template /Templates/System/Forms/Label Settings.
Important: If a field template does not have standard values, the Forms field won’t work. The standard values items are used to populate the default Forms field values when the field is added from the form elements pane to the canvas.
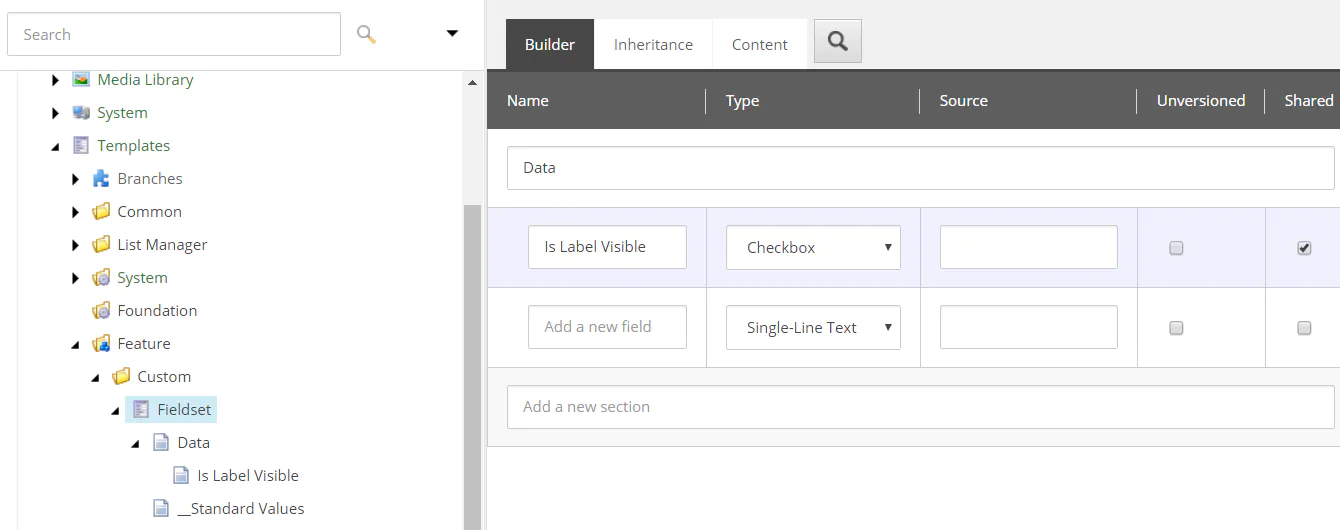
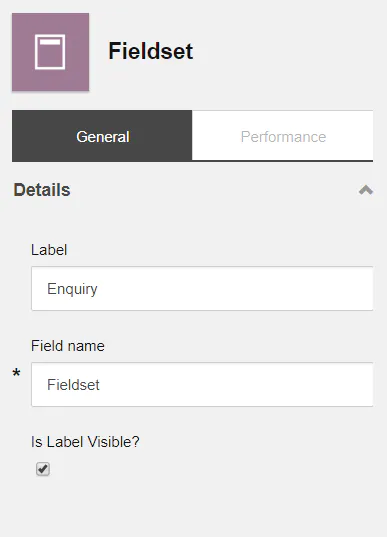
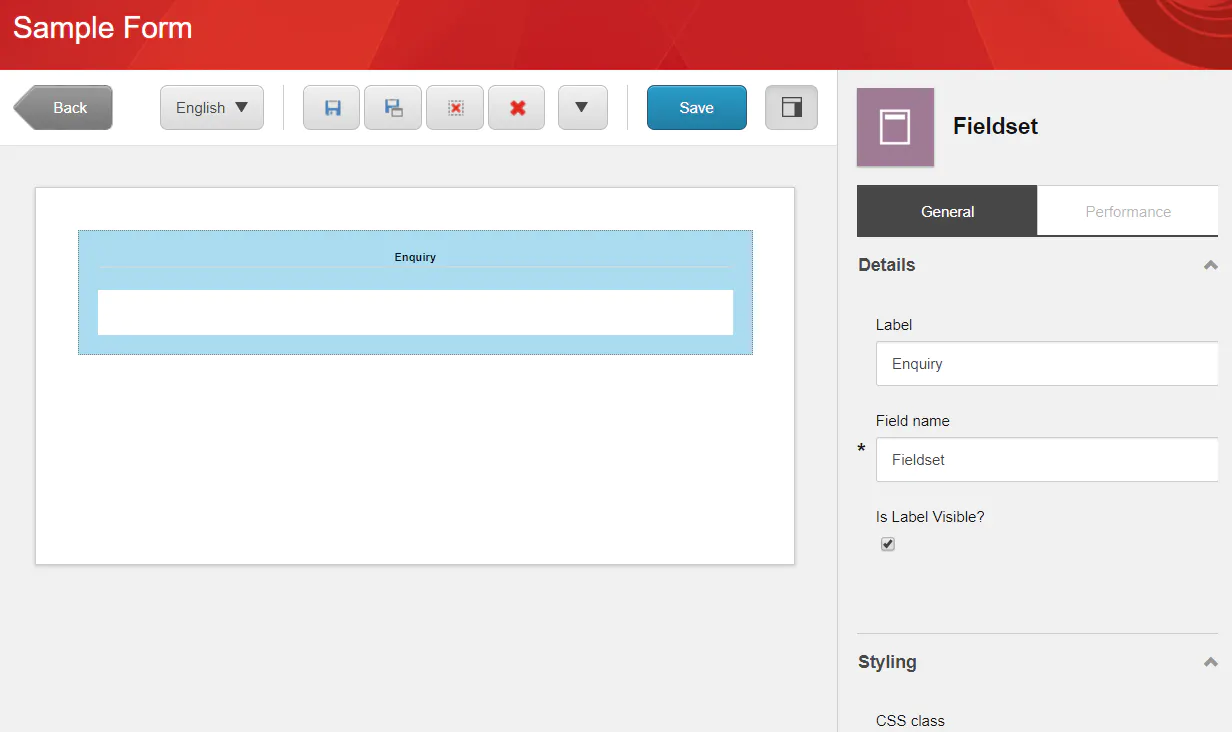
Next, let’s add a checkbox field named Is Label Visible. Mark this field as “Shared”. The idea of this field is to control whether the markup will be visible.
Now let’s quickly switch to the Visual Studio solution.
Install required NuGet packages
Make sure you install the following packages according to the Sitecore version you are using:
- Sitecore.ExperienceForms
- Sitecore.ExperienceForms.Mvc
- Sitecore.Kernel
- Sitecore.Mvc
Note: Up to version 9.0 Update-2 you can install the .NoReferences packages. Starting on version 9.1, you no longer have the .NoReferences packages. However, you can use the new Nuget PackageReference feature. The Visual Studio extension NuGet PackageReference Upgrader can help you with the migration to PackageReference.
Create a view model class
The view model class will contain all the necessary logic for the HTML element.
When you create new element (field) in Sitecore Forms, if you don’t need it to be persisted in database, you can simply derive the view model class from the Sitecore.ExperienceForms.Mvc.Models.Fields.FieldViewModel class.
On the other hand, when you need it to be persisted in database, you must derive the view model class from the Sitecore.ExperienceForms.Mvc.Models.Fields.InputViewModel<T> class.
The HTML element doesn’t need to be persisted in database, so we are going to derive the view model class from the FieldViewModel base class.
As we are reusing the /Templates/System/Forms/Label Settings base template, we also are going to derive the Fieldset view model from the Sitecore.ExperienceForms.Mvc.Models.Fields.TitleFieldViewModel class which derives from FieldViewModel class and already implement the logic for the Label and Css Label properties.
- Create a new class that derives from the
Sitecore.ExperienceForms.Mvc.Models.Fields.TitleFieldViewModelclass. - Name this class
FieldsetViewModel. - Add the following code:
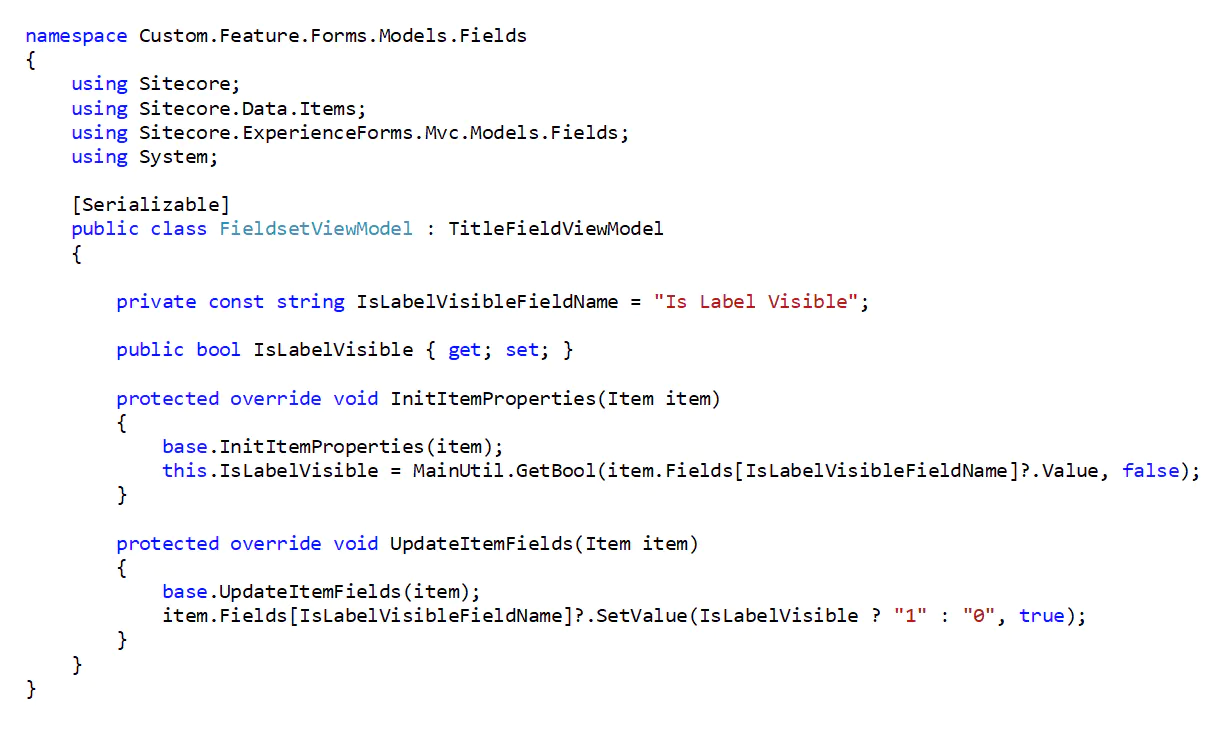
In the code above, we observe the following:
- We created a public property named
IsLabelVisibleto store the information from the Is Label Visible field from/to our Fieldset field template. It is a good practice to store the field name in a constant and reuse it across your code. You can use the Guid of the field instead. - The
InitItemPropertiesmethod stores information in theIsLabelVisibleproperty.InitItemPropertieswill be called in two moments. First, when you open the Forms application and second when you render the form in your website. Theitemis the Fieldset item in the content tree from a specific Form. e.g. /sitecore/Forms/Sample Form/Page/Fieldset. - The
UpdateItemFieldsmethod reads the information from theIsLabelVisibleproperty and persists into the corresponding field item. e.g. /sitecore/Forms/Sample Form/Page/Fieldset. TheUpdateItemFieldsmethod will be called once you hit the Save button in the Forms application. - As Sitecore stores Boolean information as a string “1” or “0” (instead of true or false) we had to convert the Boolean value from the
IsLabelVisibleproperty to a string “1” or “0” in theUpdateItemFieldsmethod. - Why haven’t we implemented the logic for the Title and Css Label fields? Because the base class
TitleFieldViewModelalready takes care of that for us. Just make sure you invoke thebase.InitItemProperties(item)andbase.UpdateItemFields(item)methods.
Important: Because the view models are stored in session state they must be marked [Serializable].
The default razor view files for Sitecore Forms are stored in /Views/FormBuilder/FieldTemplates. We are going to create the Fieldset view in the FieldTemplates folder.
- Add the folders FormBuilder and FieldTemplates to the Views folder in your project.
- Next, create a new View named "Fieldset" (right click FieldTemplates folder -> Add -> View).
- Add the following code:
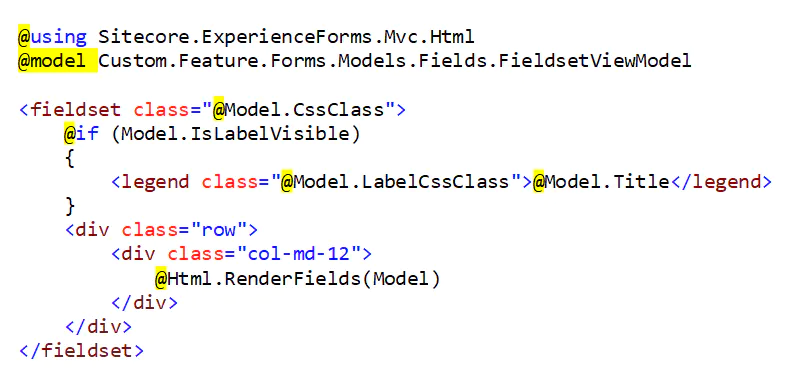
Note: Whenever you create Forms elements that serves as containers, you must run the html helper RenderFields which can be located in the namespace Sitecore.ExperienceForms.Mvc.Html.
Important: Don’t forget to enclose any HTML tag. That will cause a known bug. Whenever you save the Form, it will be deleted.
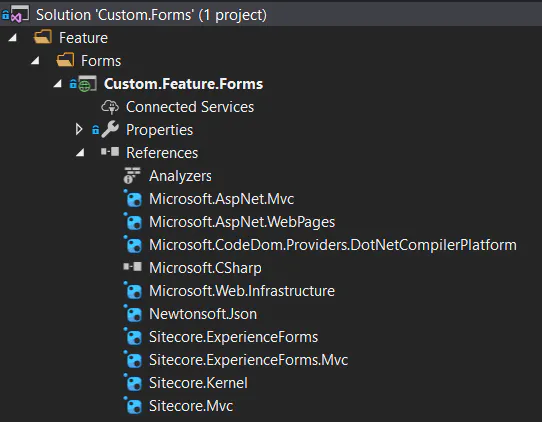
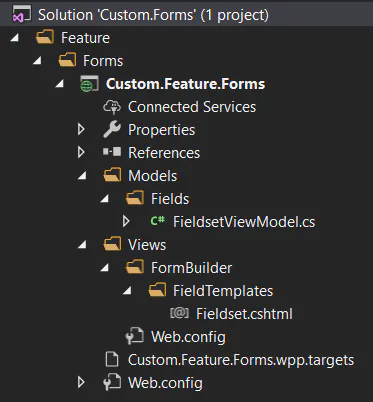
By now, your Visual Studio solution should look like the following:
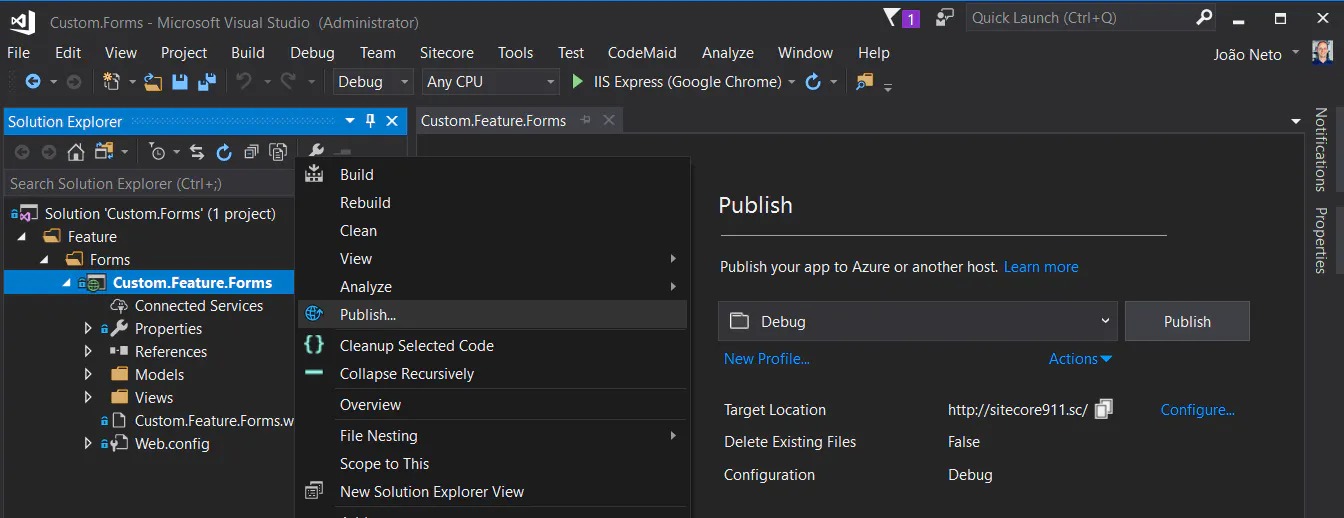
Deploy the Visual Studio project to your Sitecore instance
Having the view model class and the razor view built, now deploy the Visual Studio project to your Sitecore instance.
Create a field property editor for the Form elements pane
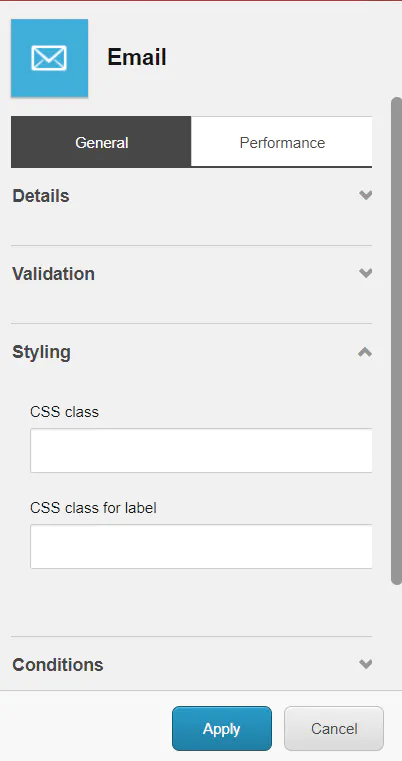
Next we are going to create the field property editor for the HTML element. A field property editor is where you can add the sections that appear in the Form elements pane. For example, the Email element contains the following sections: Details, Validation, Styling, Conditions, and Advanced settings.
To create the field property editor, you can either use the Content Editor or the Sitecore Rocks extension. Sitecore Rocks is a Visual Studio extension that allows you to quickly manipulate Sitecore items among other features.
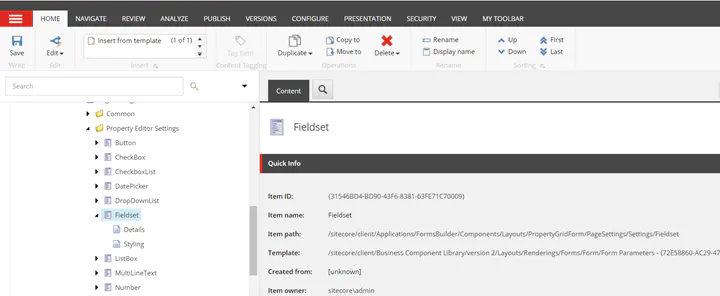
- In Sitecore Rocks, expand the core database and navigate to /sitecore/client/Applications/FormsBuilder/Components/Layouts/PropertyGridForm/PageSettings/Settings. In the Content Editor, you find the same folder by navigating to /sitecore/client/Applications/Forms/Components/Layouts/PropertyGridForm/PageSettings/Property Editor Settings.
- Right-click and add a new item from the template /sitecore/client/Business Component Library/version 2/Layouts/Renderings/Forms/Form/Form Parameters. Enter the name “Fieldset”.
Next we are going to add new sections to the field property editor of the Fieldset.
- Right-click the form parameter item named “Fieldset” we have just created and add a new item from the template /sitecore/client/Applications/FormsBuilder/Common/Templates/FormSection. Enter the name “Details”.
- Repeat the same step but add one more item named “Styling”
By now, you should have something similar as the image below.
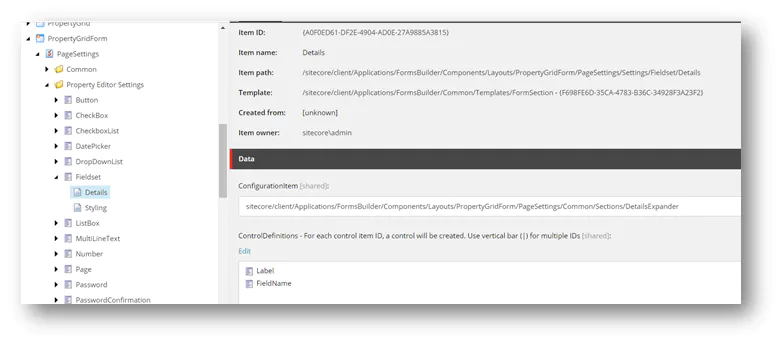
What we just did was to define two sections to the HTML
element. The section Details will contain the properties Label and the Field name. As those properties already exist, we are going to reuse them.
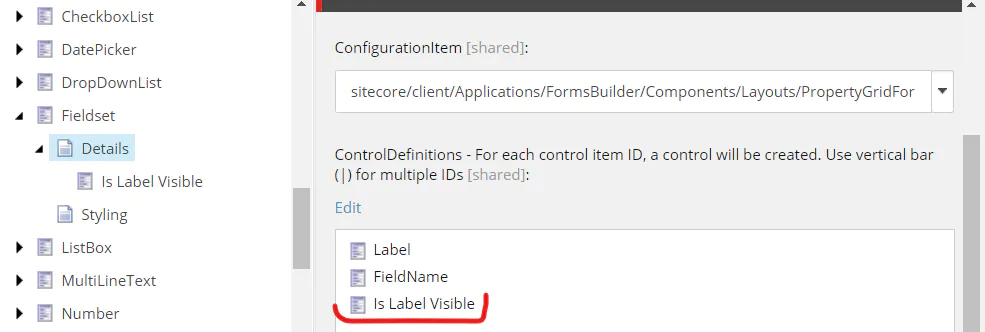
Click the “Details” section of the “Fieldset” form parameter and select the following values:
- ConfigurationItem: sitecore/client/Applications/FormsBuilder/Components/Layouts/PropertyGridForm/PageSettings/Common/Sections/DetailsExpander
- ControlDefinitions:
- sitecore/client/Applications/FormsBuilder/Components/Layouts/PropertyGridForm/PageSettings/Common/Details/FieldName
- /sitecore/client/Applications/FormsBuilder/Components/Layouts/PropertyGridForm/PageSettings/Common/Details/Label
Note: /sitecore/client/Applications/FormsBuilder/Components/Layouts/PropertyGridForm/PageSettings/Common contains common properties defined by system. Before adding a new property, check if it doesn’t exist in the common properties.
By now the “Details” section should look like the image below:
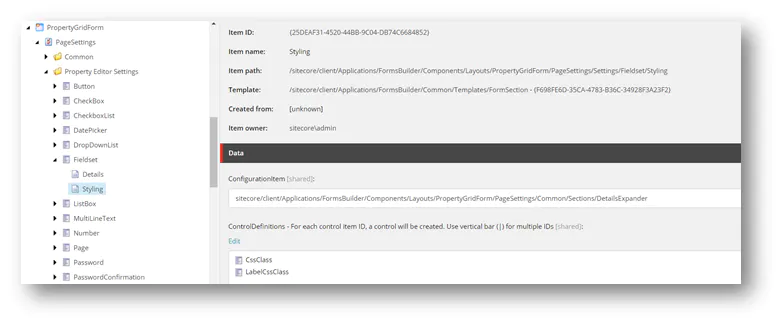
Next, click the “Styling” section of the “Fieldset” form parameter and select the following values:
- ConfigurationItem: /sitecore/client/Applications/FormsBuilder/Components/Layouts/PropertyGridForm/PageSettings/Common/Sections/StylingExpander
- ControlDefinitions:
- /sitecore/client/Applications/FormsBuilder/Components/Layouts/PropertyGridForm/PageSettings/Common/Styling/CssClass
- /sitecore/client/Applications/FormsBuilder/Components/Layouts/PropertyGridForm/PageSettings/Common/Styling/LabelCssClass
By now the “Styling” section should look like the image below:
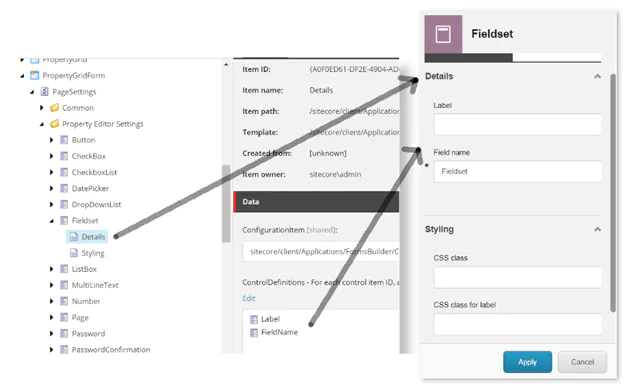
If things seem confusing then look at the image below and see what we have just configured.
Next, we are going to create the property for the Is Label Visible field.
- Right-click the Details item that you just created and add a new item from the template /sitecore/client/Business Component Library/version 2/Layouts/Renderings/Forms/Form/Templates/FormCheckBox Parameters. Enter the name “Is Label Visible”.
- Next, click the “ Is Label Visible” item enter the following values:
- FormLabel: Is Label Visible?
- IsLabelOnTop: true
- BindingConfiguration: isLabelVisible (camel cased) | IsChecked
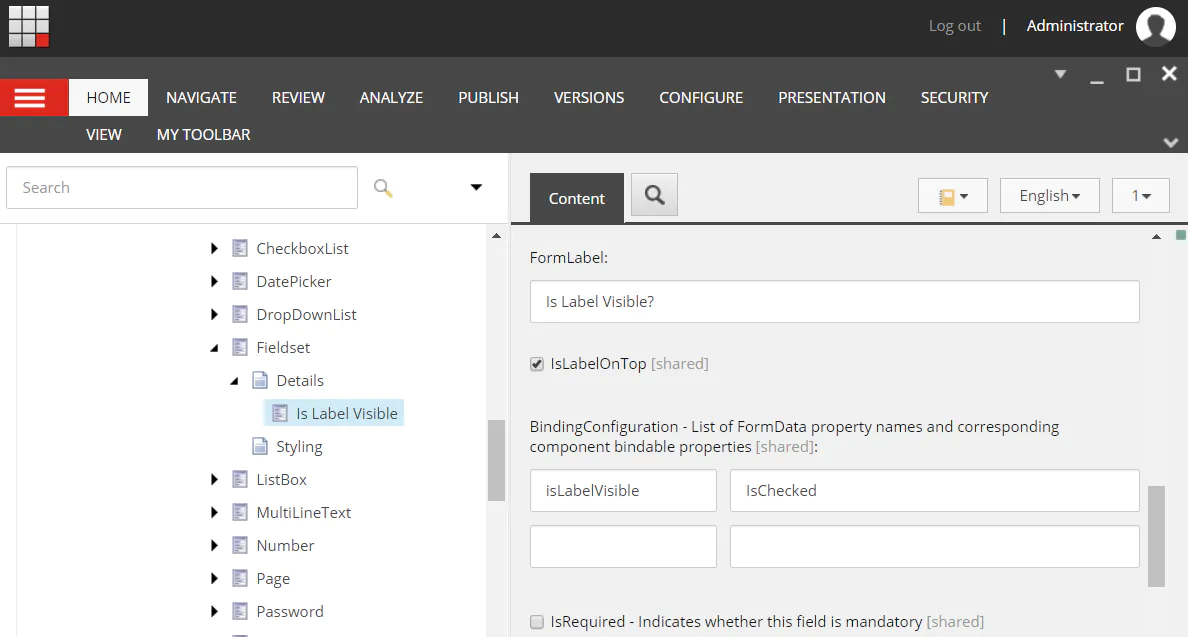
Now, click back the “Details” section of the “Fieldset” form parameter and add the “Is Label Visible” to the ControlDefinitions field.
Note: If you forget to add the “Is Label Visible” to the Controls Definition property, it won’t be visible in the Form element pane.
By now, you should see the Is Label Visible property in the Forms element pane.
Create the field type item
Now we can create the custom field in Sitecore. To create the field type item:
- Go to /sitecore/system/Settings/Forms/Field Types/Structure folder.
- Right-click the Structure folder and add a new item from the template /System/Forms/Field Type, enter “Fieldset” name.
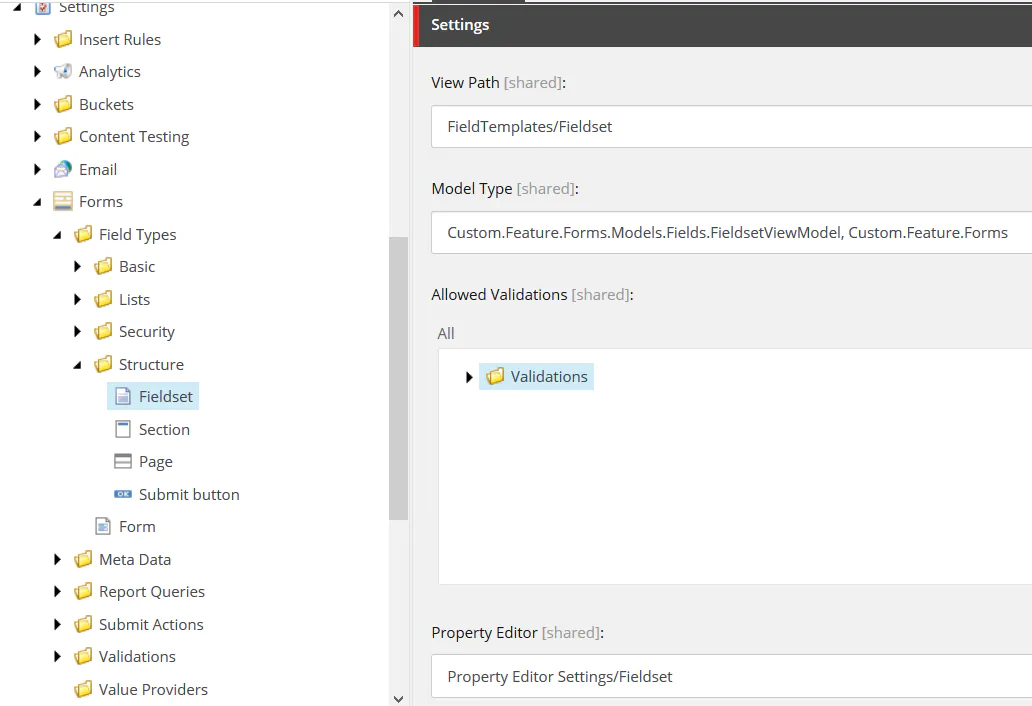
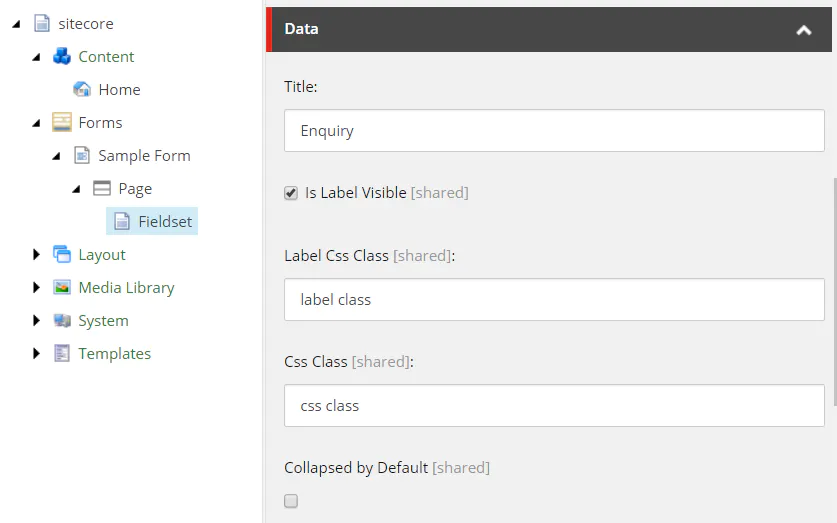
Edit the Settings section fields:
- View Path: This is the path that points to the razor view file. You don’t have to add the “.cshtml” extension. By default, Forms is expecting all the views to be saved to the [site]\Views\FormBuilder folder. So that’s why you don’t have to enter the whole path.
- Value = FieldTemplates/Fieldset
- Model Type: The full qualified namespace of the view model class we created in Visual Studio.
- Value = Custom.Feature.Forms.Models.Fields.FieldsetViewModel, Custom.Feature.Forms
- Property Editor Property Editor Settings/Fieldset
- Field Template: As this field filters only templates available at “/sitecore/templates/System/Forms/Fields” you must enable “Raw Values” option in the View tab and paste the complete path to the Fieldset template
- Value = sitecore/Templates/Feature/Custom/Fieldset
In the Appearance section, edit the following fields:
- Icon: The icon that will appear in the Forms elements pane.
- Value = OfficeWhite/32×32/document_header.png.
- BackgroundColor: The background color for the icon that will appear in the Form elements pane.
- Value = Eggplant
Below is an image of how you field type should look like.
Test the HTMLelement
Now, open the Forms application. You should see the HTML element in the Forms Elements Pane.
Try adding a new HTML element.
Don’t forget to save the changes. And check if they were persisted to the respective item in the Content Tree.
If you want to learn how to render a form in your website, please read Add a form to a webpage documentation.
Credits
Photo by Danilo Cestonato on Unsplash.
