
Continuing with my article on how to add Elasticsearch to your Sitecore, today I'll be demonstrating how to index documents using NEST, a .NET client of Elasticsearch. Next, I demonstrate how to add two buttons to the Developer tab in Sitecore that triggers an Index re-creation and an indexation of the content tree.
If you've missed the first part of this article, please read Use Elasticsearch on Sitecore - Part I .
I've uploaded the code that I created in this article to netojoa/blog/tree/master/sitecore/elasticsearch/sitecore-elasticsearch .
NEST and Elasticsearch
Before adding any code to Sitecore, we’ll explore some basic usages of Elasticsearch.
There is a .NET client of Elasticsearch named NEST. It is the official high-level .NET client of Elasticsearch.
NEST has the advantage of having mapped all the request and response objects, comes with a strongly typed query DSL that maps 1 to 1 with the Elasticsearch query DSL, and takes advantage of specific .NET features such as covariant results. NEST internally uses, and still exposes, the low level Elasticsearch.Net client.
Example:
var elasticClient = new ElasticClient(new ConnectionSettings(new Uri("http://elastic.local:9200")));
var response = await client.GetAsync <article>(1, i => i.Index(indexName));
Let’s play a little bit with NEST.
Create a new Console Application project named “ElasticSearchDemo”.
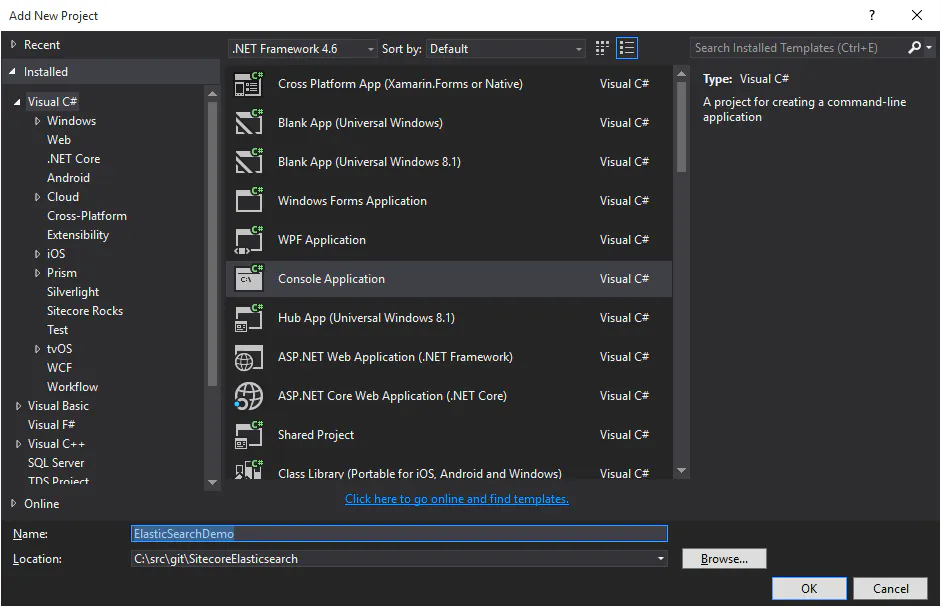
Next, we’ll install the NEST NuGet package. You can use either the Nuget Package Manager (Tools > Nuget Package Manager > Manage Nuget Packages for Solution...) or install it through Package Manager Console (Tools > Nuget Package Manager > Package Manager Console):
PM> Install-Package NEST

Now, open the file Program.cs and add the following code:
namespace ElasticSearchDemo {
  using Nest;
  class Program {
    static void Main(string[] args) {
      // Connecting to Elasticsearch
      var node = new Uri("http://elastic.local:9200");
      var settings = new ConnectionSettings(node);
      var client = new ElasticClient(settings);
    }
  }
}
To connect to Elasticsearch running locally at localhost:9200 you just need to instantiate a new instance of the Elastic client: var client = new ElasticClient().
In real scenarios, you need to pass additional configuration options to the client such as the address of Elasticsearch that is running on a remote machine. This is where ConnectionSettings come in.
var node = new Uri("http://elastic.local:9200");
var settings = new ConnectionSettings(node);
var client = new ElasticClient(settings);
Next, we’ll create a Plain Old CLR Object (POCO) named “Article” to represent the data we want to be indexed.
- In Solution Explorer, right-click the project name and click Add, and then click Add Class.
- The Add New Item dialog box appears with the C# Class icon already selected.
- In the dialog box, enter the name “Article” in the Name field and click Add. The new class is added to your project.
- Add the code below to the “Article” class.
public class Article {
  public int Id {
    get;
    set;
  }
  public string Body {
    get;
    set;
  }
  public string Title {
    get;
    set;
  }
  public string Author {
    get;
    set;
  }
  public string Url {
    get;
    set;
  }
  public DateTime DatePublished {
    get;
    set;
  }
  public DateTime DateCreated {
    get;
    set;
  }
  public DateTime DateModified {
    get;
    set;
  }
}
Finally, we’ll create an index named “articles-index” and index a single instance of the Article class.
namespace ElasticSearchDemo {

  using System;
  using Nest;

  class Program {

    static void Main(string[] args) {

      // Connecting to Elasticsearch
      var node = new Uri("http://elastic.local:9200");
      var settings = new ConnectionSettings(node);
      var client = new ElasticClient(settings);

      // Creating an index
      string indexName = "articles-index";
      var createResponse = client.CreateIndex(indexName);
      System.Console.WriteLine("The index {0} - has been created? {1}", indexName, createResponse.Acknowledged);

      // Indexing a document
      var article = new Article {
        Id = 1,
        Author = "kitty",
        Title = "Lorem ipsum dolor sit amet",
        Body = "Lorem ipsum dolor sit amet, consectetur adipiscing elit. Sed aliquam feugiat est ut condimentum.",
        DateCreated = new DateTime(2016, 12, 01),
        DateModified = new DateTime(2016, 12, 15),
        DatePublished = new DateTime(2016, 12, 20),
        Url = "https://goo.gl/tvcMLp"
      };

      var indexResponse = client.Index(article, x => x.Index(indexName));

    }
  }
}
In the code above we created an index named “articles-index” by calling the method client.CreateIndex(indexName). Next, we checked if the index was created successfully by checking the property createResponse.Acknowledged. Then, we created a single instance of the Article class and indexed it by calling the method client.Index(article, x => x.Index(indexName)).
Now, open elastic.local:9200/_plugin/kopf in a browser to see your index created. I am assuming you have followed through the first part of this article and installed the kopf plugin.
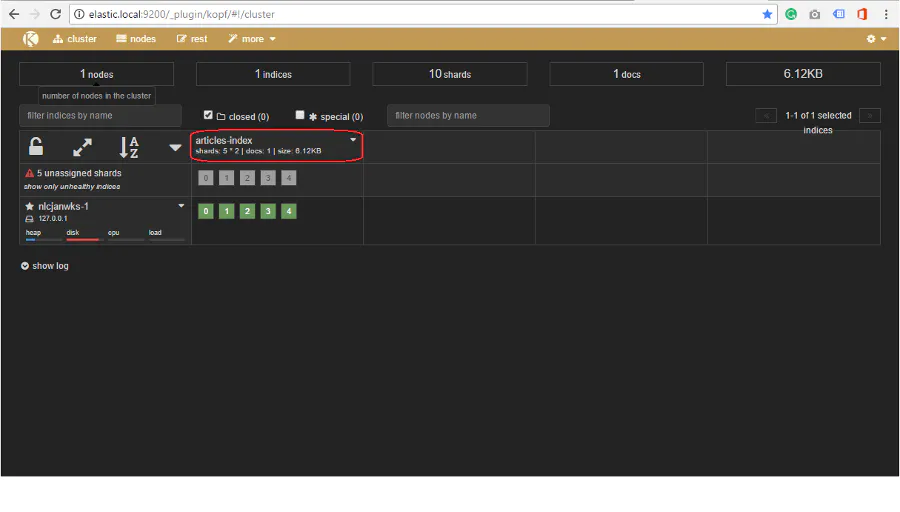
If you have not installed the kopf plugin, then just open elastic.local:9200/articles-index in a browser. You should see a JSON result like the following:
{
    "articles-index": {
        "aliases": {},
        "mappings": {
            "article": {
                "properties": {
                    "author": {
                        "type": "string"
                    },
                    "body": {
                        "type": "string"
                    },
                    "dateCreated": {
                        "type": "date",
                        "format": "strict_date_optional_time||epoch_millis"
                    },
                    "dateModified": {
                        "type": "date",
                        "format": "strict_date_optional_time||epoch_millis"
                    },
                    "datePublished": {
                        "type": "date",
                        "format": "strict_date_optional_time||epoch_millis"
                    },
                    "id": {
                        "type": "long"
                    },
                    "title": {
                        "type": "string"
                    },
                    "url": {
                        "type": "string"
                    }
                }
            }
        },
        "settings": {
            "index": {
                "creation_date": "1495287853379",
                "number_of_shards": "5",
                "number_of_replicas": "1",
                "uuid": "0RQbgs5YTm6VF0KoK9zvAQ",
                "version": {
                    "created": "2030499"
                }
            }
        },
        "warmers": {}
    }
}
Now, how do we get a document? It is as simple as adding the code below:
// Getting a document
var getResponse = client.Get <article>(1, i =>; i.Index(indexName));
Article articleDocument = getResponse.Source; // the original document
In the code above the getResponse.Source returns a typed Article object from the index.
And how do we use search to find an article that contains a given text inside of it?
var searchResponse = client.Search <article>(s =>
    s.Index("articles-index")
    .Size(10)
    .Query(q => q.Match(m => m.Field(f => f.Author).Query("kitty"))));
var articles = searchResponse.Documents;
In the code above we are searching for all the articles that have “kitty” as the Author. On top of that, we are delimiting the size of the results by 10. Last, but not least, we are using the Match Query, which basically is a boolean query that looks for the term “kitty” inside the field Author and returns true if it is found. There are other types of queries such as Multi-Match, Fuzzy and others.
Integrating Elasticsearch with Sitecore
Now that we played with Elasticsearch, let’s add it to Sitecore.
For this article, I created a ElasticSearch module to add to a Habitat installation. Basically, you will need to add a new ASP.NET Web Application using the Empty template and the .NET Framework 4.6. Obviously, there are some additional steps to setup the Sitecore solution that won’t be covered here.
If you want to know how to install Habitat, please see https://github.com/Sitecore/Habitat/wiki/01-Getting-Started .
Don’t forget to install the NEST NuGet package:
Install-Package NEST
In Sitecore, we’ll add two buttons to the Developer tab. The first, named “Re-Create Elastic Indexes”, will be responsible for re-creating the Elasticsearch indexes. The second, named “Re-Index Elastic Tree”, will be responsible for updating the Elasticsearch indexes for the selected item and its descendants in the Content Tree.
To add the mentioned buttons to the Developer tab, in the Core database, you should add them under /sitecore/content/Applications/Content Editor/Ribbons/Chunks/Indexing using the /sitecore/templates/System/Ribbon/Large Button template.
Re-Create Elastic Indexes button
- Item name: RecreateElasticIndexes
- Header: Re-Create Elastic Indexes
- Icon: Office/32x32/cloud_flash.png
- Click: demo:elastic:indexing:recreateindexes
- Tooltip: Recreates all elastic indexes (removes all existing content, a refresh tree command will be required after to re-populate the indexes)
Re-Index Elastic Tree button
- Item name: RefreshElasticTree
- Header: Re-Index Elastic Tree
- Icon: Office/32x32/cloud_refresh.png
- Click: demo:elastic:indexing:refreshtree
- Tooltip: Rebuild the elastic master and web index for this item and its descendants.
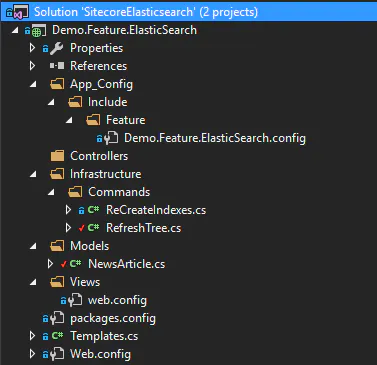
Here is how my Sitecore solution looks like after adding the definition item above.

First, create the NewsArticle model class with the following code:
using Nest;
public class NewsArticle {

    [Text]
    public string Id { get; set; }
    public string Title { get; set; }
    public string Image { get; set; }
    public string Date { get; set; }
    public string Summary { get; set; }
    public string Body { get; set; }

    }
The important thing about this code is the field Id which will help Elasticsearch to avoid duplicating your documents every time you reindex de tree.
Next, create the Templates class with the following code:
public struct Templates {

    public struct NewsArticle {

        public static readonly ID ID = new ID("{B69277AD-E917-4B9F-9136-A12E0A3E462F}");

        public struct Fields {

            public static readonly ID Title = new ID("{BD9ECD4A-C0B0-4233-A3CD-D995519AC87B}");
            public const string Title_FieldName = "NewsTitle";
            public static readonly ID Image = new ID("{3437EAAC-6EE8-460B-A33D-DA1F714B5A93}");
            public static readonly ID Date = new ID("{C464D2D7-3382-428A-BCDF-0963C60BA0E3}");
            public static readonly ID Summary = new ID("{9D08271A-1672-44DD-B7EF-0A6EC34FCBA7}");
            public const string Summary_FieldName = "NewsSummary";
            public static readonly ID Body = new ID("{801612C7-5E98-4E3C-80D2-A34D0EEBCBDA}");
            public const string Body_FieldName = "NewsBody";
        }
    }
}
Don’t forget to update the Template ID and Field IDs with the corresponding ones of your Sitecore instance.
Then, create the RefreshTree class and add the following code:
using Demo.Feature.ElasticSearch.Models;
using Nest;
using Sitecore;
using Sitecore.Configuration;
using Sitecore.Data;
using Sitecore.Data.Items;
using Sitecore.Diagnostics;
using Sitecore.Jobs;
using Sitecore.Shell.Applications.Dialogs.ProgressBoxes;
using Sitecore.Shell.Framework.Commands;
using System;
using System.Collections.Generic;
using System.Linq;

[Serializable]
public class RefreshTree : Command
{

    protected Handle JobHandle { get; set; }

    public override void Execute(CommandContext context)
    {

        Assert.ArgumentNotNull(context, "context");
        var item = context.Items[0];

        Assert.IsNotNull(item, "context item cannot be null");
        var progressBoxMethod = new ProgressBoxMethod(Refresh);

        ProgressBox.Execute(string.Format("{0} ({1})", "Re-Index Elastic Tree.",
            item.Paths.ContentPath),
            "Re-indexing the current item and its descendants in Elastic",
            progressBoxMethod,
            new object[] { item });
    }

    private void Refresh(object[] parameters)
    {
        JobHandle = Sitecore.Context.Job.Handle;
        if (parameters.Length != 1) return;
        var contextItem = parameters[0] as Item;
        if (contextItem == null) return;
        var job = JobManager.GetJob(JobHandle);
        var items = new List();
        if (contextItem.TemplateID == Templates.NewsArticle.ID) items.Add(contextItem);
        items.AddRange(contextItem.Axes.GetDescendants().Where(s = > s.TemplateID == Templates.NewsArticle.ID));

        List newsArticles = items.Select(news = > new NewsArticle
        {
            Id = news.ID.ToString(),
            Body = news[Templates.NewsArticle.Fields.Body],
            Date = news[Templates.NewsArticle.Fields.Date],
            Image = news[Templates.NewsArticle.Fields.Image],
            Summary = news[Templates.NewsArticle.Fields.Summary],
            Title = news[Templates.NewsArticle.Fields.Title]
        }).ToList();

        if (job != null) job.Status.Messages.Add(string.Format("Indexing: {0} entries", newsArticles.Count));
        var response = IndexNews(newsArticles);
        if (response != null) job.Status.Messages.Add(string.Format("Indexing result: {0}", response.DebugInformation));

    }

    private IBulkResponse IndexNews(IEnumerable newsArticles)
    {
        if (newsArticles == null || !newsArticles.Any()) return null; // Connecting to Elasticsearch
        string protocol = Settings.GetSetting("ElasticSearch.Protocol", "http");
        string host = Settings.GetSetting("ElasticSearch.Host", "elastic.local");
        string port = Settings.GetSetting("ElasticSearch.Port", "9200");
        var node = new Uri(string.Format("{0}://{1}:{2}", protocol, host, port));
        var settings = new Nest.ConnectionSettings(node);
        var client = new Nest.ElasticClient(settings); // Reindexing items
        var indexName = Settings.GetSetting("ElasticSearch.ArticlesIndex", "articles-index");
        var indexerResponse = client.IndexMany(newsArticles, indexName);
        return indexerResponse;
    }

}
In this code, I create a collection of Sitecore items that match the condition TemplateID == Templates.NewsArticle.ID, then I Invoke the method IndexNews that will connect to Elasticsearch and do a bulk index through the client.IndexMany(newsArticles, indexName) method.
Finally, create the ReCreateIndexes class with the following code:
using Sitecore.Diagnostics;
using Sitecore.Jobs;
using Sitecore.Shell.Applications.Dialogs.ProgressBoxes;
using Sitecore.Shell.Framework.Commands;
using System;

[Serializable]
public class ReCreateIndexes : Sitecore.Shell.Framework.Commands.Command
{
    protected Handle JobHandle { get; set; }
    public override void Execute(CommandContext context)
    {
        Assert.ArgumentNotNull(context, "context");
        var item = context.Items[0];
        Assert.IsNotNull(item, "context item cannot be null");
        var progressBoxMethod = new ProgressBoxMethod(Recreate);
        ProgressBox.Execute("Recreate Elastic Indexes.", "Recreating all Elastic indexes.", progressBoxMethod, new object[] { item });
    }

    private void Recreate(params object[] parameters)
    {
        JobHandle = Context.Job.Handle;
        if (parameters.Length != 1) return;
        var item = parameters[0] as Item;
        if (item == null) return;
        var job = JobManager.GetJob(JobHandle);

        // Connecting to Elasticsearch
        string protocol = Settings.GetSetting("ElasticSearch.Protocol", "http");
        string host = Settings.GetSetting("ElasticSearch.Host", "elastic.local");
        string port = Settings.GetSetting("ElasticSearch.Port", "9200");
        var node = new Uri(string.Format("{0}://{1}:{2}", protocol, host, port));
        var settings = new Nest.ConnectionSettings(node);
        var client = new Nest.ElasticClient(settings);

        // Re-creating index
        var indexName = Settings.GetSetting("ElasticSearch.ArticlesIndex", "articles-index");
        DisplayStatusMessage(job, string.Format("Deleting '{0}' index", indexName));
        var deleteResponse = client.DeleteIndex(indexName);
        DisplayStatusMessage(job, string.Format("The index {0} - has been deleted? - {1}", indexName, deleteResponse.Acknowledged));
        DisplayStatusMessage(job, string.Format("Creating '{0}' index", indexName));
        var createResponse = client.CreateIndex(indexName);
        DisplayStatusMessage(job, string.Format("The index {0} - has been created? {1}", indexName, createResponse.Acknowledged));
    }

    private void DisplayStatusMessage(Job job, string message)
    {
        if (job != null) job.Status.Messages.Add(message);
    }
}
There is nothing new in the code above. We are just deleting and creating the index as we did in the Console Application.
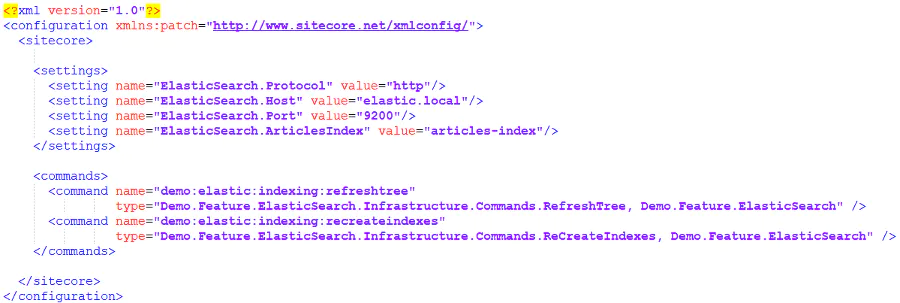
Last, but not least, create the configuration file and add the following:
Don’t forget to publish the Visual Studio solution to your webroot folder.
Now, open you habitat instance and run the Re-create Elastic Indexes command in the Developer tab.
Next, select the item in the node /sitecore/content/Habitat/Home/Modules/Feature/News/News and run the Re-Index Elastic Tree command in the Developer tab.
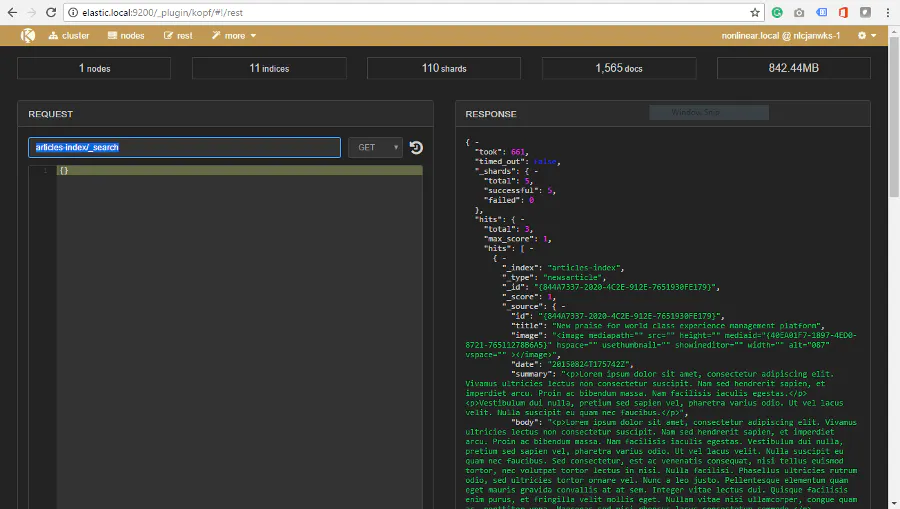
Open elastic.local:9200/_plugin/kopf/#!/rest in a browser, and run the request “articles-index/_search”. You should see the Sitecore items indexed like the following.
In this article, I demonstrated one of the ways you can integrate your Sitecore with Elasticsearch. Obviously, that doesn`t show the full potential of Elasticsearch.
