For developers: moving your Sitecore 9.x installation to another folder

Sometimes, you might decide to tidy the Sitecore installation folders or you realized that you dislike the name the installation folder received.
Here’s some steps on how to move or rename your Sitecore installation folders
##Sitecore X0/XP/XM and IdentityServer Open Internet Information Services (Run > inetmgr) and stop the Identity Server and Sitecore X0/XP/XM websites. Move those sites to the target folder (Cut > Paste), or rename them.
On IIS, click on the Identity Server website. In the right pane, click on Basic Settings… and then in the Edit **Site dialog, update the Physical Path. Repeat this step for the other Sitecore X0/XP/XM** roles.
Finally, start the websites again.
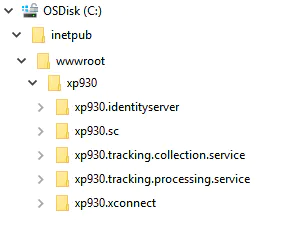
I like to group the Sitecore roles into a parent folder. For example, I have a folder xp930 that contains:
- Identity Server: xp930.identityserver
- Sitecore X0: xp930.sc
- Universal Tracker Collection Service: xp930.tracking.collection.service
- Universal Tracker Processing Service: xp930.tracking.processing.service
- Sitecore xConnect: xp930.xconnect
xConnect, Index Worker, Marketing Automation, Processing Engine
Open Internet Information Services (Run > inetmgr) and stop the xConnect website.
Open Services (Run > services.msc) and stop the Sitecore Marketing Automation Engine, Sitecore Processing Engine and Sitecore XConnect Search Indexer services.
Now, move the xConnect website folder to the target folder (Cut > Paste), or rename it.
On IIS, click on the xConnect website. In the right pane, click on Basic Settings… and then in the Edit Site dialog, update the Physical Path.
Open a Command Prompt dialog as Administrator and run the following command lines to update the path of the Sitecore Marketing Automation Engine, Sitecore Processing Engine and Sitecore XConnect Search Indexer services.
Index Worker
SC CONFIG "xp903.xconnect-IndexWorker" binPath= "\"C:\inetpub\wwwroot\xp903.xconnect\App_Data\jobs\continuous\IndexWorker\XConnectSearchIndexer.exe\" \"-service\""
Marketing Automation
SC CONFIG "xp930.xconnect-MarketingAutomationService" binPath=
"\"C:\inetpub\wwwroot\xp930\xp930.xconnect\App_Data\jobs\continuous\AutomationEngine\Sitecore.MAEngine.exe\" \"-service\""
Sitecore Processing Engine
SC CONFIG "xp930.xconnect-ProcessingEngineService" binPath=
"\"C:\inetpub\wwwroot\xp930\xp930.xconnect\App_Data\jobs\continuous\ProcessingEngine\Sitecore.ProcessingEngine.exe\" \"-service\""
The first argument is the name of the service, which you can find by double-clicking the service and inspecting the Service name property.
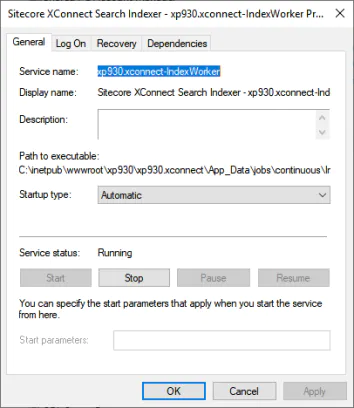
The second argument is the executable path of the service. Notice that I escape quotation marks by using a backslash ( \ ) key.
Remarks:
- For each command-line option (parameter), the equal sign is part of the option name.
- A space is required between an option and its value (for example, binPath= C:\… If the space is omitted, the operation will fail.
With all set and done, start Sitecore Marketing Automation Engine, Sitecore Processing Engine and Sitecore XConnect Search Indexer services and the xConnect website.
Note: By moving things around, you might need to reconfigure permissions on folders. Since I am dealing with a developer machine, I normally add all the permissions to the root of the inetpub folder. This way I don’t have to worry about setting it over again.
Credits
Photo by Sharon McCutcheon on Unsplash.
comments powered by Disqus